How Madgicx custom automation works
With Custom Automation, you can set your ad account to autopilot and:
- Create complex automation strategies tailored to your needs
- Automate ad sets and campaigns across your entire marketing funnel
- Delegate any routine action you take in your account to Madgicx

Custom automation allows you to build your own rules that trigger changes to your advertising assets. Use custom automation to monitor your account round the clock and automatically take action on your behalf.
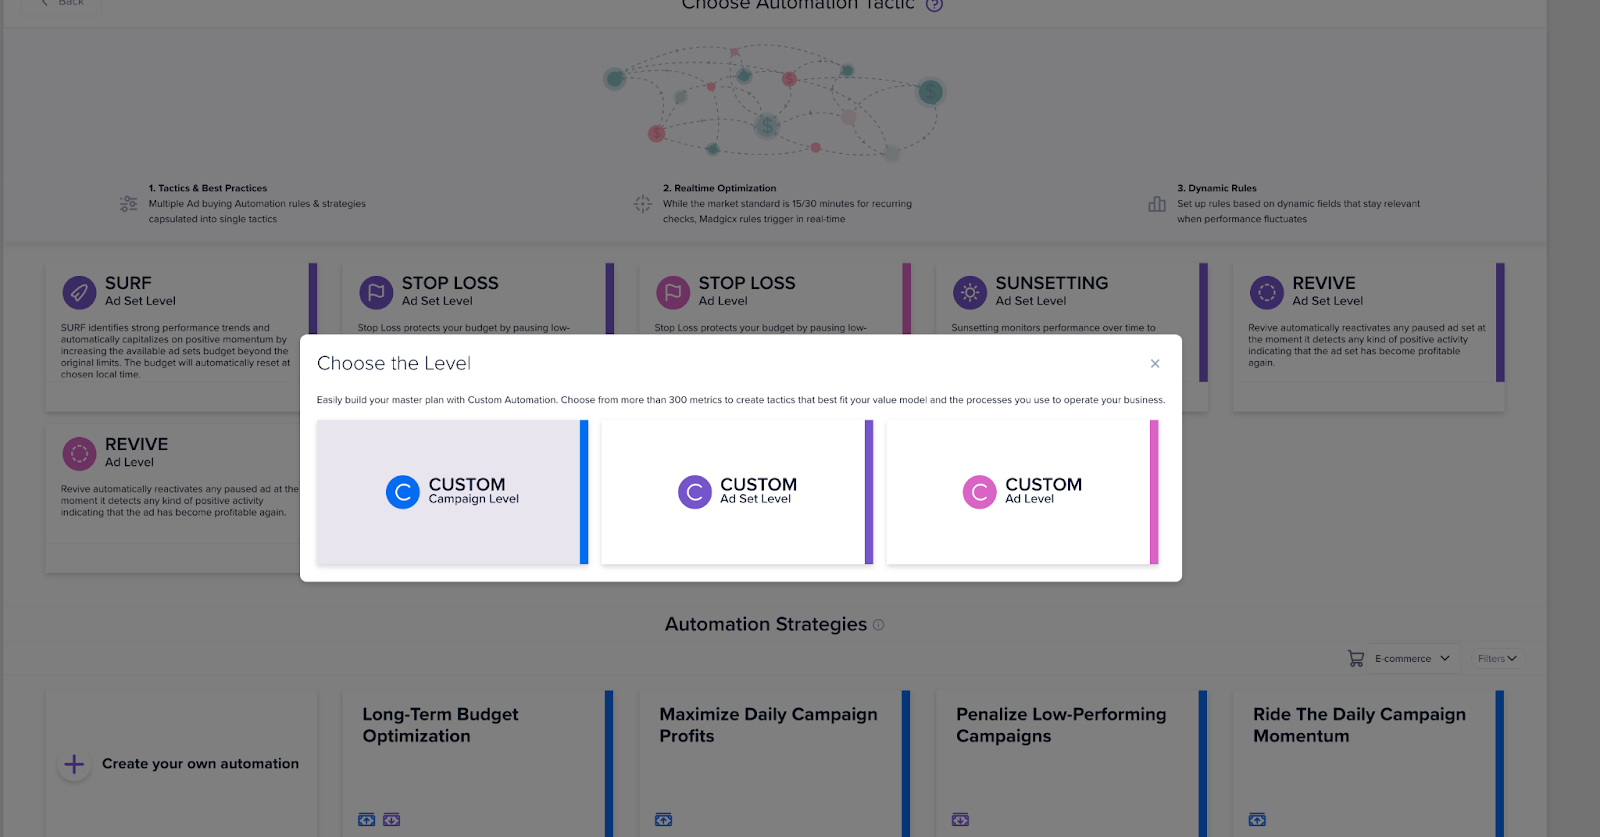
This tool gives you the ability to combine tactics and conditions to create a strategy tailored to your requirements. custom automation differs from — and automation strategies in that they are a blank slate on which you can create any automation you need for any action within Facebook Ads Manager.
Which custom automations can you create?
There are 24 different custom automations that you can create. The number of automations available depends on the level (ad, ad set, campaign) you create the automation for.
You can set the following automations to launch when all your conditions apply:
- Pause — pauses the asset indefinitely
- Pause for today — pauses the asset for today and restarts it tomorrow
- Start — launches the asset
- Set budget — assigns a budget to the asset
- Increase budget — gives more budget to the asset
- Decrease budget — takes away budget from the asset
- Set bid — assigns a bid
- Increase bid — increases the bid amount
- Decrease bid — decreases the bid amount
- Set bid strategy — assigns an approach (lowest cost with/without bid cap, cost cap) to spending budget
- Duplicate — creates a new asset identical to this one
- Set spending limit — assigns a minimum spend target and bid cap (CBO only)
- Increase spending limit — increases minimum or maximum spend limit
- Decrease spending limit — decreases minimum or maximum spend limit
- Remove spending limit — removes the minimum/maximum budget limits
- Delete — deletes the asset
- Add to name — adds a text that you specify to the asset’s name
- Replace text in name — replaces the asset’s name with a text that you specify
- Optimize gender — optimizes budget allocation based on your performance trends for specific genders
- Optimize age — optimizes budget allocation based on your performance trends for specific age groups
- Optimize locations — optimizes budget allocation based on your performance trends for specific countries, regions, and designated market areas (DMAs)
- Optimize platforms — optimizes budget allocation based on your performance trends for specific platforms
- Optimize placements — optimizes budget allocation based on your performance trends for ad placement
- Optimize devices — optimizes budget allocation based on your performance trends for specific device usage
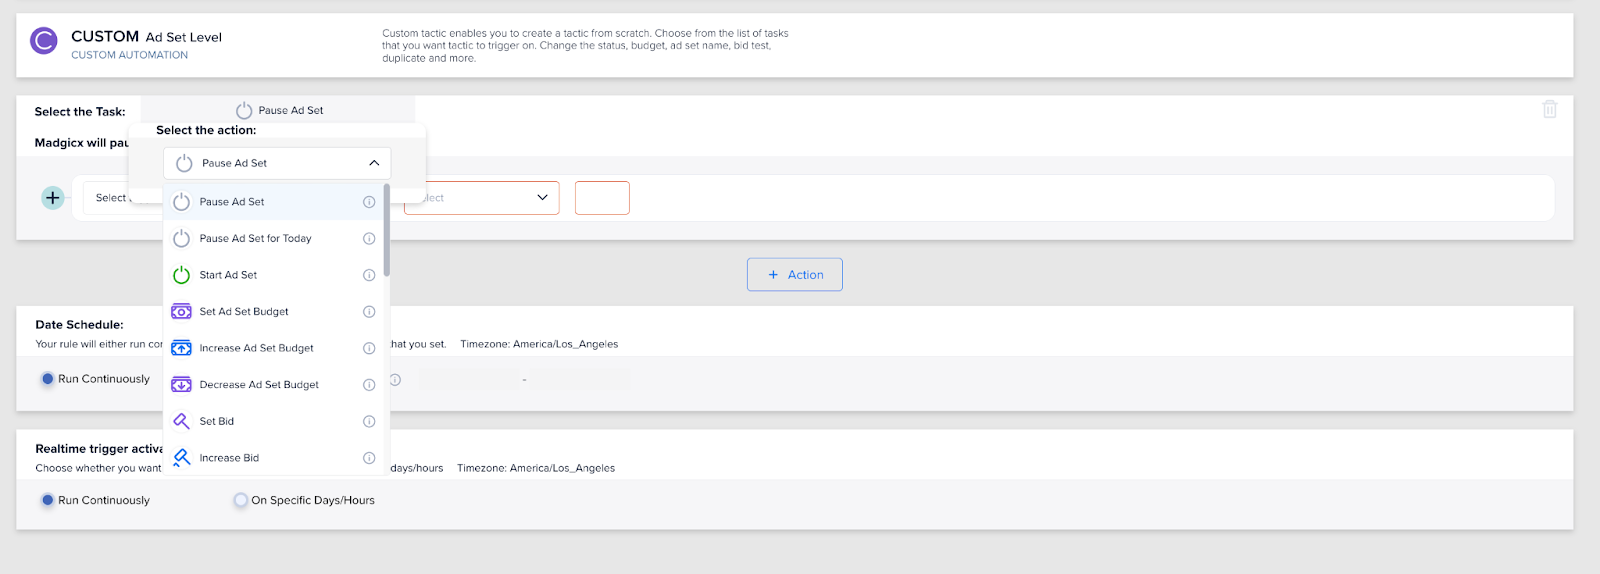
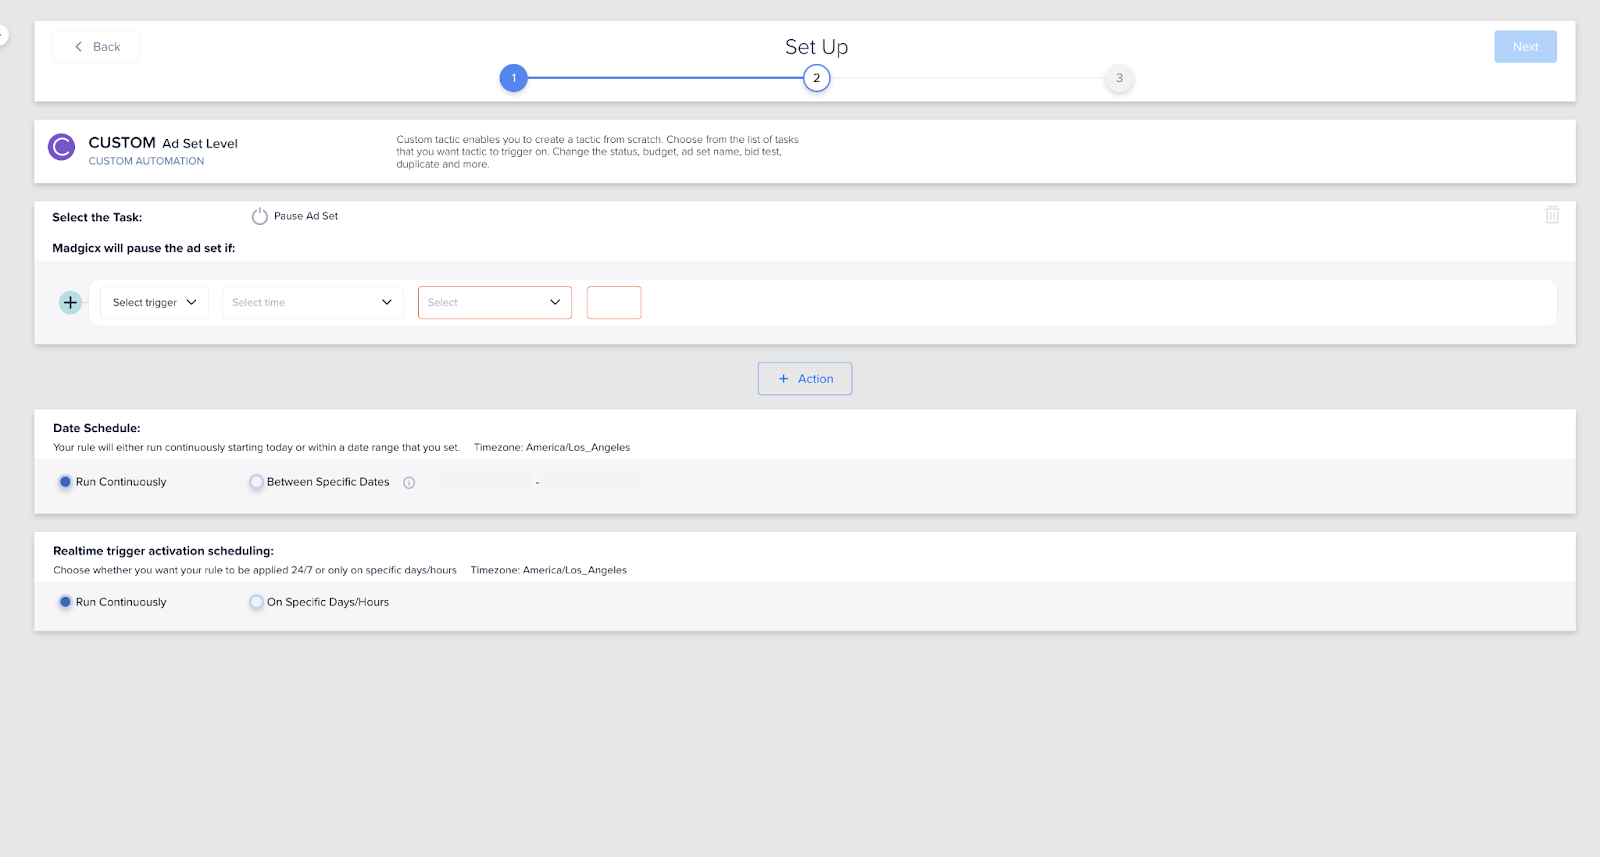
Choose the action you want from the dropdown list and then set the conditions upon which you want it to trigger.
For example, below, I created a custom automation that pauses poor performing ad sets. The ad sets are given at least 120 hours (5 days) run time to see if they can pick up any momentum and after that point will be paused if:
- I spend on the ad set 1.5 times more than the account’s average cost of purchase in the past week
- The ad set’s performance dips below 0.5x (50%) the account’s average ROAS for the past week
- The ad set’s performance dips below 0.4x (40%) the account’s average ROAS for the past 3 days
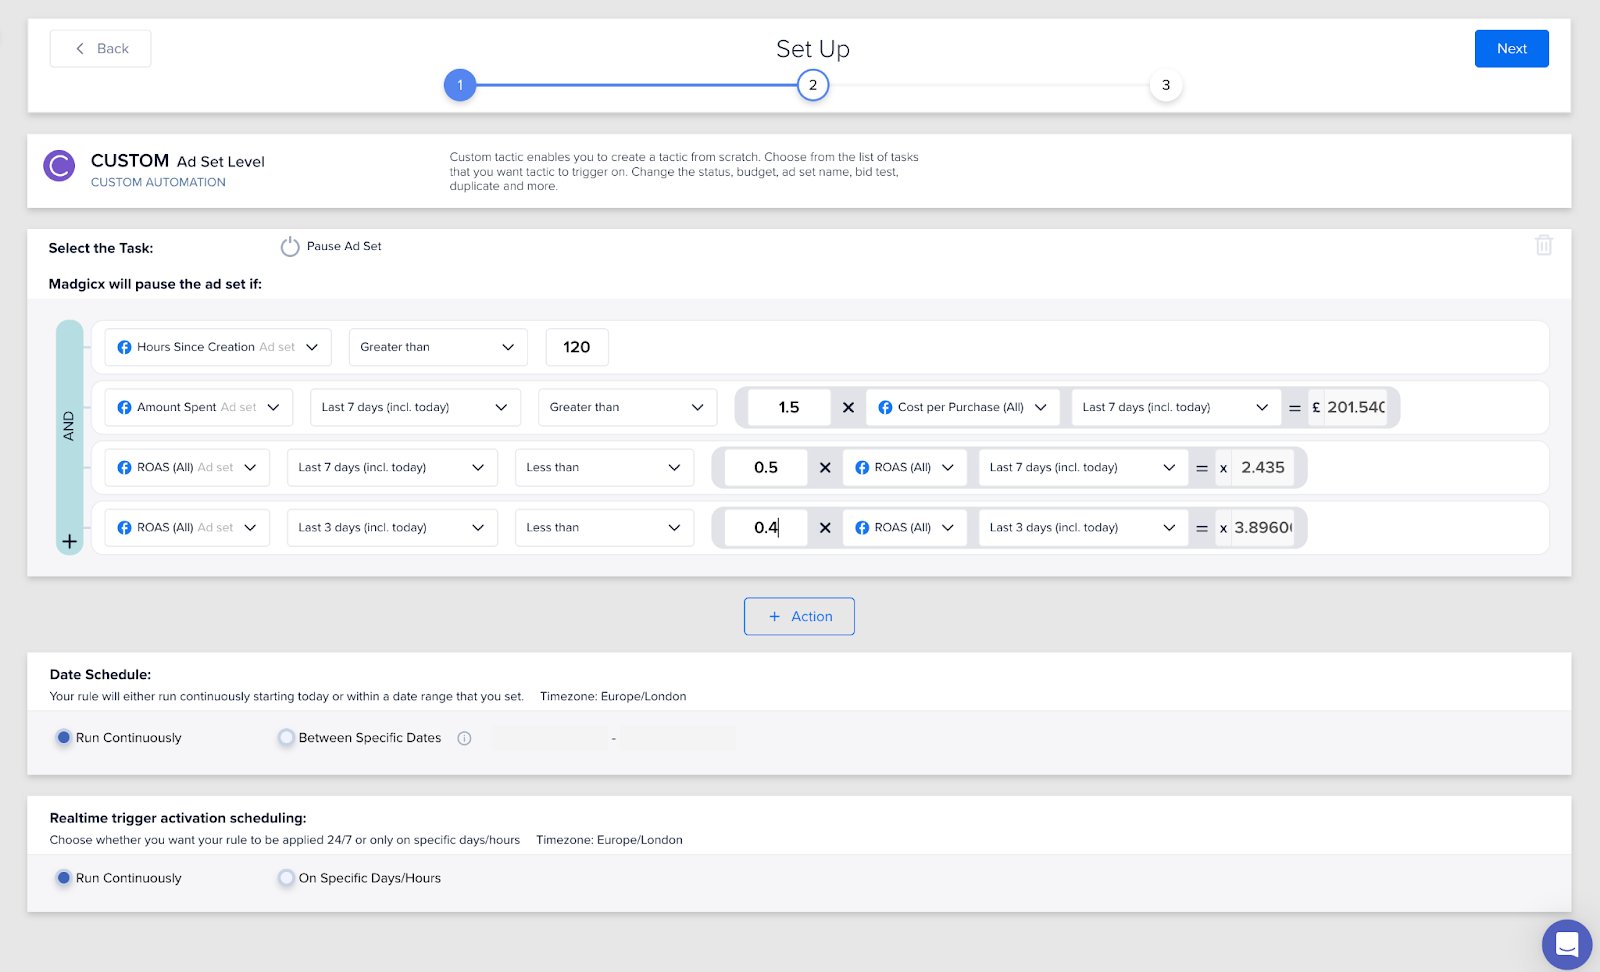
The example above gives the ad set a very fair chance to drive purchases, but protects us from ad sets that have a consistent negative performance trend.
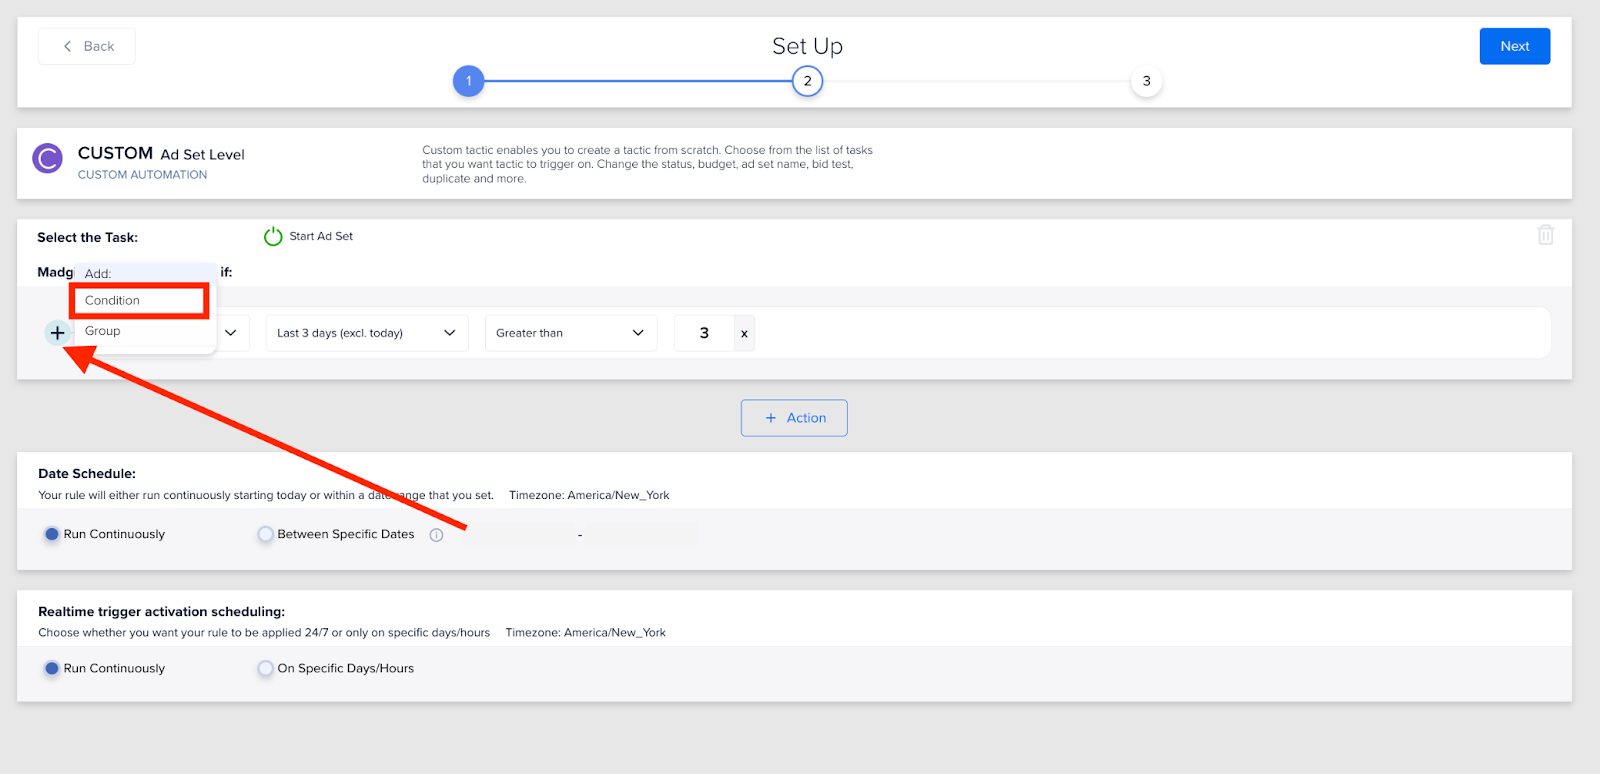
How to use "AND/OR" to create an automation
Click the “+” icon next to the condition, then click “Condition” to add it. This will allow you to add another situation when the automation will fire. The default for the condition is set to “AND”, click “AND” once to change it to “OR”.
The difference between “AND” and “OR”
“AND” conditions all have to occur for the automation to fire: e.g., ROAS >3 over the last 3 days AND Amount Spent >£1000 AND Hours Since Creation < 72.
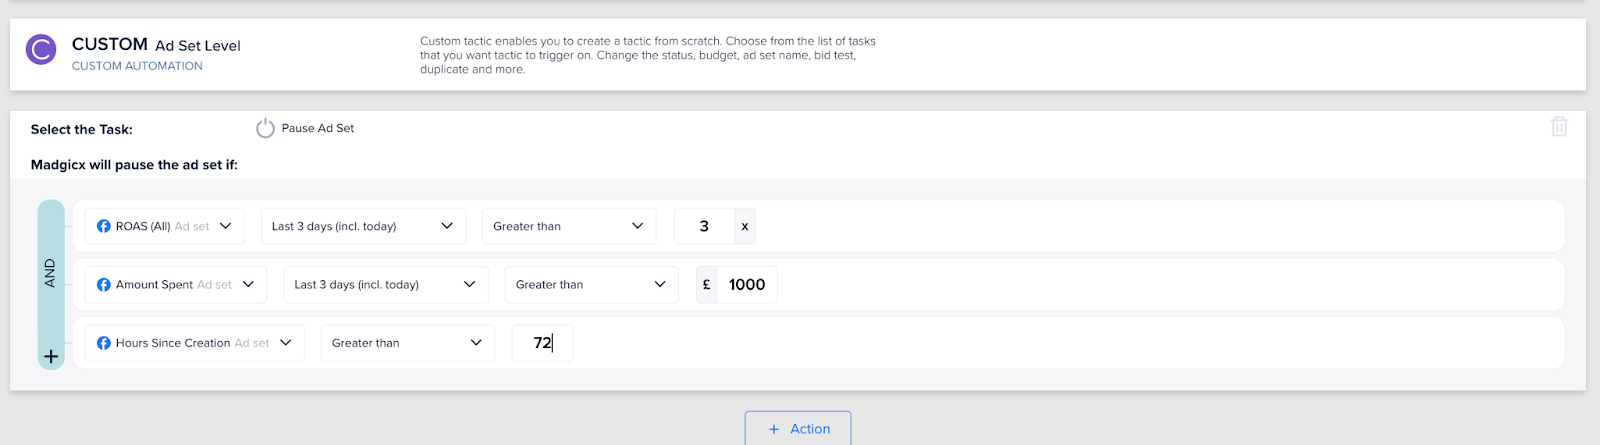
In the example above, all 3 conditions have to be satisfied for the automation to fire.
When using “OR” conditions, the automation will fire if any one of the conditions is satisfied: e.g., turn the ad (back) on if ROAS >1.6 in the last 3 days OR ROAS >1.2 in the last 7 days.
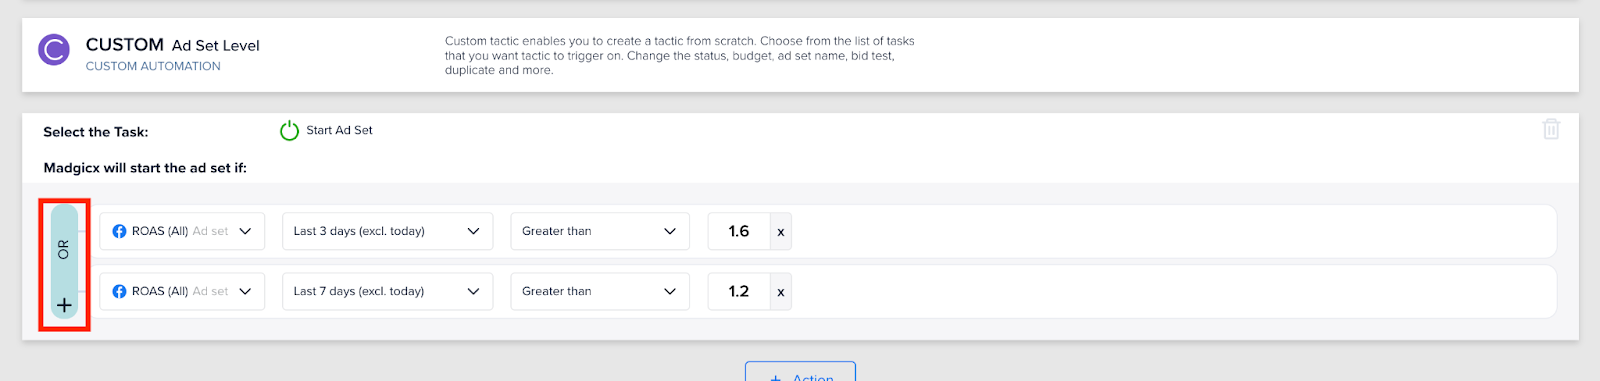
In this “OR” example, reaching a ROAS of above 1.2 over the past 7 days would make the automation fire, even if a 1.6 ROAS wasn’t reached over the past 3 days, and vice versa.
To switch between AND and OR, click on the text that reads vertically.
Dynamic metrics
While static metrics are set numbers or ratios, dynamic metrics allow you to set automations that trigger depending on your live performance over a selected time period. Using a dynamic metric as a trigger for an automation tactic can make sure that your tactics stay relevant to your current account data.
Use cases
- Comparison across metrics: set an automation tactic to trigger once, for example, the amount spent is higher than twice or three times your average cost per purchase
- Comparison over time: compare performance with other time frames to get a better understanding of the trend and automate changes (e.g., pause the ad set if the ROAS yesterday and in the last 3 days has been significantly lower than in the last 7 days)
- Comparison against account average: see how your assets measure up to your entire account and automate changes (e.g., pause the ad if the cost per purchase is significantly higher than the account average)
To ensure that the automation triggers based on a value that changes depending on your account’s performance, you need to “Switch to dynamic value” by clicking the stacked left and right arrows.

Then edit the values and set a dynamic trigger.
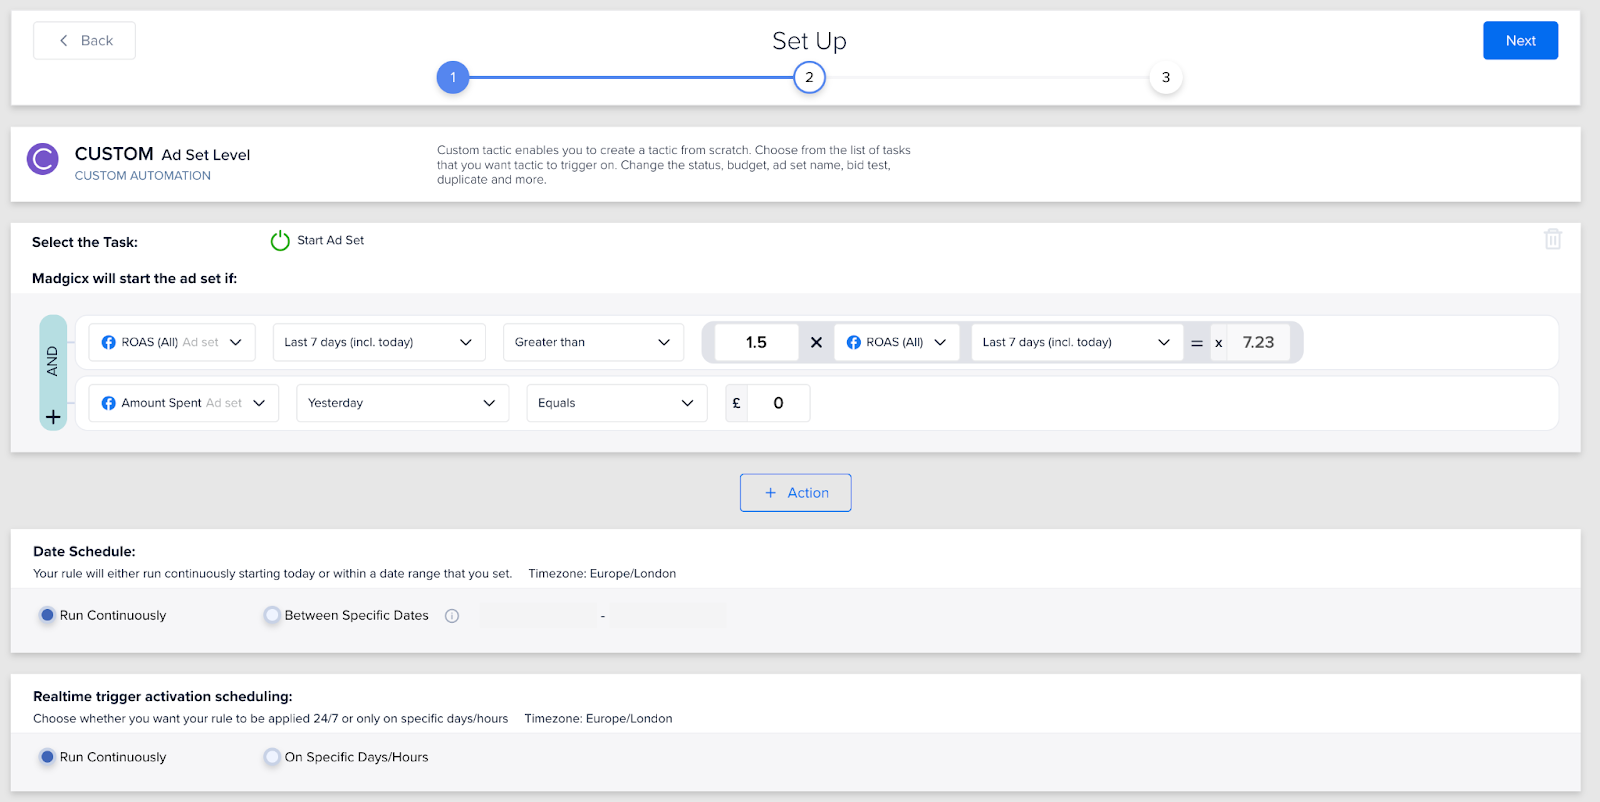
In the screenshot above, we have started to create an automation to bring back ads that were turned off because of “low” performance, but they performed better than we thought because of delayed attribution. We now need to schedule the date and time for this automation.
Date and time scheduling
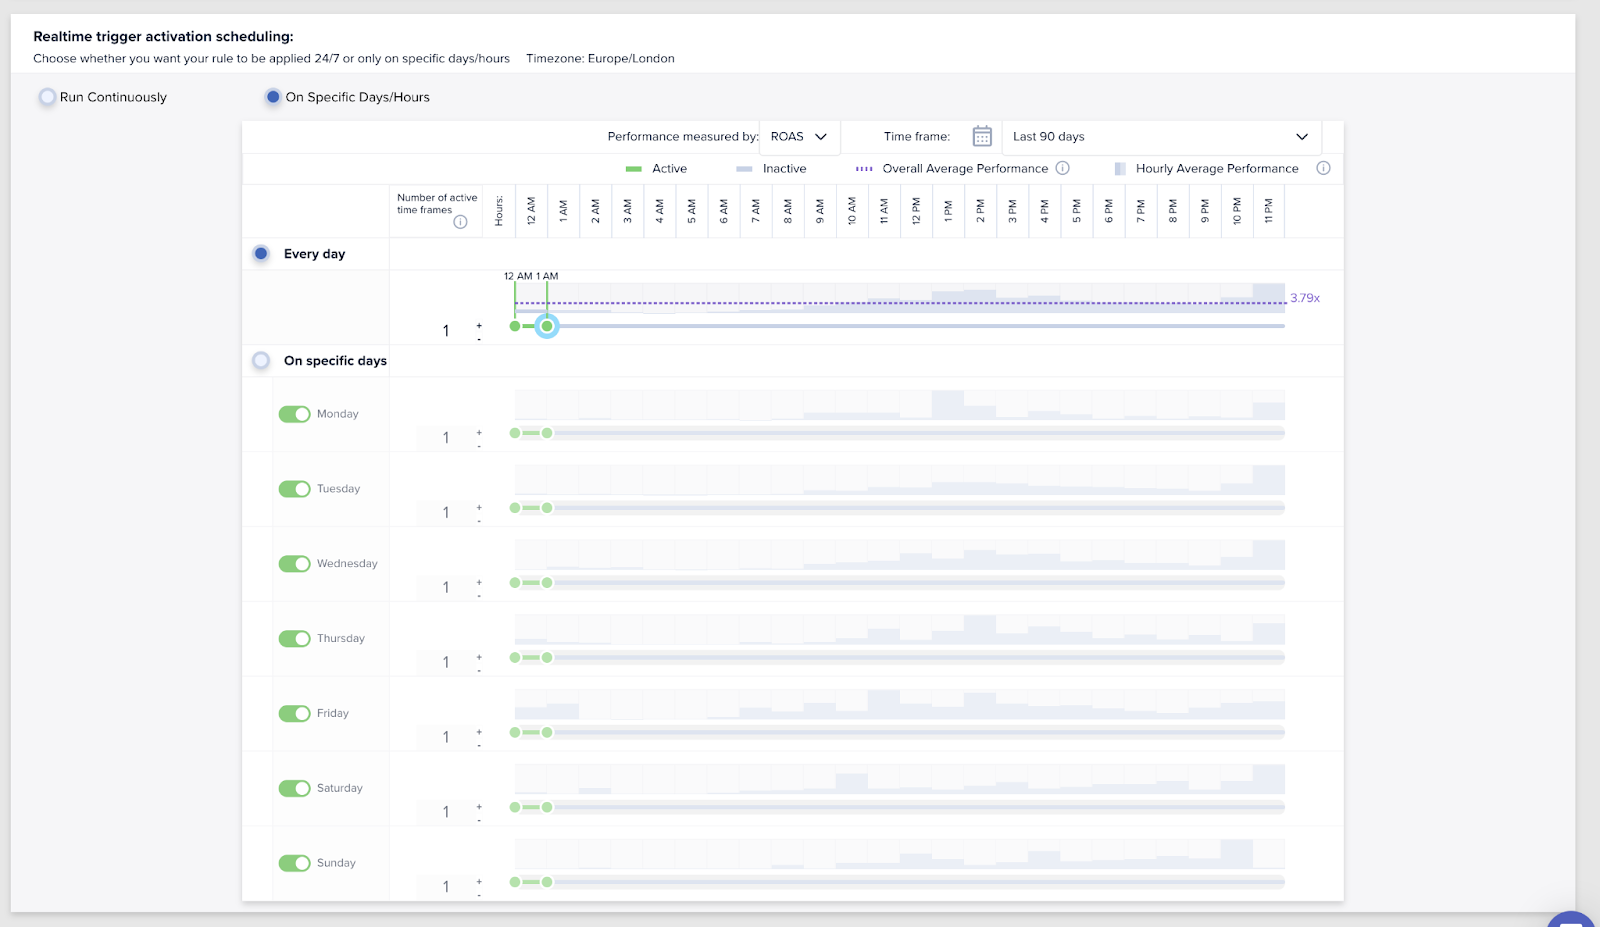
Accurately control triggering time and make sure your tactics operate when it counts. Madgicx provides you with helpful insights concerning your metrics in order to run your ads when they are most effective.
You can schedule the date and time when you want your automation to be active. This means that the automation will only fire on these days and during these times.
First off, you can choose the date schedule in which you want your automation to be active.
- Run continuously: automations will run forever unless you manually disable them
- Between specific dates: automations will run between the selected dates

The default is set for your custom automation to run continuously until you manually disable it. Setting your automation to run between specific dates is especially useful when you are running a limited offer, during the Black Friday-Cyber Monday period, for example.
Secondly, you can choose the times that you want the automation to be active. Here, again, you can set the automation to run continuously (the default) or “On Specific Days/Hours”. Select the latter option to generate a chart based on your account data.
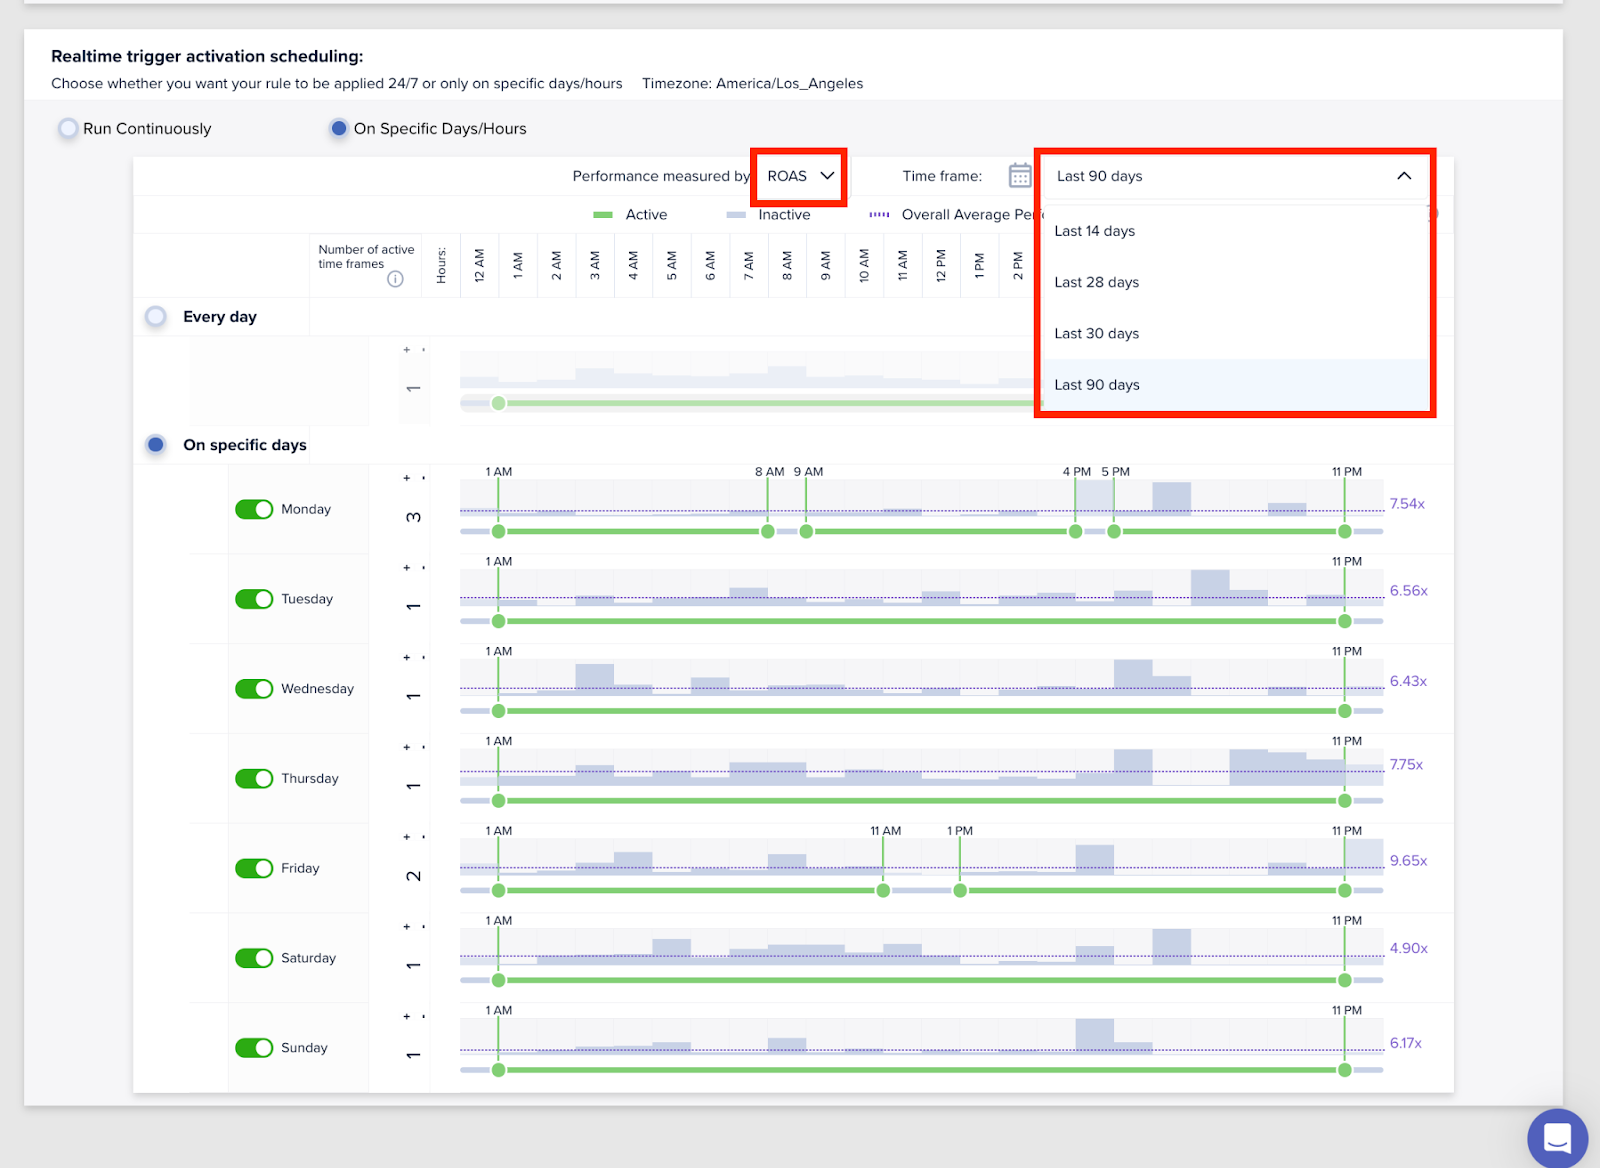
In the screenshot above, the performance metric is set to ROAS, and the time frame is set to the last 90 days. We can edit the time frame by clicking on the dropdown to select time frames of the last:
- 14 days
- 28 days
- 30 days
- 90 days
Likewise, we can edit the performance metric we see data for in the chart according to:
- ROAS
- Purchase value
- Leads (All)
On the top row of the chart we can see the average performance for each hour across the week and below this the data is broken down to show hourly performance on specific days of the week.
The green divisions represent blocks of time in which the tactics will be active. The tactics can be set in up to nine separate time frames per day.
Depending on the automation you create, you may want it to trigger at certain times on certain days. For example, if you know that you don’t make many sales from ads on a weekend, you can create one Custom Automation that pauses your campaigns at a set time on a Friday and then create another Custom Automation that triggers your campaigns to start at a set time on Monday.
Returning to our example to counter delayed attribution in the “dynamic metrics” section above, we want the automation to trigger only at the start of a new day if yesterday we didn’t spend anything, but the ROAS is 50% higher than the account average over the past 7 days (including today).
We set the automation to check whether to trigger at the start of the next day, checking whether, in hindsight: paused assets performed better than we thought when they were turned off.
Pause ads at set hours
The target audience for your ads likely has hours of the day when they are asleep or very unlikely to convert. During these hours, it is best practice to pause your ads.
You can stop wasting your budget at these hours of the day by creating one custom automation that will turn off all your ads and another automation that then restarts them at hours when they bring results.
Part one: automation to pause
First, head to the “Create Automation” section of Madgicx and click on “Create your own automation” in the “Automation Strategies” section.
For our use case, we want to turn all of our ads off at certain times, but you can modify this.
Then select the automation to run at the campaign level. We want it to run at the campaign level so that we can apply it to all campaigns (and, therefore, all ad sets > all ads).
Now we need to select the automation’s action. From the dropdown menu, we’ll select “Pause Campaign”.
In our example, we are an eCom brand selling to local customers and know that nobody makes any purchases between 3 AM and 7 AM. To do so, we need to select the trigger as “Random Number from 0 to 100” and set the value to “Greater than or Equals” 1.
This condition is always true, so the tactic will always trigger when it is active. We now need to set the time for the tactic to trigger.
In the “Realtime trigger activation scheduling” section, we select “On Specific Days/Hours” and then toggle the radio button to “Every day”.
Now we set the automation to trigger at 3 AM by moving the green slider to be 3 AM - 4AM.
The tactic is set to pause campaigns at 3 AM, and now we’ll click “Next” in the top-right corner.
On this next screen, we’ll give our automation a name and toggle the “Asset Selection” to “By manual selection”.
Apply the tactic to all of your campaigns by clicking “Launch”.
Now that we have the first half of the automation built, we need to now build the second half to unpause the campaigns.
Part two: automation to restart
Again, we’ll head to the “Create Automation” section of Madgicx and click on “Create your own automation” in the “Automation Strategies” section.
We select the automation to run at the campaign level again.
Now we need to select the automation’s action as “Start Campaign”.
Here we’ll get a warning that the tactic will turn any relevant campaigns (which is all campaigns for our use case) back on.
IMPORTANT
Since this tactic will turn all campaigns on, if you are planning to sunset any of your existing campaigns or have dead campaigns you don’t want reactivated, you need to go into those campaigns and turn all of the ad sets inside them off.
Doing so will mean that — even if these campaigns are switched on — ads won’t run as the ad sets inside them are inactive.
If you choose to apply this tactic to all active campaigns, you can manually remove it from any campaigns you don’t want it to trigger for whenever you like. You could also create a naming convention by adding “DISABLED” to all of your inactive campaigns that you don’t want to reactivate and set the automation by filter to campaigns that their names don’t contain “DISABLED.”
Now we need to again set the trigger as the time, but for this automation, we want to turn on the campaigns at 07 AM.
Again we set the trigger to be “Random Number from 0 to 100” and set the value to “Greater than or Equals” 1 so that the automation will always trigger when active.
On the green slider in the “Realtime trigger activation scheduling,” we set the time the automation will be active to 7 AM - 8 AM every day.
Just as before, we go to the manual selection and apply the automation to all campaigns. Also, we’ll give this one a name, too, so that we can easily identify it.
Click “Launch” to set your automation live.
That’s it! Now all of our ads will turn off at 3 AM and turn back on at 7 AM, so we don’t waste any of our budgets during these hours.
Difference with Facebook Ads Manager
Madgicx Automations make you a better media buyer because it saves you time by completing actions in Facebook Ad Manager for you.
Which custom automations can you create?
There are 24 different actions for custom automations that you can create. You can use these actions to create all manner of automations for different purposes. The amount of actions available depends on the level (ad, ad set, campaign) you create the automation for.
You can set the following automations to launch when all your conditions apply:
- Pause - pauses the asset indefinitely
- Pause for today - pauses the asset for today and restarts it tomorrow
- Start - launches the asset
- Set budget - assigns a budget to the asset
- Increase budget - gives more budget to the asset
- Decrease budget - takes away budget from the asset
- Set bid - assigns a bid
- Increase bid - increases the bid amount
- Decrease bid - decreases the bid amount
- Set bid strategy - assigns an approach (lowest cost with/without bid cap, cost cap) to spending budget
- Duplicate - creates a new asset identical to this one
- Set spending limit - assigns a minimum spend target and bid cap (CBO only)
- Increase spending limit - increases minimum or maximum spend limit
- Decrease spending limit - decreases minimum or maximum spend limit
- Remove spending limit - removes the minimum/maximum budget limits
- Delete - deletes the asset
- Add to name - adds a text that you specify to the asset’s name
- Replace text in name - replaces the asset’s name with a text that you specify
- Optimize gender - optimizes budget allocation based on your performance trends for specific genders
- Optimize age - optimizes budget allocation based on your performance trends for specific age groups
- Optimize locations - optimizes budget allocation based on your performance trends for specific countries, regions, and designated market areas (DMAs)
- Optimize platforms - optimizes budget allocation based on your performance trends for specific platforms
- Optimize placements - optimizes budget allocation based on your performance trends for ad placement
- Optimize devices - optimizes budget allocation based on your performance trends for specific device usage
You set the rules according to which the automations trigger, including the performance level and the timeframe.
Which Madgicx plans include Automations?
Automations are included in the following Madgicx plans:
- All-in-One with AI
- All-in-One
- Automation AI
- Automation
Click the support icon in the bottom right of your screen to talk to us to find out more.
Should I include today’s data when setting up an automation to trigger?
This depends on the amount of data the automation should use when calculating the trigger point. Automations which calculate data using longer-term periods can be skewed by today’s data. This is because today’s data is the most unreliable and can really skew your results.
However, when using short time periods to base data off that leads your automation to firing, you may need to include today’s data to have more complete data and a better picture of your results.
How often do Madgicx’s automations trigger?
Madgicx's automation will carry out automated checks based on:
- Live performance stats
- Time cycles
This means that how often automations trigger depends on how you define the triggers and the times in which they can operate.
Automations perform periodic checks to monitor whether the performance has reached the values you set as triggers (and fire if it has). Some automated tasks reset at a time you select, and some carry out a one-time permanent action.
In Automation Strategies and Custom Automation, you can also define the hours and days in which the automated rules can monitor performance and fire.
Where can I see my current automation tactics?
To check the status of each of your tactics, select “Automation” on the left sidebar menu and navigate to “Automation Overview”.
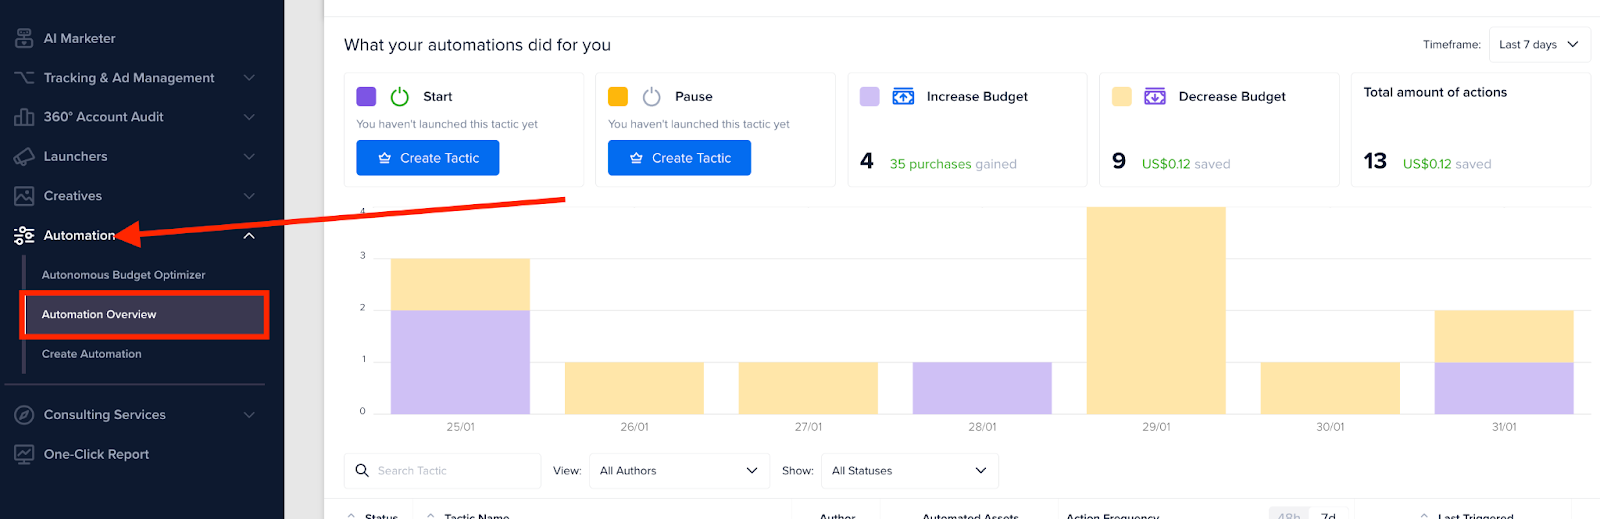
From here, you can
- Turn your automations on and off
- Search for specific automations
- See the action frequency of each automation
- Edit the settings of each automation trigger
What should I do if my automations aren’t firing?
Here is what you should do if your automation isn’t firing:
- Check your automation settings: Review the automation’s criteria and conditions are correct based on what you want to achieve.
- Compare the data: Compare the actual data with the automation rule criteria. If the criteria were met and the automation didn’t trigger, you should get in touch with our support team via live chat.
How much data do I need to have to select a metric for an automation tactic?
For prebuilt automation tactics, the relevant event needs to have been triggered at least once in order to select a metric for a tactic. For custom automations, however, any metric can be selected whether or not the event has been triggered before.
Can I create an automation to equally distribute the budget across all the ads within an ad set?
Unfortunately, it’s not possible to control the budget at an ad level, so you can’t set up an automation to do this.
We do have a workaround for you, though 🤓
You can ensure each ad has the same budget if each ad set only has one ad in it. This ensures that the ad set budget is allocated to the single ad entirely.
Can I use HYROS purchases instead of the regular Meta purchase metric in automation tactics?
HYROS metrics are not available in prebuilt automation tactics. However, you can easily recreate it using the HYROS sales metrics (sales, unique sales, sales day of click) in custom automation tactics.


.jpg)

Didn't find what you were looking for?
Try our FAQ
Check out the answers to our most frequently asked questions. If you can’t find the answer there, you’ll be able to contact our support team.