How to launch a Meta ad campaign with Madgicx
By using Madgicx to launch your Meta ad campaigns, you can:
- Save time by doing everything in one place - no need to leave Madgicx
- Create ads using your best creative elements with the Ad Creation tool
- Test and launch new audiences quickly with the Audience Launcher
- Create multiple ad variations for creative testing in a few clicks

In this article, we cover how to launch a new Meta ad campaign with Madgicx. We assume you already have all your ad creatives ready for this campaign, either from your designer or by using the AI Ad Generator to create ads.
We will show you the most common way to launch a new campaign from scratch with Madgicx. If you have already created your ads, you can skip to the audience creation step, and if you just want to launch new ads into an existing ad set, you can just read the part about creating and launching new ads.
When you have your ad creative ready, follow this guide to launch an ad campaign with Madgicx ✨
Create new ads using the Ad Creation Tool
Head to the Ad Launcher from the Creatives menu and click the “Create New Ad” button to open the Ad Creation tool.
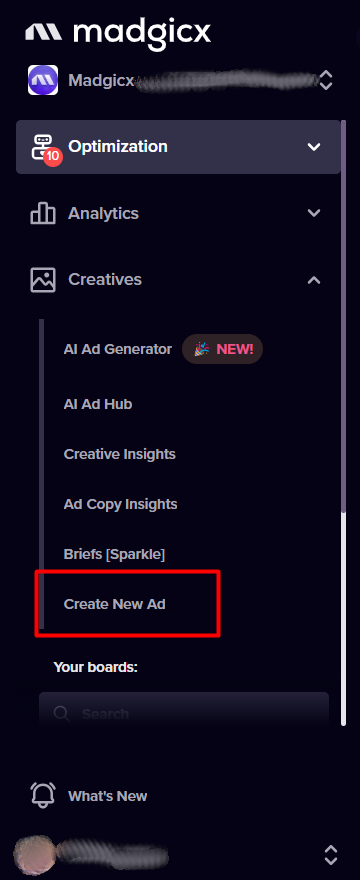
The Ad Creation tool will open, where you can build your ad by selecting the creatives you want to use, typing in your ad copy, and setting up the rest of your ad.

Once you've created your ad, you should save it by clicking the “Save” button directly above it because you still need to set up your audience(s) and launch a new campaign.
However, you could also launch it into an existing ad set by choosing the ad set and time and then clicking the “Launch” button. This process ensures that your ad is placed in the right context for maximum impact.
Choose your audience and launch your ad with the Audience Launcher
Now that you’ve put together your ad, you must select the target audience you want to market to.
Note: If you want to create interest-based audiences, you should do it in the Audience Studio. Our article explains how to create and launch them.
Go to the Audience Launcher from the main Madgicx menu. Read our article about it for a detailed explanation of how to use the Audience Launcher.

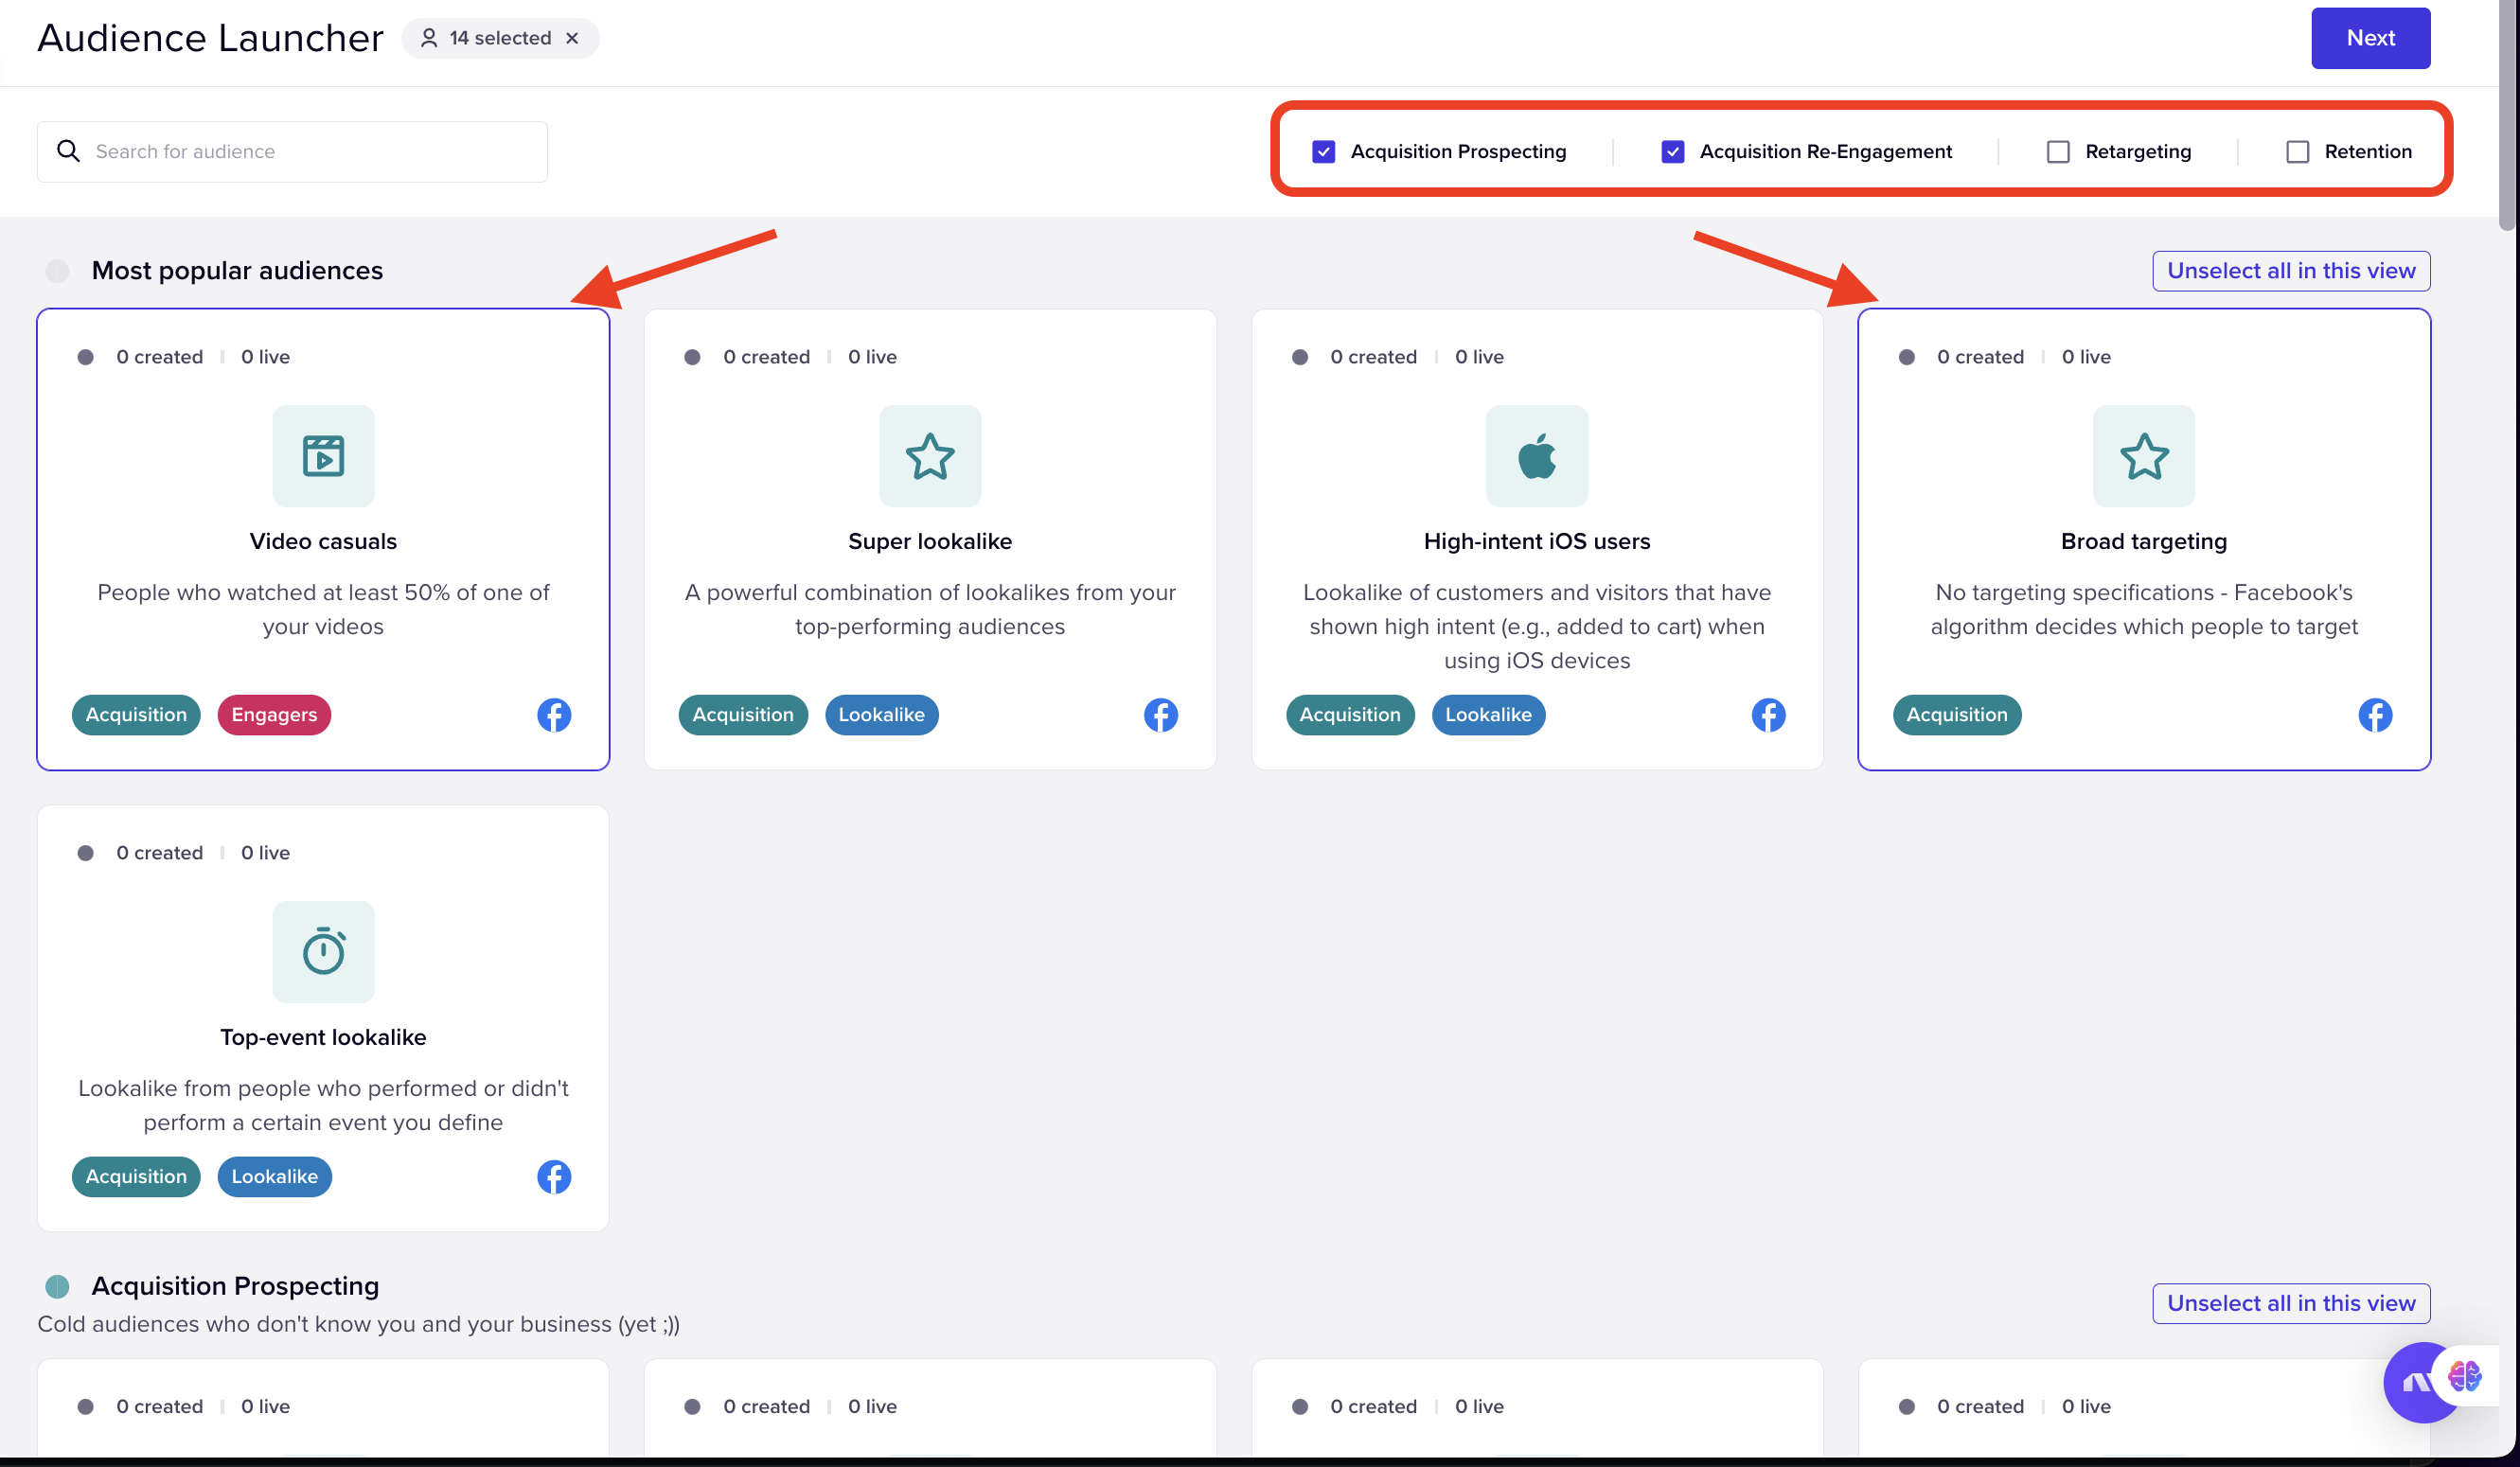
The Audience Launcher lets you choose an audience from our list of Madgicx preset audiences based on your audience’s activities and interests. It also allows you to create audiences for each marketing funnel stage.
The list of available audience presets appears, which you can filter by selecting the funnel stages you want to target at the top right of the page. Choose the audiences you want to target with the new ad you want to launch by selecting them and clicking “Next.”
In the next step, you must choose whether to split the campaigns by funnel stage or launch them into one campaign. You can also edit the default name of your campaign, set the objective, and choose your budget optimization strategy.
We recommend using ABO to control the budget at the ad set level of your campaign for better control of how your budget is spent.
Click “Next” when you are ready to move to the next step to add your ad creatives to your new audience.

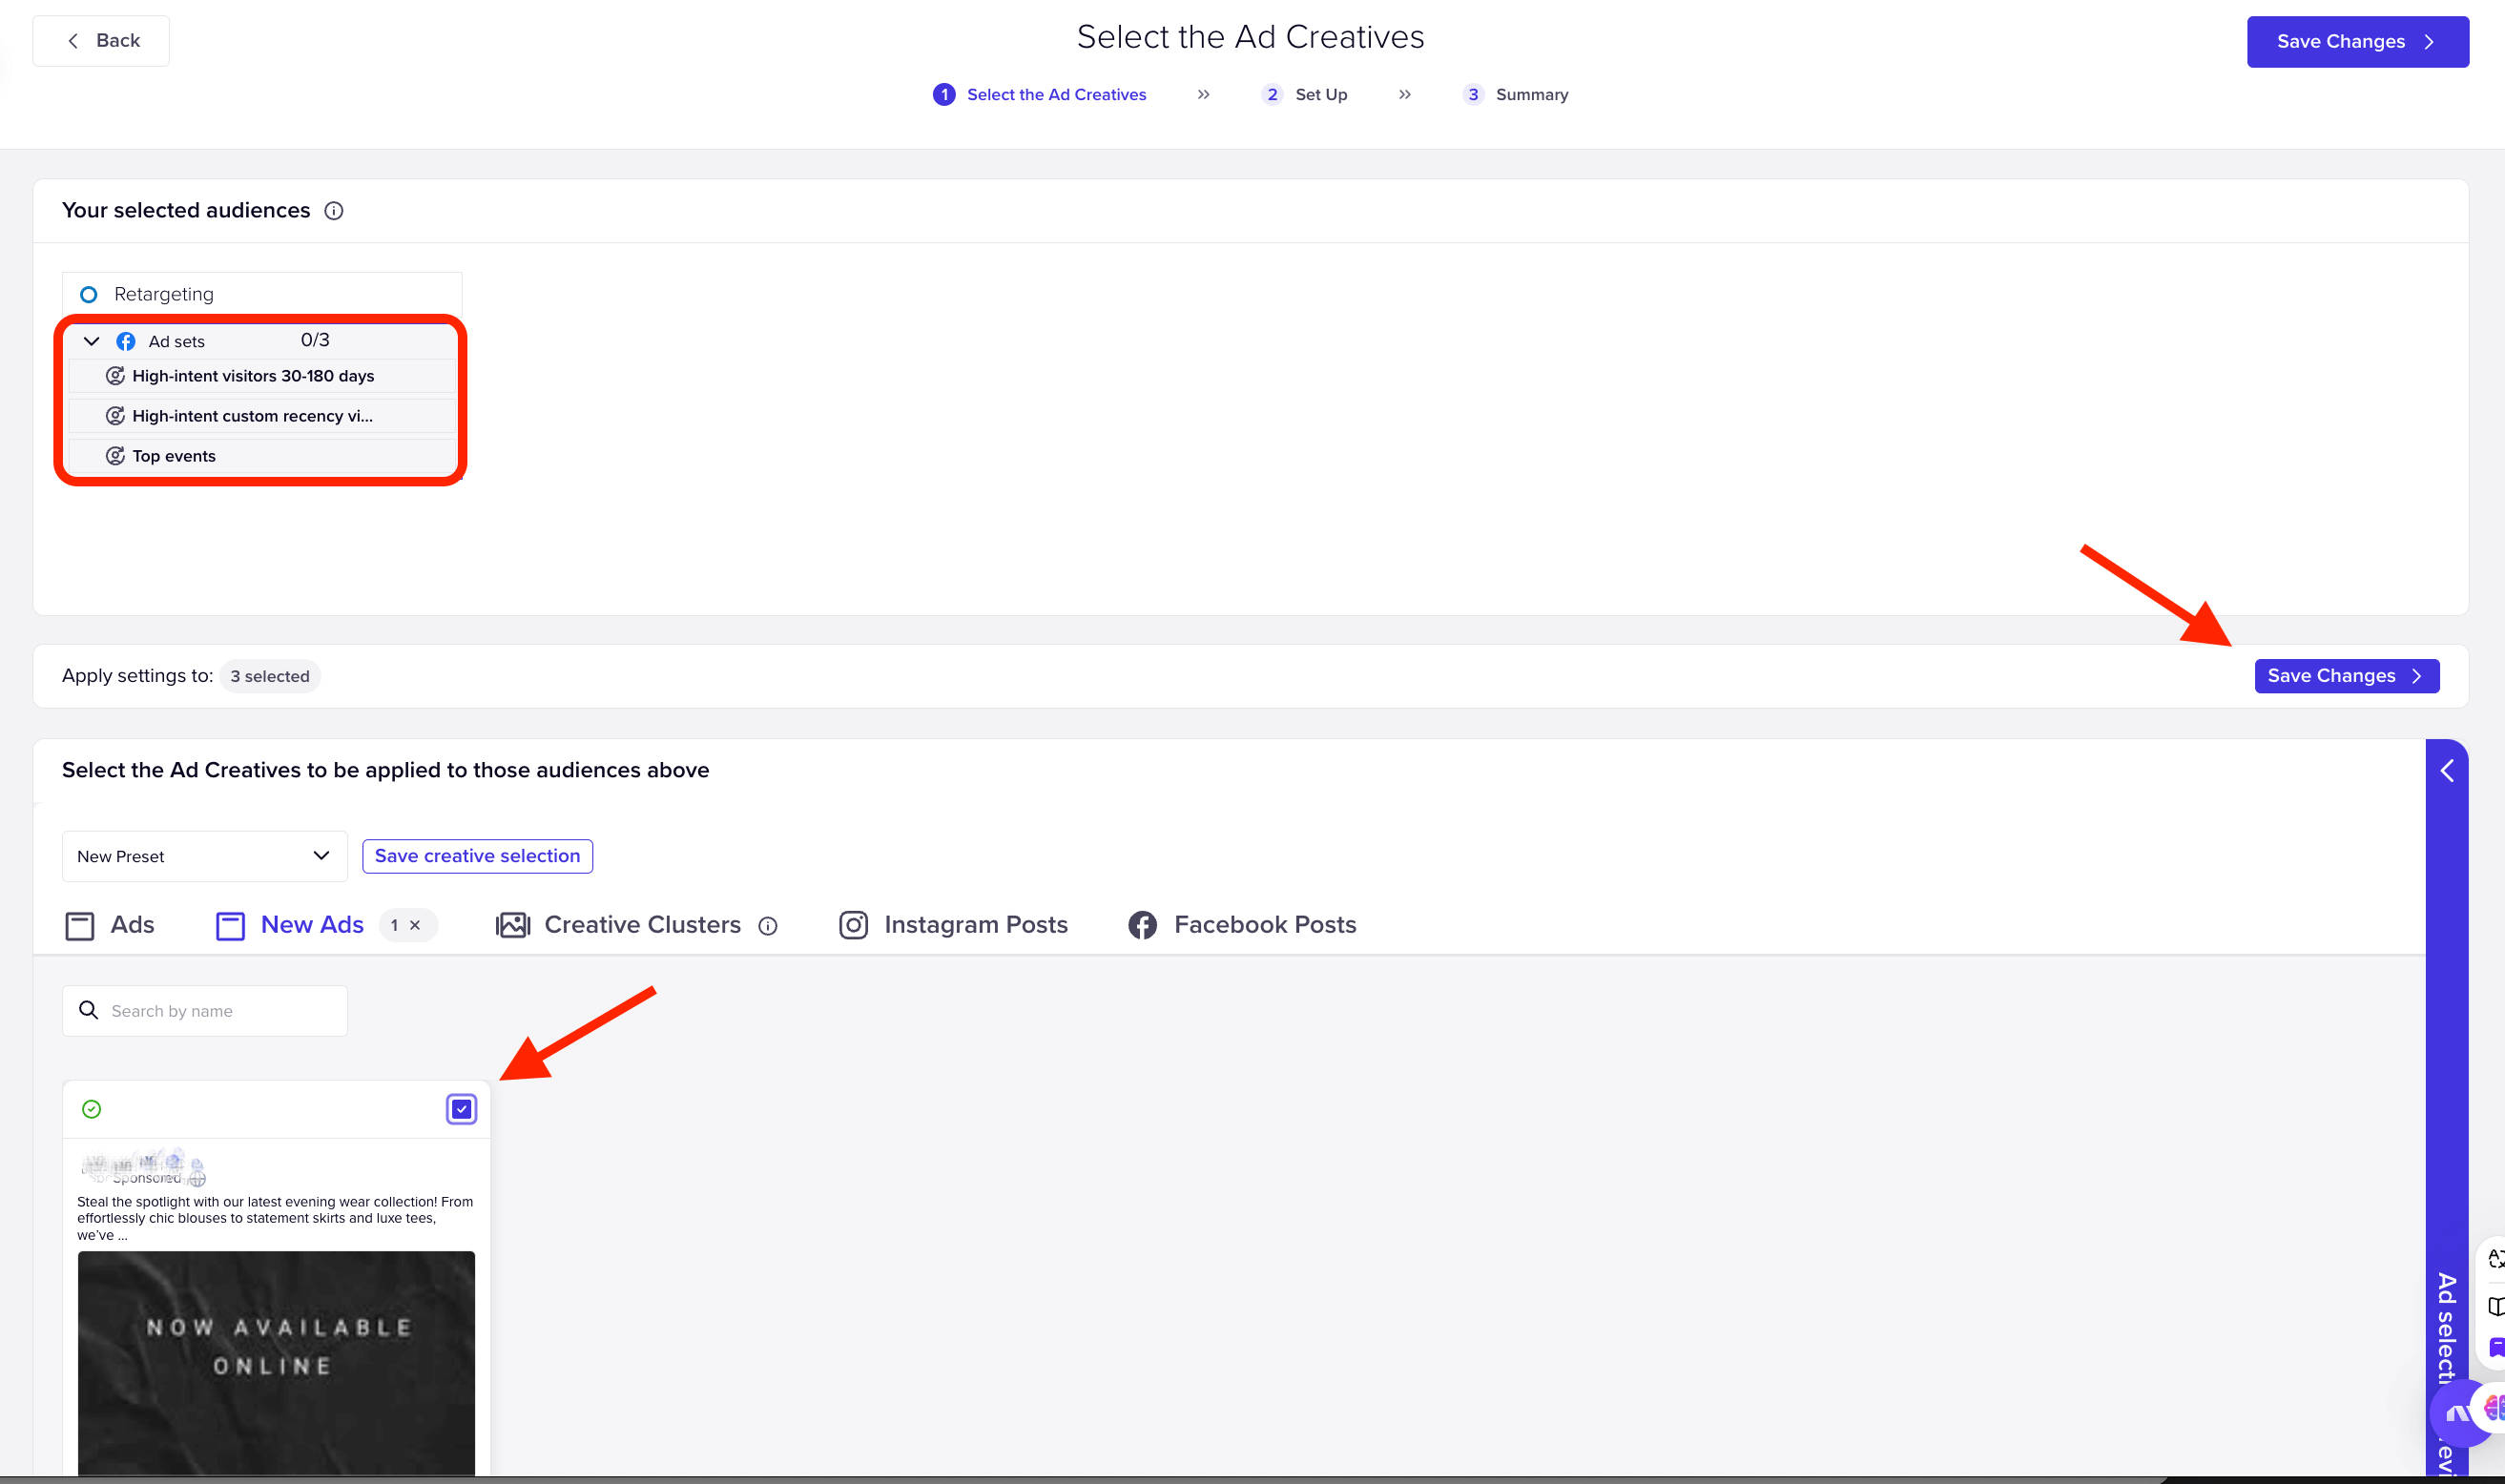
If you are launching multiple audiences, you must choose the ad for each one. You can add more than one ad to each audience if you like. Simply select each ad you want to show them. Then, save your selection by clicking the smaller “Save Changes” button at the bottom right of the chosen audience.
If you want to use a new ad you created with Madgicx (as explained above), choose the “New Ads” tab in the section where you select your ad creatives.
Next, you must set up your audiences. Start by clicking the audience you want to work with (you can launch multiple audiences at the same time with the Audience Launcher) and go through all the audience settings to apply to your new campaign.
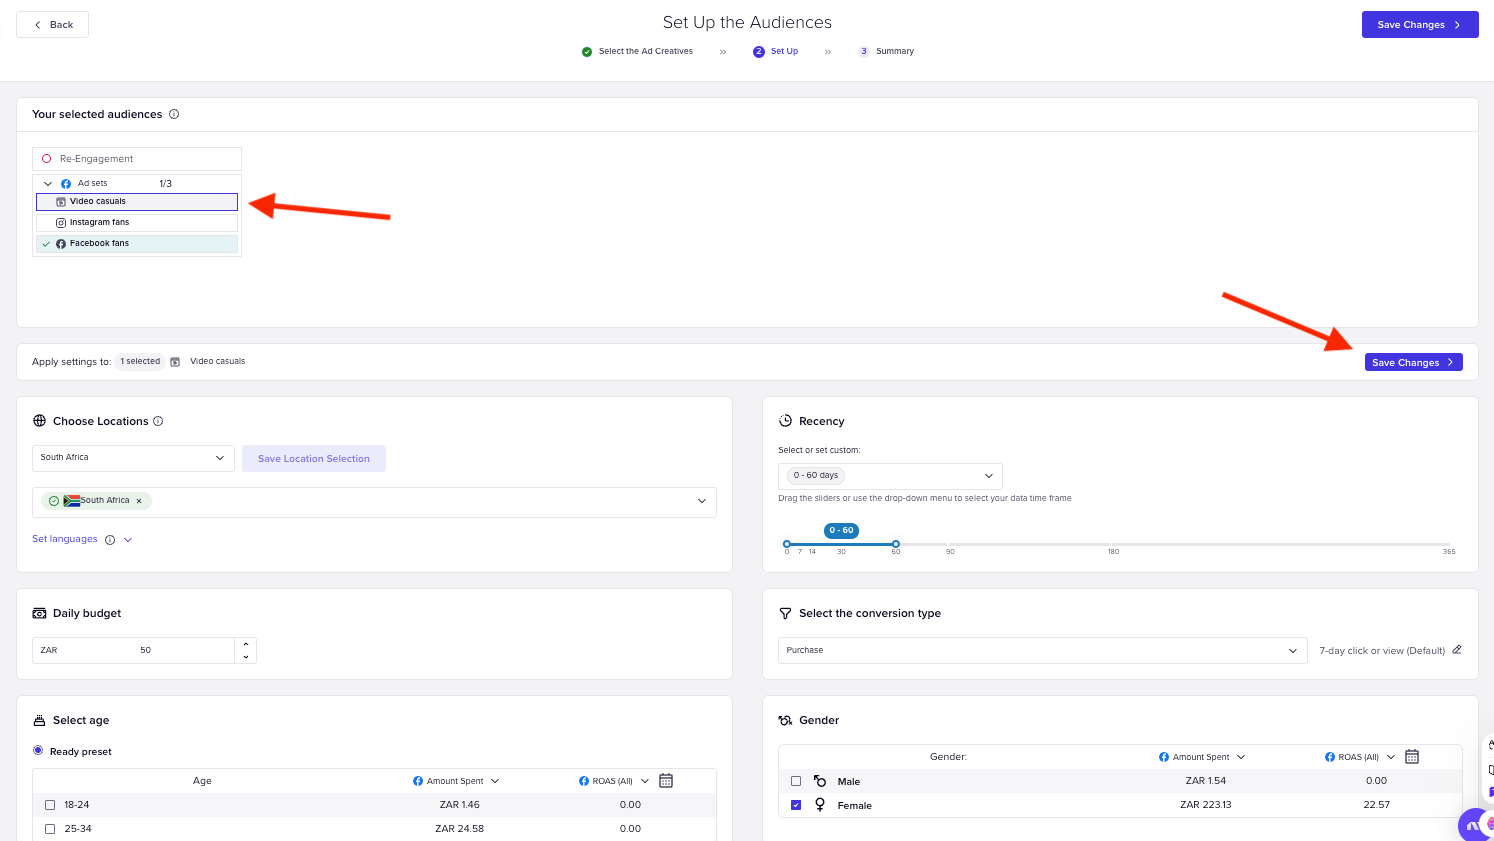
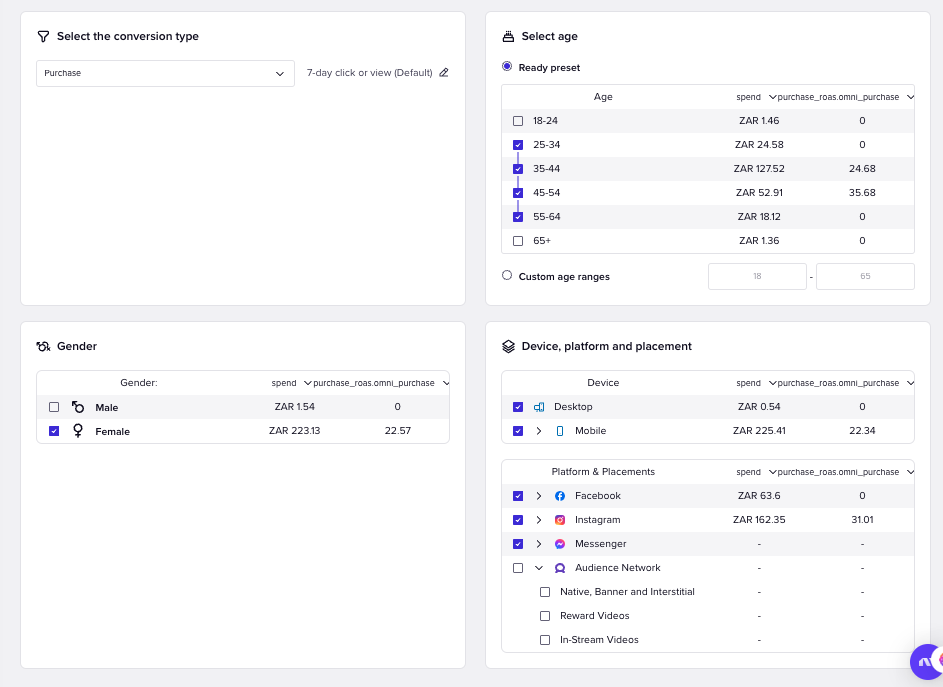
After setting the budget and location, set the audience demographics, devices, and placement for your new ad campaign. Click “Save Changes,” as seen in the image above, to save your audience changes.
Note: If you choose to launch multiple audiences at the same time, you would need to select the relevant ones to edit the settings for them, or you can set the parameters individually.
Click “Launch” at the bottom right when you’re happy with your setup.
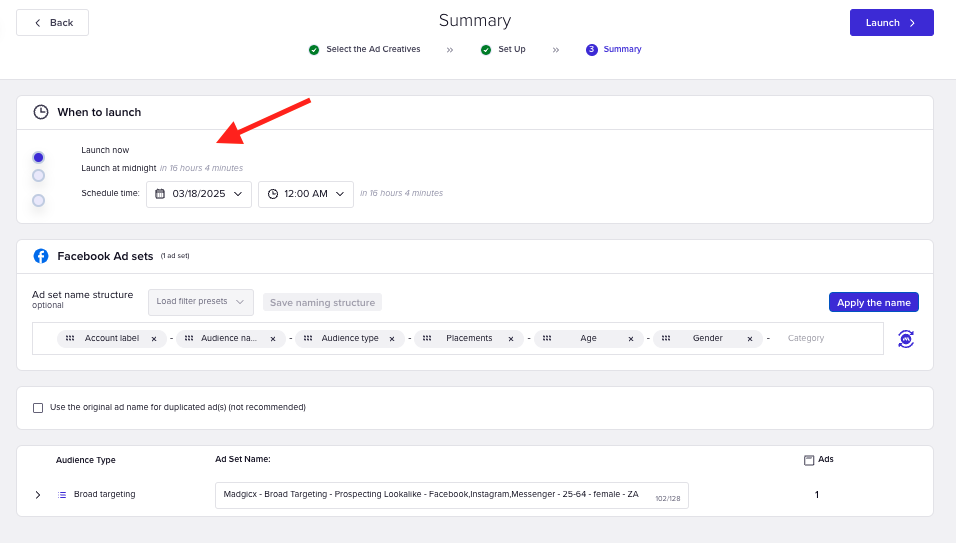
A summary page will open so you can double-check your settings before publishing. Here, you can also adjust the name of your ad set and the naming structure. Click “Launch” when you are ready.
You’re done 🚀
Your ad is in the queue to be approved and will soon appear in the Madgicx Ads Manager 2.0 once it starts getting impressions, and you’ll start receiving optimization tips from the AI Marketer 👾
Does audience size matter?
Audience size is a delicate issue because the solution tends to be unique for each user's needs. It refers to the number of potential customers who could see your ad. The right audience size depends on your campaign goals and the stage in your marketing funnel.
We want to focus mainly on the top of the funnel (acquisition) for users just starting.
We aim to drive a large pool of potential customers to our site and convert them into paying customers. We want to continue to grow this audience until we have a large enough group in our retargeting segment.
Once we see a significant increase in traffic and pixel data, we reallocate our spending to retargeting and, eventually retention audiences.
Once the retargeting segment is large enough, you split the spending allocation close to 70% acquisition and 30% retargeting and retention. Again - this is usually different for every ad account, but 70/30 tends to be a good split.
Ultimately, it doesn't matter how big or expensive an audience is or how many times you reach that audience as long as the ROAS is where you want it to be.
How do I create interest-based audiences on Madgicx?
Go to the Audience Studio from the Madgicx menu by clicking the settings icon on the left.

The Audience Studio helps you discover new interest-based audiences and mix and match them with your top-performing audiences. Go to the “Discover new interests” tab on the right, where a list of suggested interests will appear. You can select the boxes on the left to include or exclude them in your new audience.

Once your interests are added to the list of included audiences in the “Audience mixer,” you can drag them across to the other intersection boxes to the right to create the rules and conditions you want to apply to your audience.
You can also add all your exclusions for interests that aren’t a good fit for you. Doing this allows you to be super specific and test different audience segments so you can learn which ones perform the best and are worth investing in.
Click the “Launch” button to choose the creatives to use and where to launch them. Read our help article for a comprehensive guide on how to use the Audience Studio.
How many ad sets will launch when I use what I have created in the Audience Studio in Audience Launcher?
One ad set will be launched when you use the Ad Launcher for audiences you have created in the Audience Studio.
How much Pixel data do you need to create Madgicx audiences?
To create a new audience, these are the recommended amounts of data:
Acquisition Prospecting
- 100 landing page views
- 100 content views
- 100 add to cart
- 100 initiated checkout
- 100 added payment info
- 100 purchases
Note: The amounts above are the minimum for creating a lookalike audience. But the more data you use, the better and more similar the LLA will be to the original custom audience.
Also, Facebook recommends that custom audiences used to create a LLA will be larger than 1,000 people.
Acquisition Re-Engagement
- 20 likes
- 20 comments
- 20 shares
- 20 clicks
Retargeting
- 20 landing page views
- 20 content views
- 20 add to cart
- 20 initiated checkout
- 20 added payment info
- 20 purchases
Retention
- 20 purchases
I can’t see ad previews
If the ad is a new combination from Creative Clusters, Madgicx needs a few minutes to generate a new preview. If you get an error saying “preview is not available,” please reopen the browser and clear the cache, then the previews should pop up.
Still can't see the previews? It may indicate a permissions issue. Please reach out to the support team for further assistance.
I can’t find my creations in the Ads Manager 2.0.
Your ad or campaign must be serving impressions to show in Madgicx.
If you launch your campaign or ad immediately, allow some time for it to show in the Ads Manager 2.0. Don’t forget your ad needs to be approved by Meta before it starts delivering, which can take a while.
When you do come back to Madgicx, make sure you refresh the Ads Manager 2.0 page to see the latest data.

If you launched using Madgicx Optimized Structure, Madgicx will add your new audiences to the existing campaigns, so please look inside these campaigns to find your creations.
If the issue persists, please contact the support team for further assistance.
I can’t select any audiences
As a free trial user, you can create up to three audiences. If you’ve exceeded this amount, hop on a Madgicx plan to launch more audiences.
If this is not your situation, then it’s most likely an account permissions issue: please follow the permissions guide to gain access to these audiences.
If the issue persists, please contact the support team for further assistance.
My audience is not delivering
There are several reasons why Madgicx audiences may not deliver. Try the following solutions to resolve this issue:
- First, if the ads are in review, please wait until Meta approves them.
- The ad budget may be too low to get enough impressions.
- If they are approved but still not delivering, ensure your placements, regions, age, and gender are not too restrictive. For example, removing a gender might reduce the audience by half.
If none of the above worked for you, or if the audience size is -1, please contact the support team for further assistance.
Can I use retargeting and retention audiences if I don’t have a website?
While having a website is ideal, options are still available for both retargeting and retention campaigns.
For re-engagement, you can create custom audiences of your Facebook and Instagram fans and users who’ve watched your videos and ads, and you can target users who’ve engaged with your social media pages.
Then, for retention, you can upload a customer list to the Meta Ads Manager to create a custom audience based on these details. You need to export the list from your email subscriber list, a CRM, or similar. By doing this, you can target your existing customers with ads to drive further engagement and repeat sales.
Can I see the audience size and potential reach of an audience before launching it?
While you can’t see the audience size and potential reach before launching a new one using the Audience Launcher, you can find this information once launched in the Audience Studio when clicking Top Audiences in the 360-degree Account Audit submenu.

It’s important to note that the actual audience size is determined by your targeted location and ad set settings in Facebook after you’ve launched it.
Can I launch ads from the Ad Launcher into new ad sets?
You can only launch ads into existing ad sets using the Ad Launcher. To launch a new ad set, you must create one using the Audience Launcher.
Why are the ads I’m looking for not showing up on the Ad Launcher?
Try these steps to resolve the issue:
- Start by selecting a longer time frame in the top right corner of the Ad Launcher
- Madgicx will only display campaigns, ad sets, and ads that have at least one impression; if your ads do not have impressions, you can find them by searching for the ad ID within Ad Launcher.
If you can’t resolve the issue, contact our support team via our chat support.
What happens to my likes and comments when launching existing ads with Madgicx?
When launching existing ads, Madgicx will preserve the existing comments and reactions to your ads. If you have an ad running with multiple IDs, we'll use the ad ID with the most reactions and comments.
This tactic is extremely valuable since ads with many likes and comments help build rapport and social proof for your business.
Can we launch Advantage+ Shopping campaigns from the Ad Launcher in Madgicx?
Currently, we don’t support launching Advantage+ Shopping campaigns from Madgicx. We recommend submitting a feature request and checking our release notes.
How can I create ads in Madgicx?
Open the AI Ad Hub inside the Creatives section of the Madgicx app. From there, you can generate ads in multiple ways.
Use the prompt box available throughout the AI Ad Hub to upload your own images, enter a text prompt, or build on your existing creatives. You can also browse the Ad Library for inspiration and click Generate Similar on any ad you like to instantly use it as a starting point for new designs.
Once your prompt is ready, choose your preferred format, template, and number of outputs, then click Generate. Your new creatives will appear in AI Generations, where you can further refine them using the built-in AI Image Editor before launching.
.webp)
.webp)

Didn't find what you were looking for?
Try our FAQ
Check out the answers to our most frequently asked questions. If you can’t find the answer there, you’ll be able to contact our support team.