How to launch winning ads with Ad Launcher
With Madgicx Ad Launcher, you can:
- Create a new ad either from scratch or combine existing copy and creatives
- Scale existing ads horizontally by launching them into additional ad sets
- Turn your top social media posts into profitable ads
- A/B test creatives quickly and simply
.webp)

Madgicx Ad Launcher unifies data so you can get a clearer picture of which ads and their creatives and ad copy are performing best and then capitalize on these insights when creating new ads. Moreover, the tool allows you to create new high-converting ads from scratch or by combining your top creatives and ad copy. From Ad Launcher, you can also turn your best Facebook and Instagram posts into powerful ads in a few clicks.
🖇️ Analyze and combine what's working
When you open Ad Launcher, you land in the Creative Clusters tool. Creative Clusters helps you immediately analyze and combine your best creatives with your best ad copy.
First, set the time frame you want to see data for. The longer the time frame, the more data will load.

The column on the far left (y-axis) shows the ad copy you have used over the indicated time frame and the top row (x-axis) shows the visual creatives you have used.
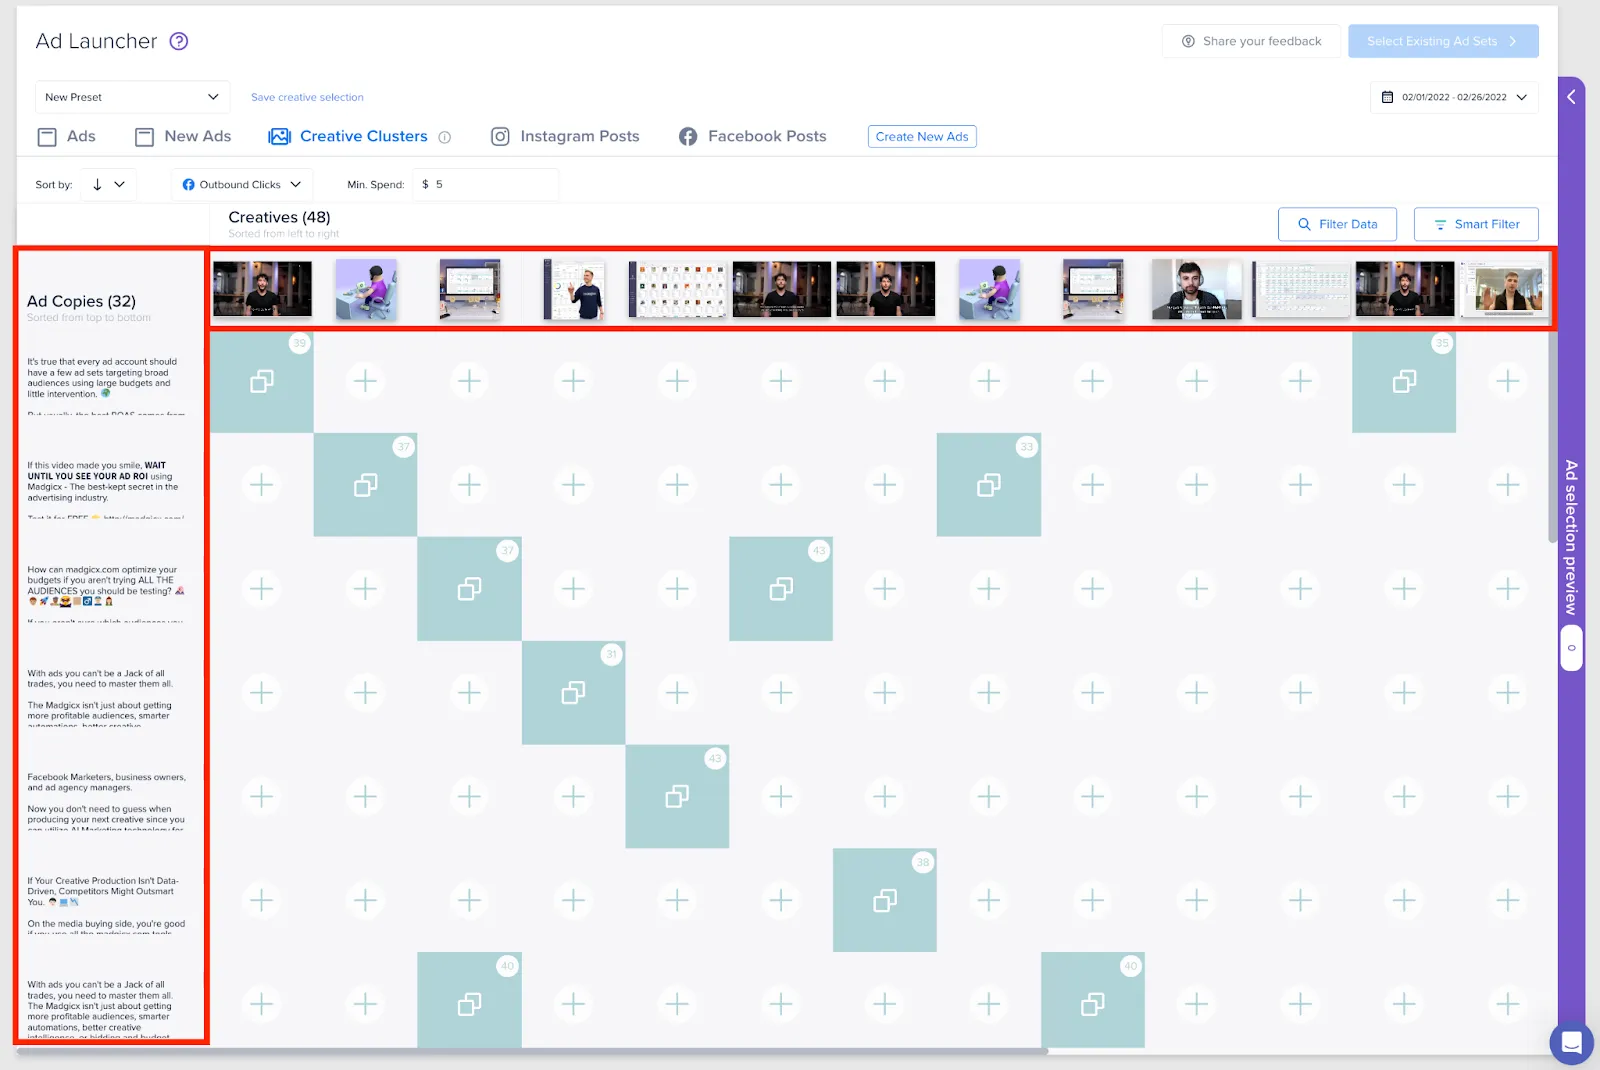
To see a breakdown of the individual performance of the creatives and copy, hover over them.
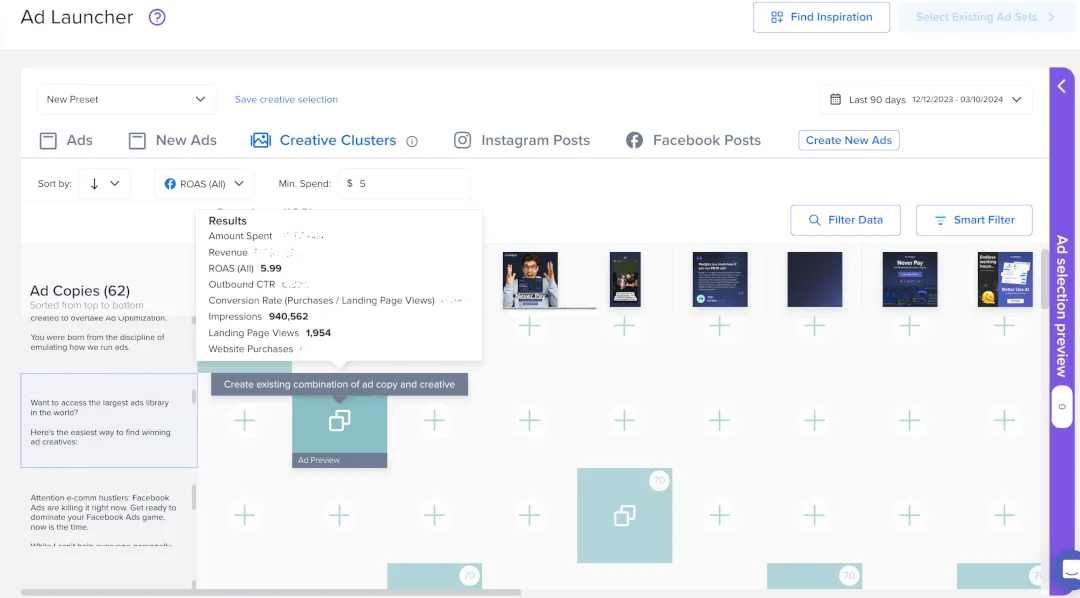
Then the magic of Creative Clusters is that you can see what the combined performance of your ad copy and creatives is to mix and match to make decisions on what works and what doesn’t.
The green squares show you the combinations of what you have launched and what has resulted in positive ROI; the red squares indicate combinations that resulted in negative ROI. The color is based on the metric you select (see screenshot below).
To experiment with new combinations of your existing copy and creatives, find the best performing ad copy and creatives and then simply click on the “+” in the gray squares to create a powerful combination of the two.
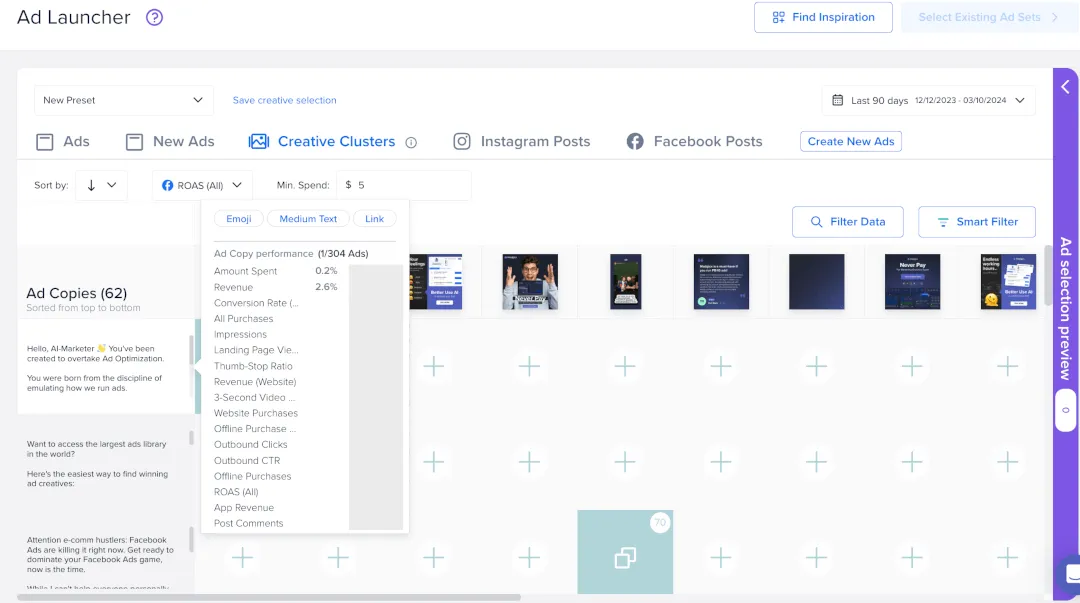
You can also select a minimum spend to find ads which have completed their learning phase and gathered sufficient results and fine-tune the KPI by which you want to judge whether your creative strategy is working.

Gain greater insight into the specific campaign, ad-set, and ad performance by clicking on the “Filter Data” button.
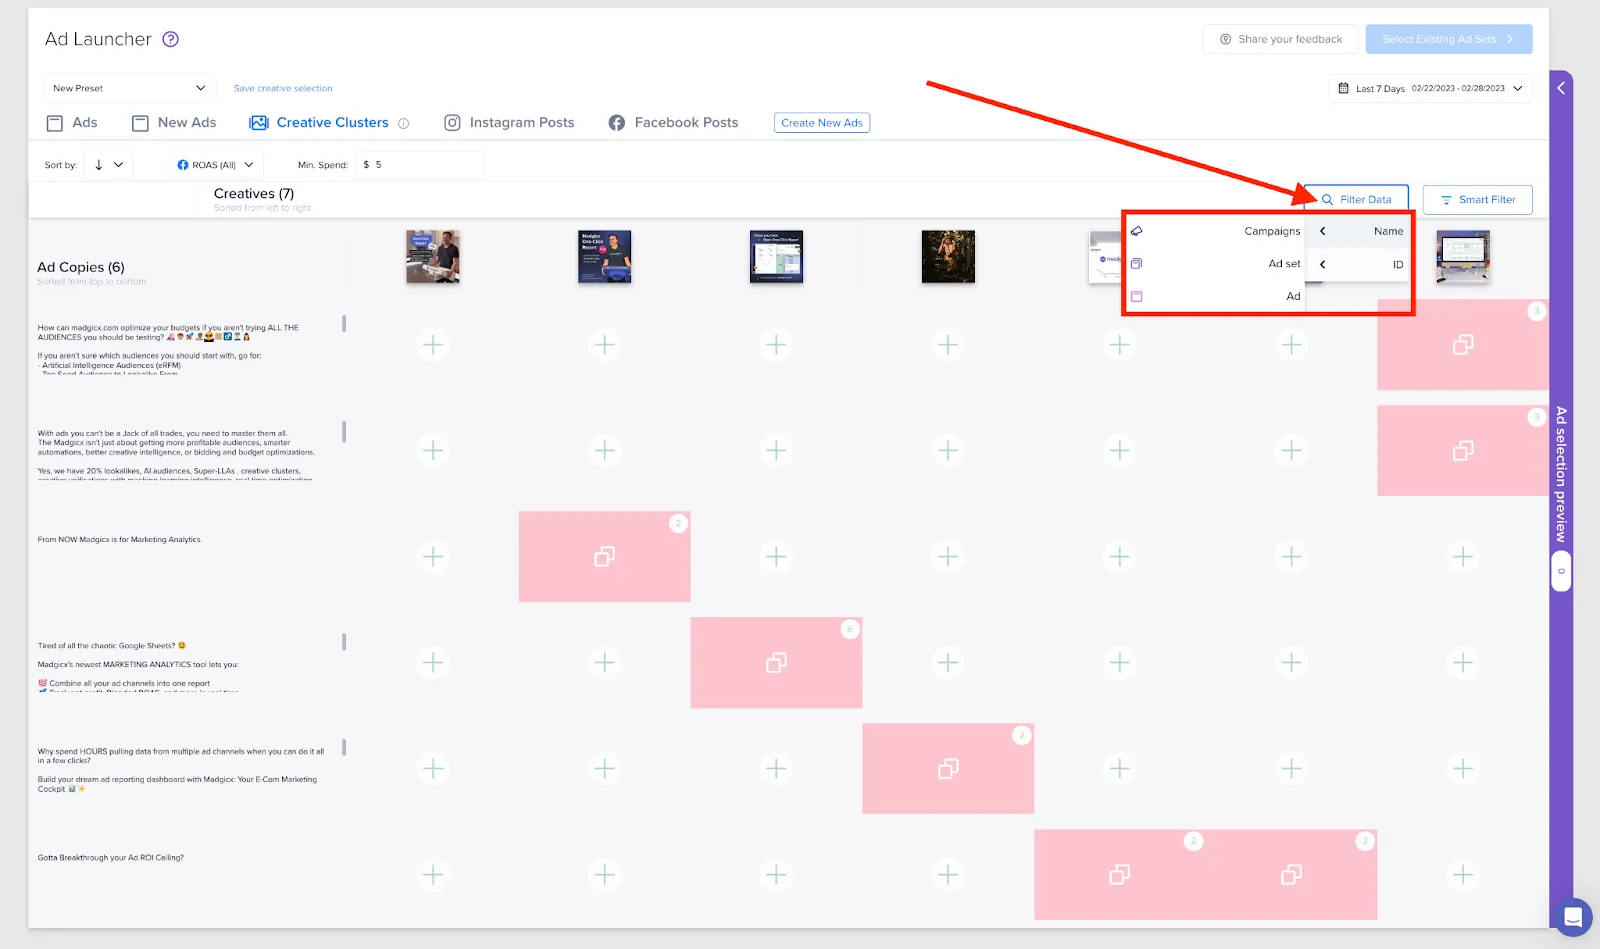
Or go further and use the “Smart Filter” to see what works for different cross-sections of your audience to mix and match copy and creatives or use the ones that work (or don’t) for inspiration on your next ad for your target audience.
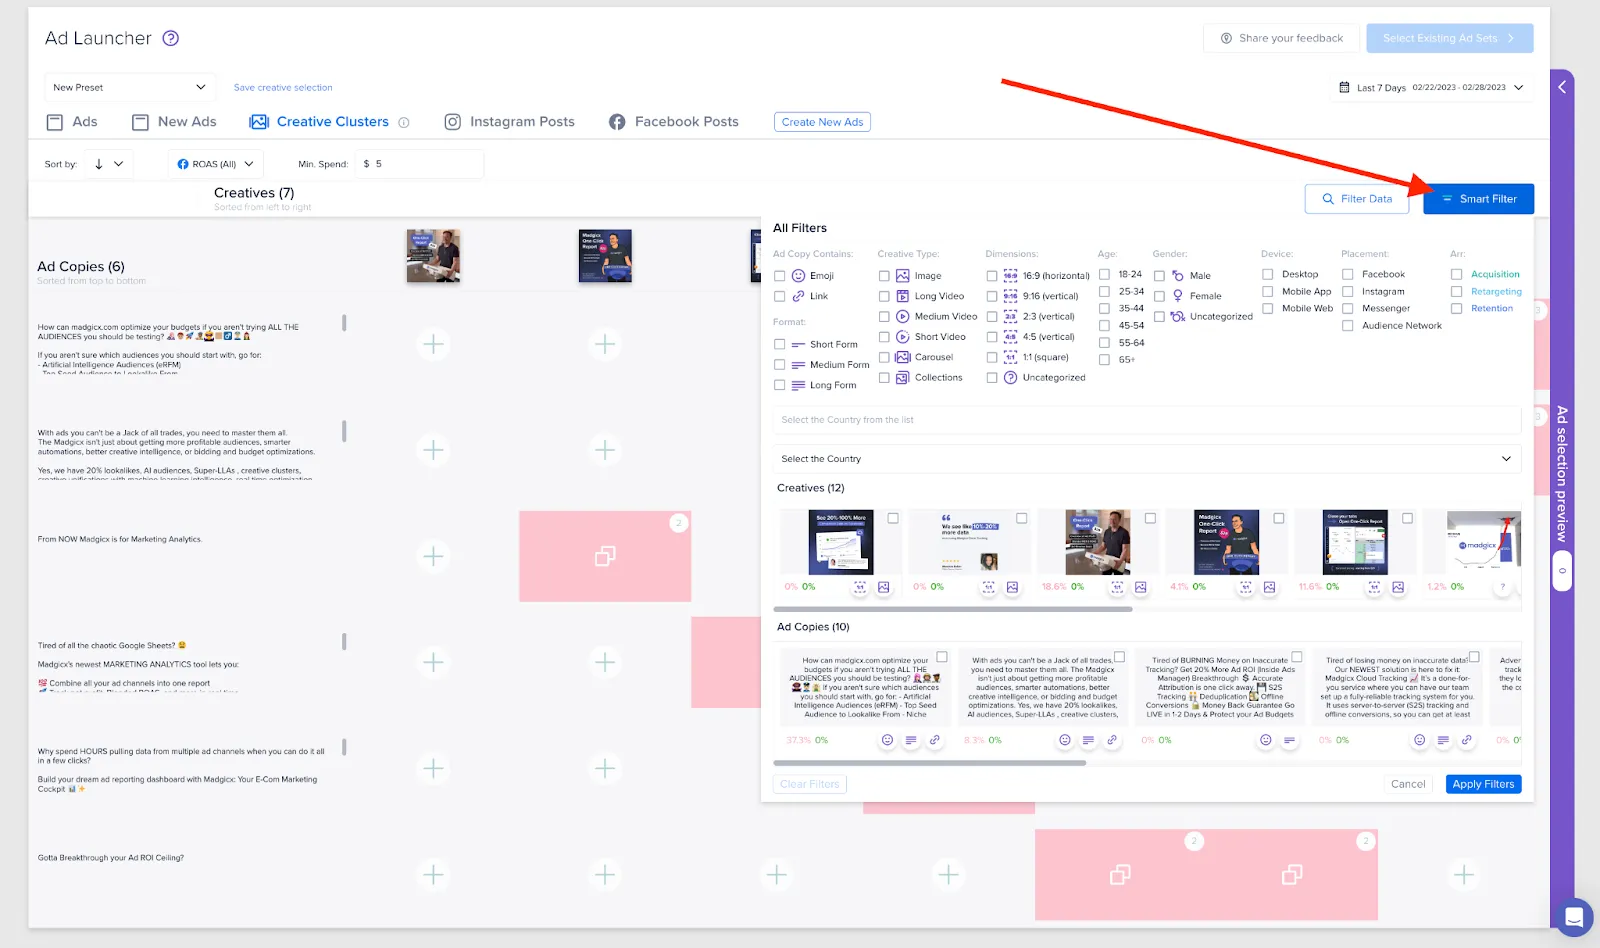
Here you are able to find out which are your best creatives and ad copy by form length, age groups, gender, placement, funnel stage, and country.
NOTES
Facebook does not share data for more than a single age range or gender at a time. This means that if you select more than one age or gender in the Smart Filter, no results will show.
If you want to see ads containing the creative and copy targets ages of 18-24 and 25-34, you will have to first select only the checkbox for 18-24 then uncheck this and check 25-34.
The same goes for genders. If you want to see all genders, leave everything unchecked. If you want to see performance for males only, check only this parameter.
Once you click Apply Filters, you'll see the data on the audience and creative types you're interested in.
With the resulting ad-copy and creative performance visualization, you can immediately combine the top creatives with the best copies to create the next best ad tailored to a specific audience.
But that’s not all Ad Launcher can do.
🏗️ Create data-driven ads from scratch
You can create and launch brand new ads from Ad Launcher using data about your previous copy and creatives to assess what worked. Use this data to guide decisions about the new ads you create, taking inspiration from what worked and even incorporating the same elements.
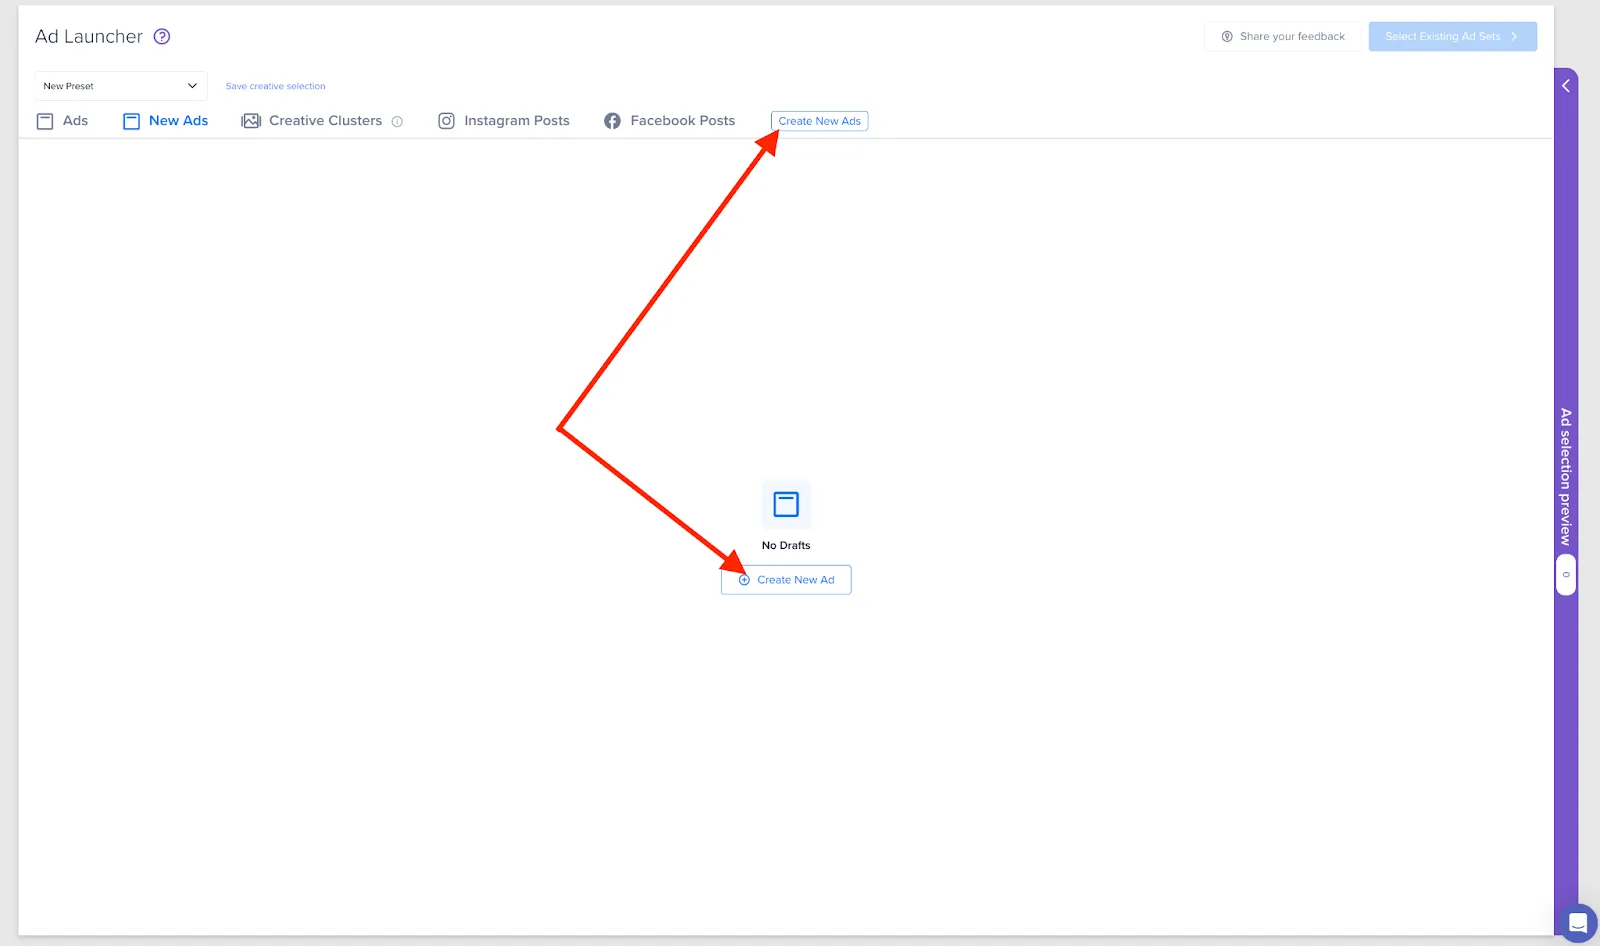
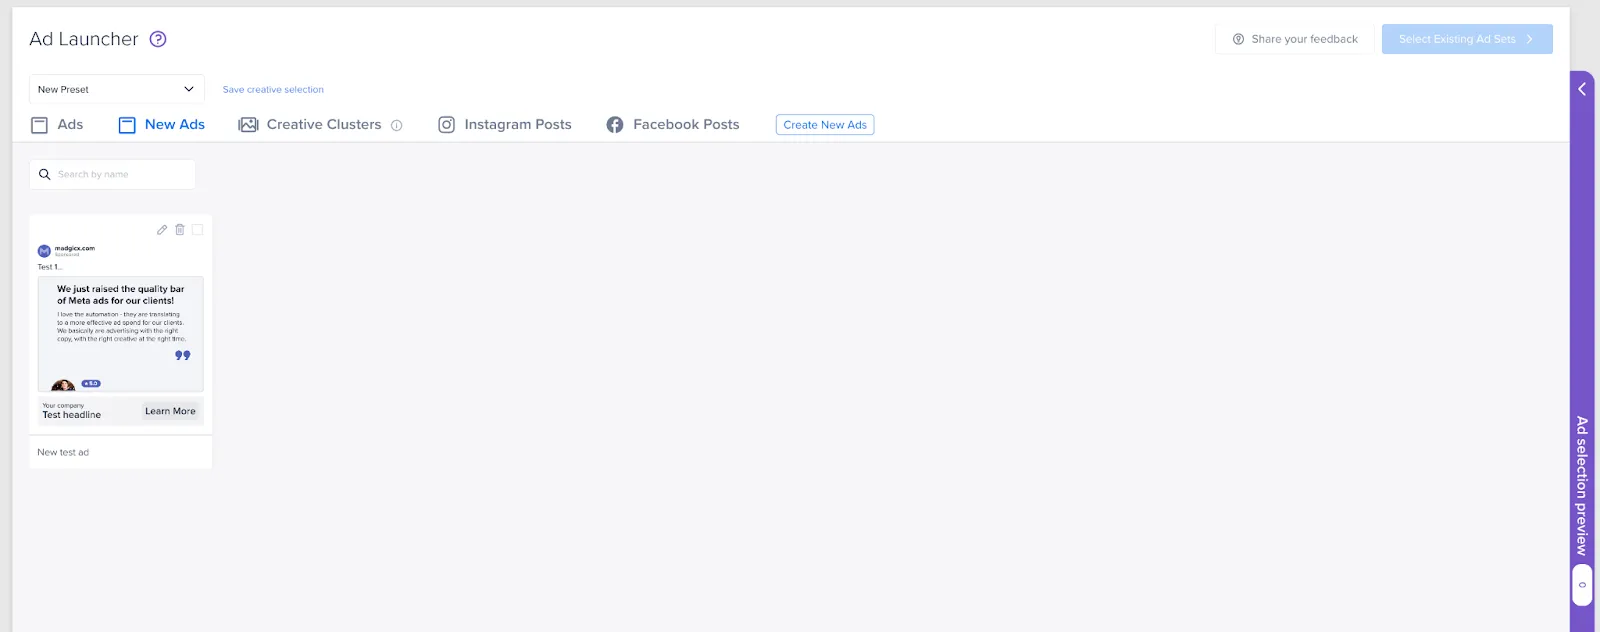
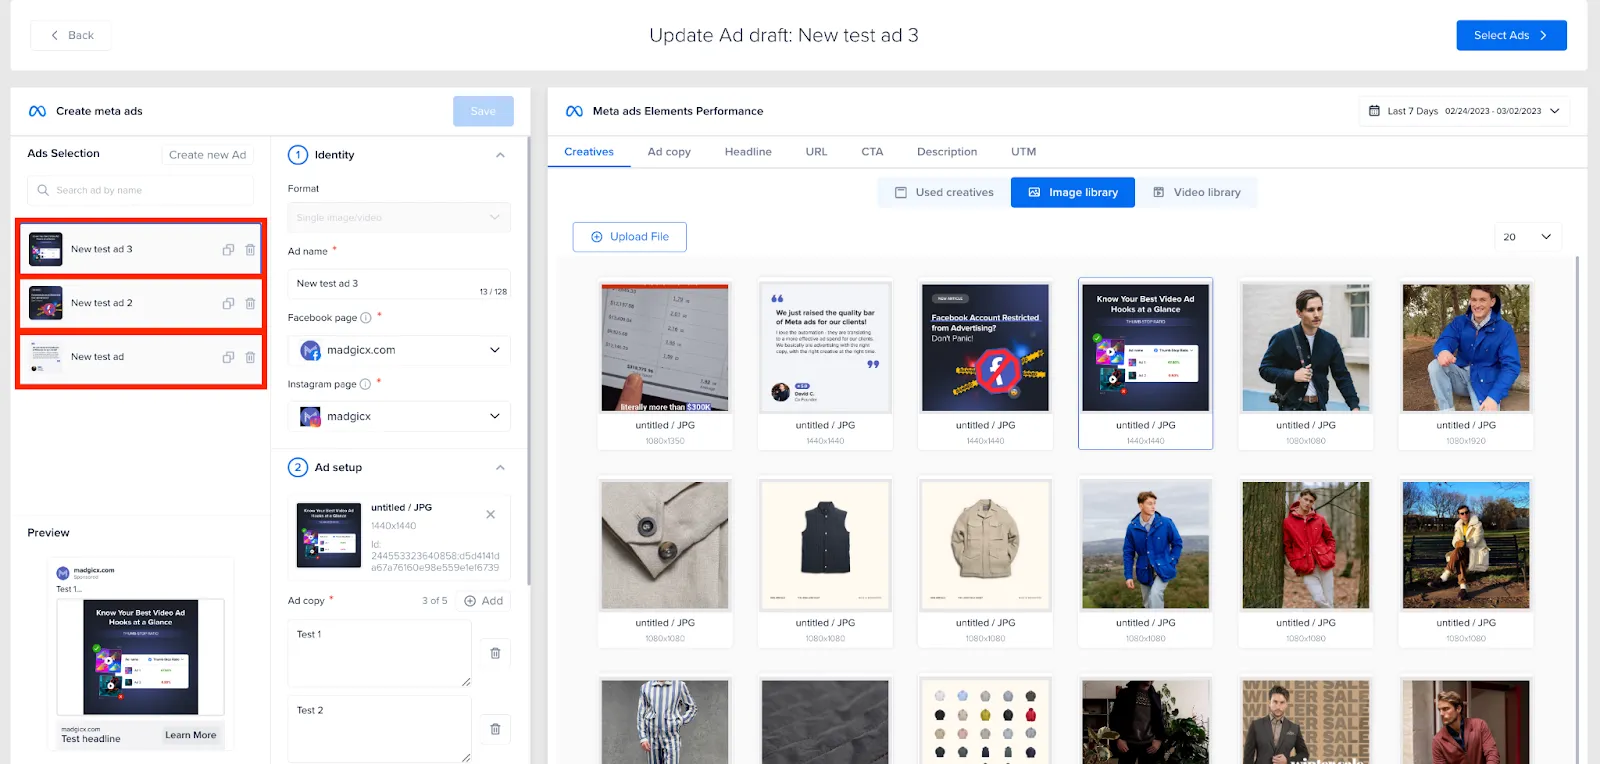
If you haven’t yet created any ads, none will appear in the “New Ads” tab. Instead, you will be prompted to create a new ad. You can also create a new ad at any time from the Ad Launcher by clicking the “Create New Ads” button in the top bar.
From here, you will be redirected to choose a creative for your ad. You can choose one of your videos and images from your existing library (ones you’ve already uploaded to Meta Ads Manager) and you can see the ones you’ve already used in ads before.
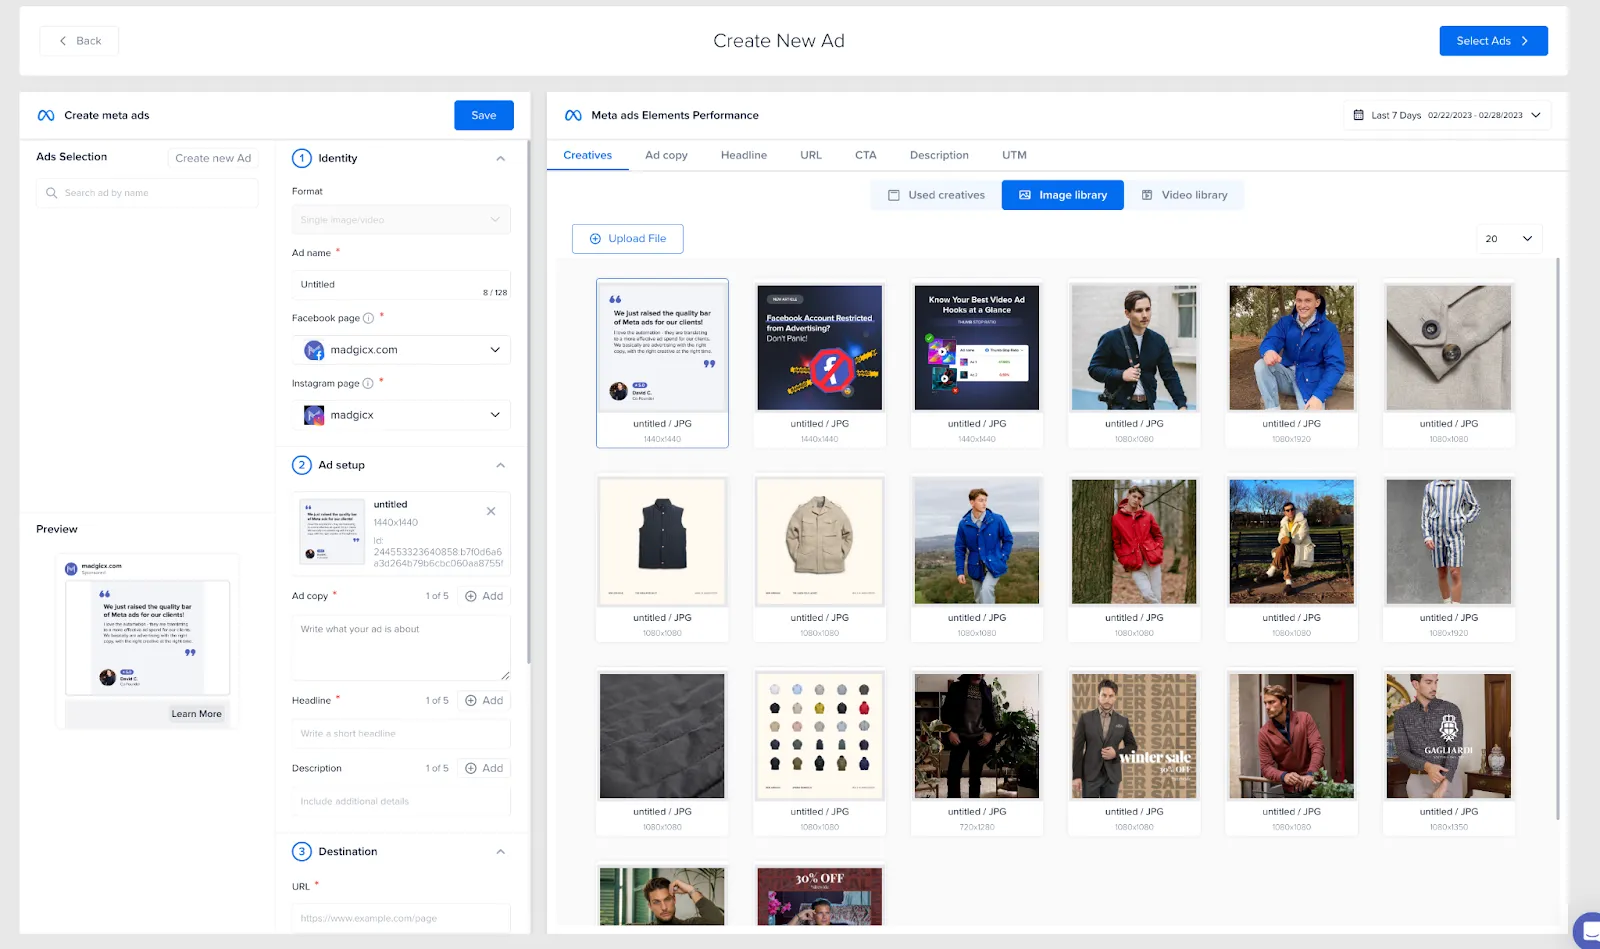
The creatives and other components that you choose can be uploaded as ads through the Meta Ads Manager.
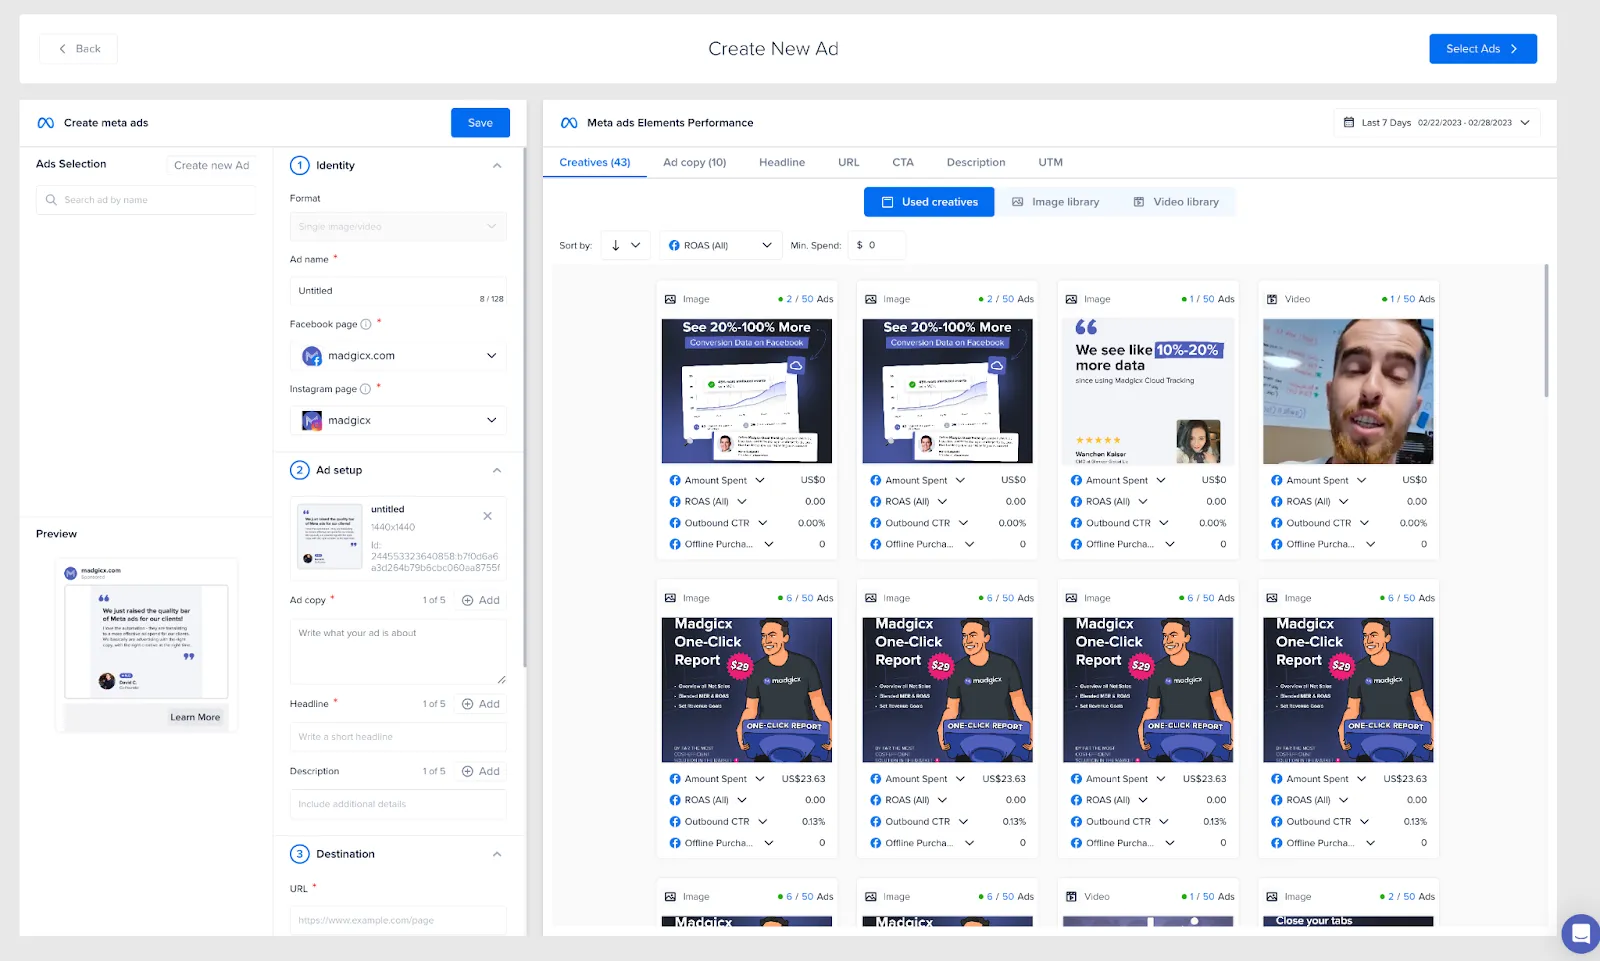
In the “Used creatives” tab, you can see the stats for the creatives’ performance and how many ads they are used in.
If you want to upload a new creative (video or image), click the “Upload File” button above your creative library.
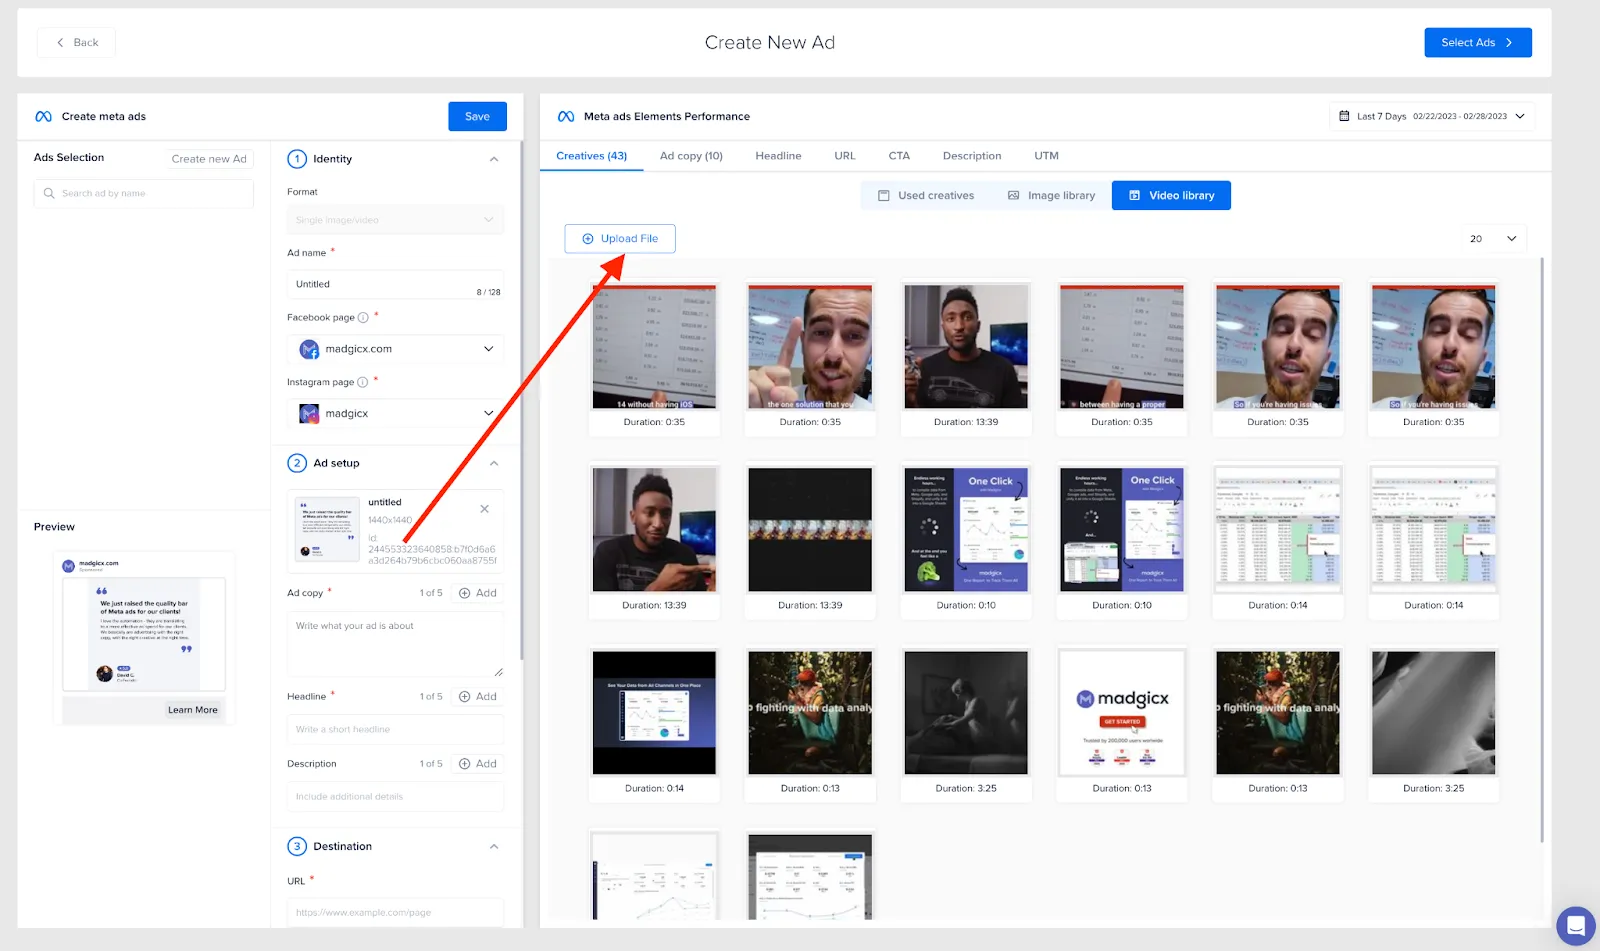
The maximum file size for images is 8 MB and the maximum video file size is 4 GB. For videos, Meta usually requires some time to process them, so you’ll need to wait a few minutes for this to complete before being able to finalize your ad.
Once you have selected a creative, it will appear in the left bar, and you can move on to selecting or creating your ad copy from scratch.
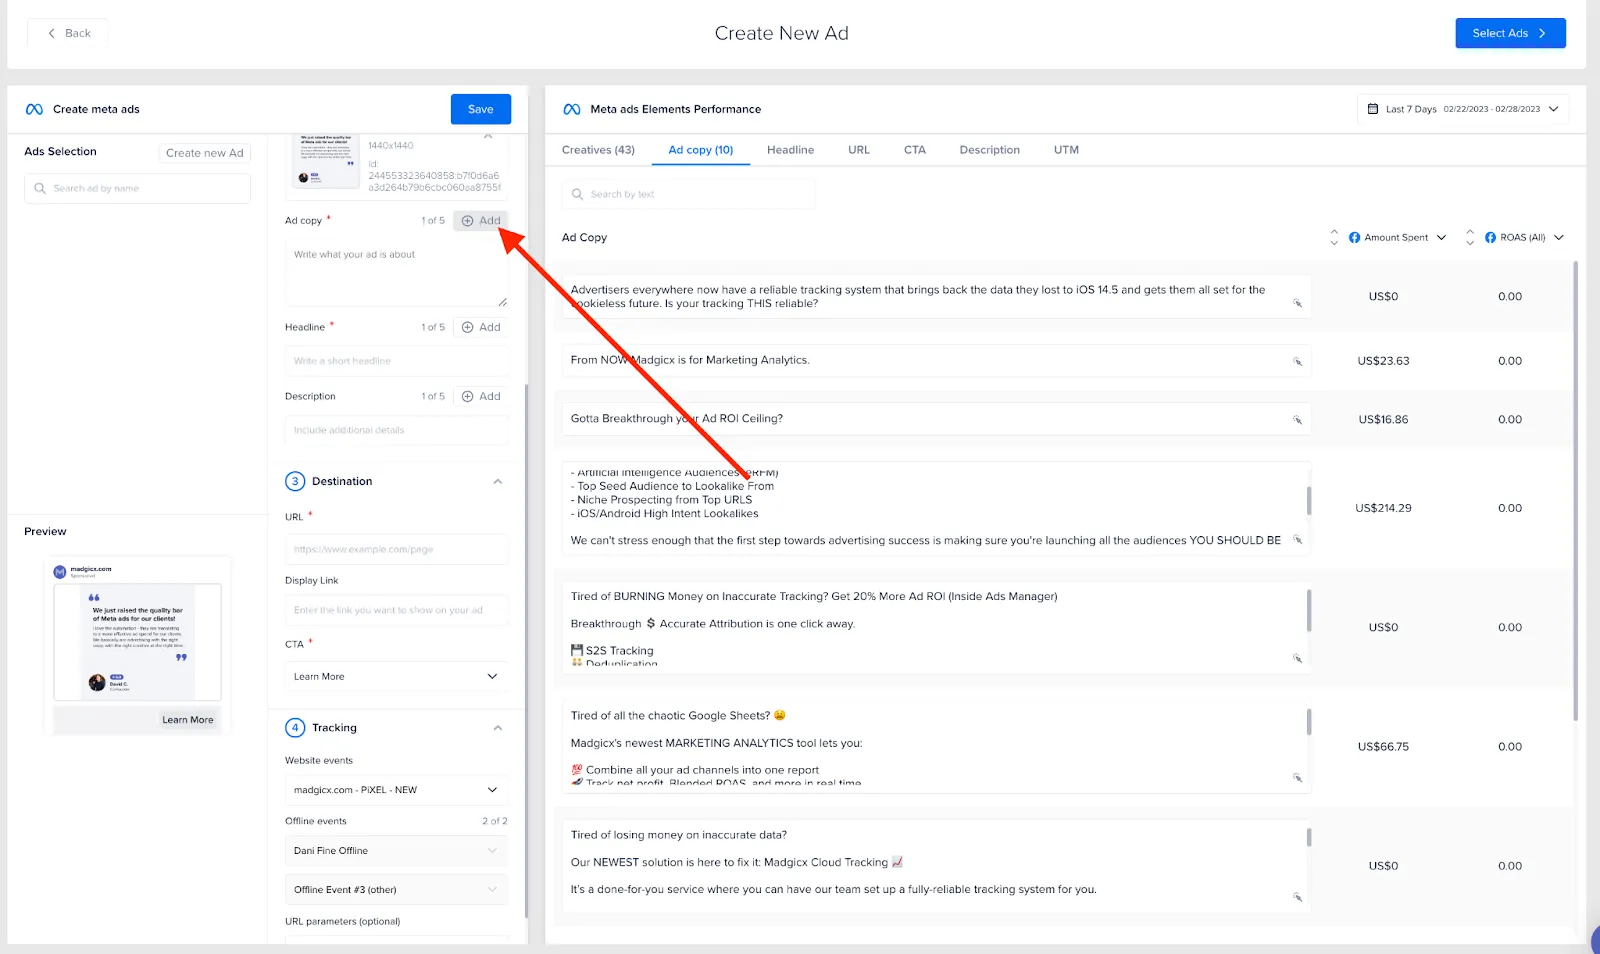
Click on the “Ad Copy” field or navigate using the tabs in the top bar. You will be shown all of your ad copy over your selected timeframe, including how well it performed according to KPIs that you can alter (right columns).

Here you can reuse your previous copy, make changes to it, or create new copy from scratch.
Add different variations of your copy for Meta to test with your audience by clicking the “Add” button above the “Ad copy” field. When you provide variations, Madgicx implements them via Meta’s multi-text options (MTO).
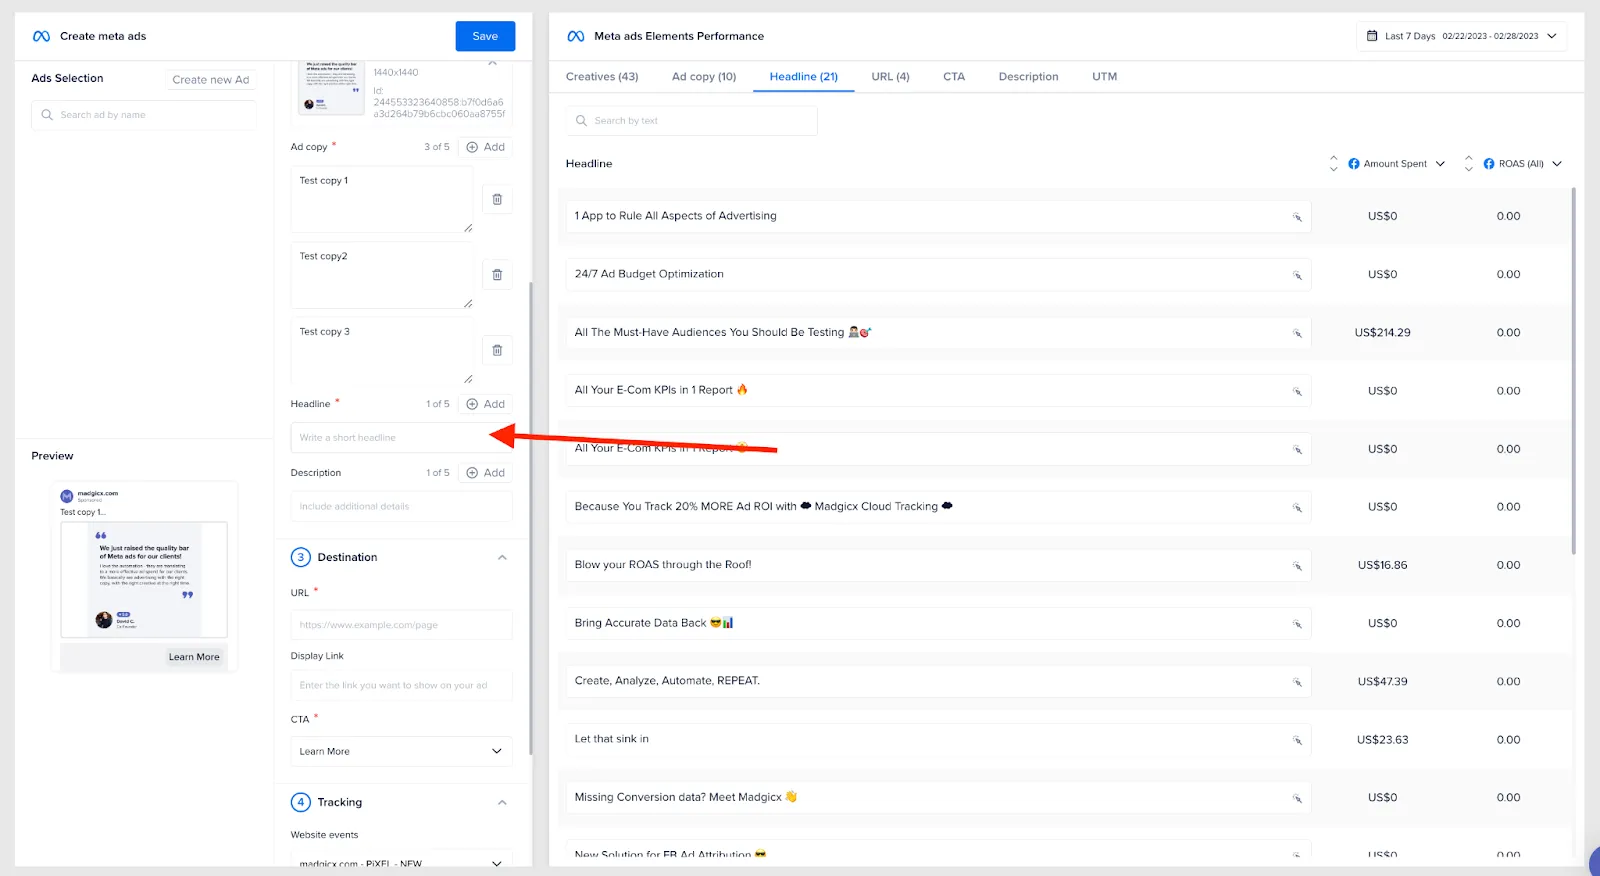
Click on the Headline box, and the window shifts to the headlines you’ve already used with supporting stats. Add your header, and here decide whether you want to add several variants for Facebook to test.
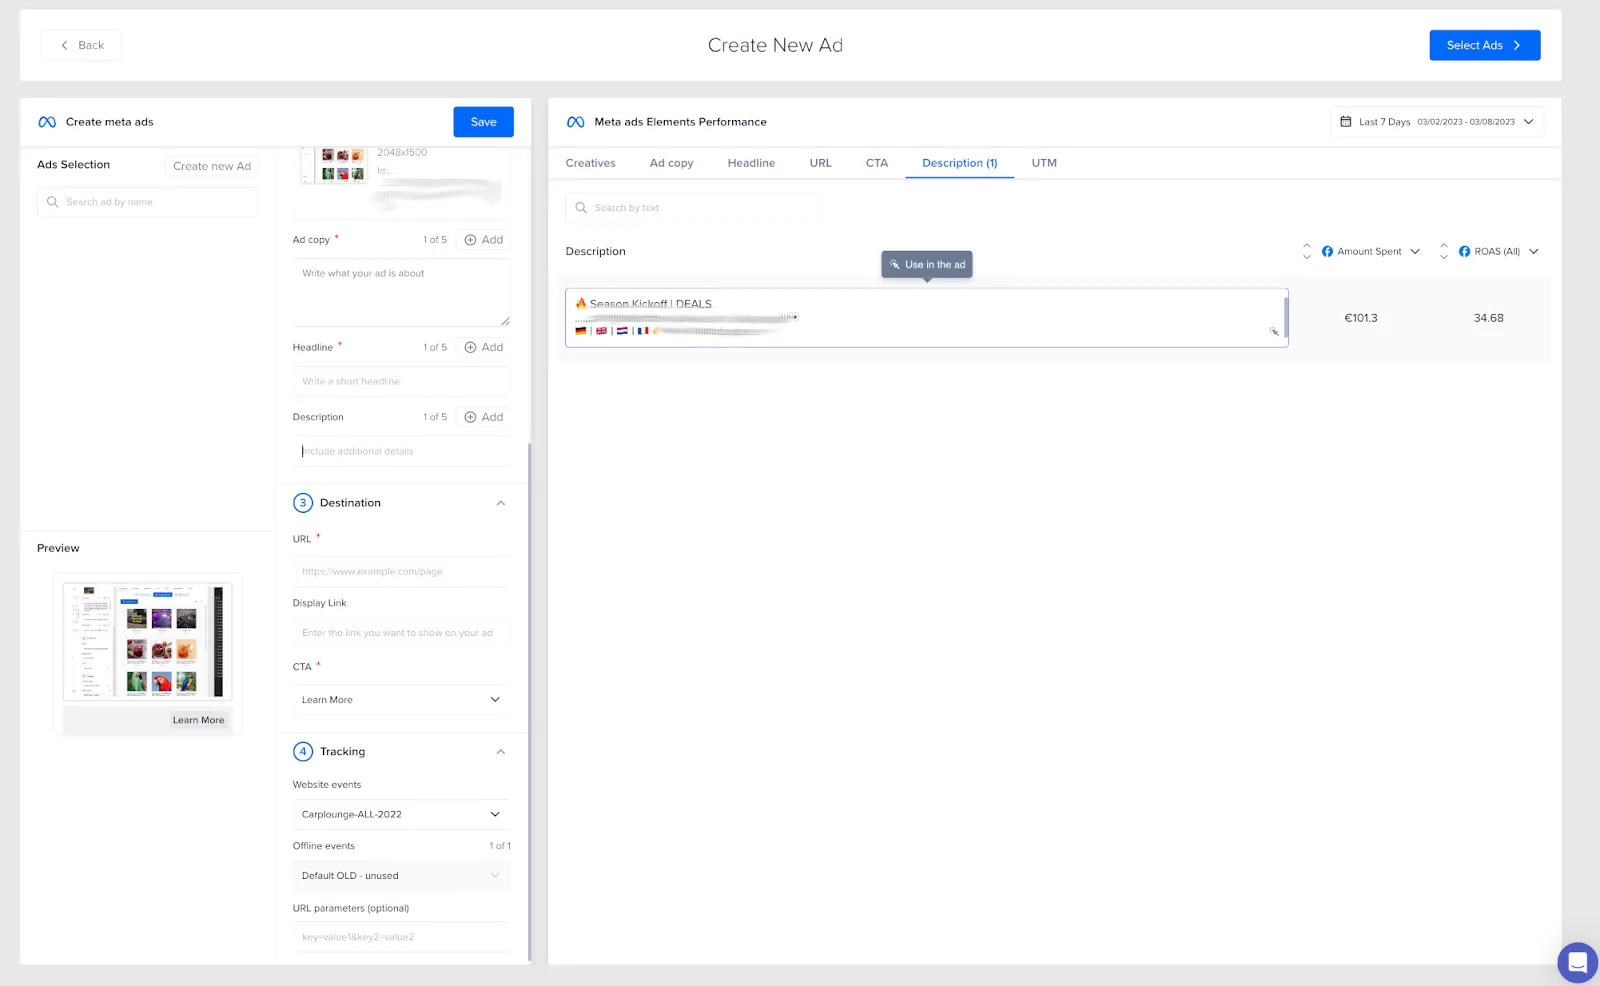
When you include a link in an ad, you have the option to add a description. When your ad appears in the Feed, the description will show dynamically. This means the description will only show in your ad if it's likely to appeal to the person seeing it.
Select which URL destination you want outbound clicks to direct to and select a CTA.

Then add UTMs (URL parameters) to track the effectiveness of your ad.
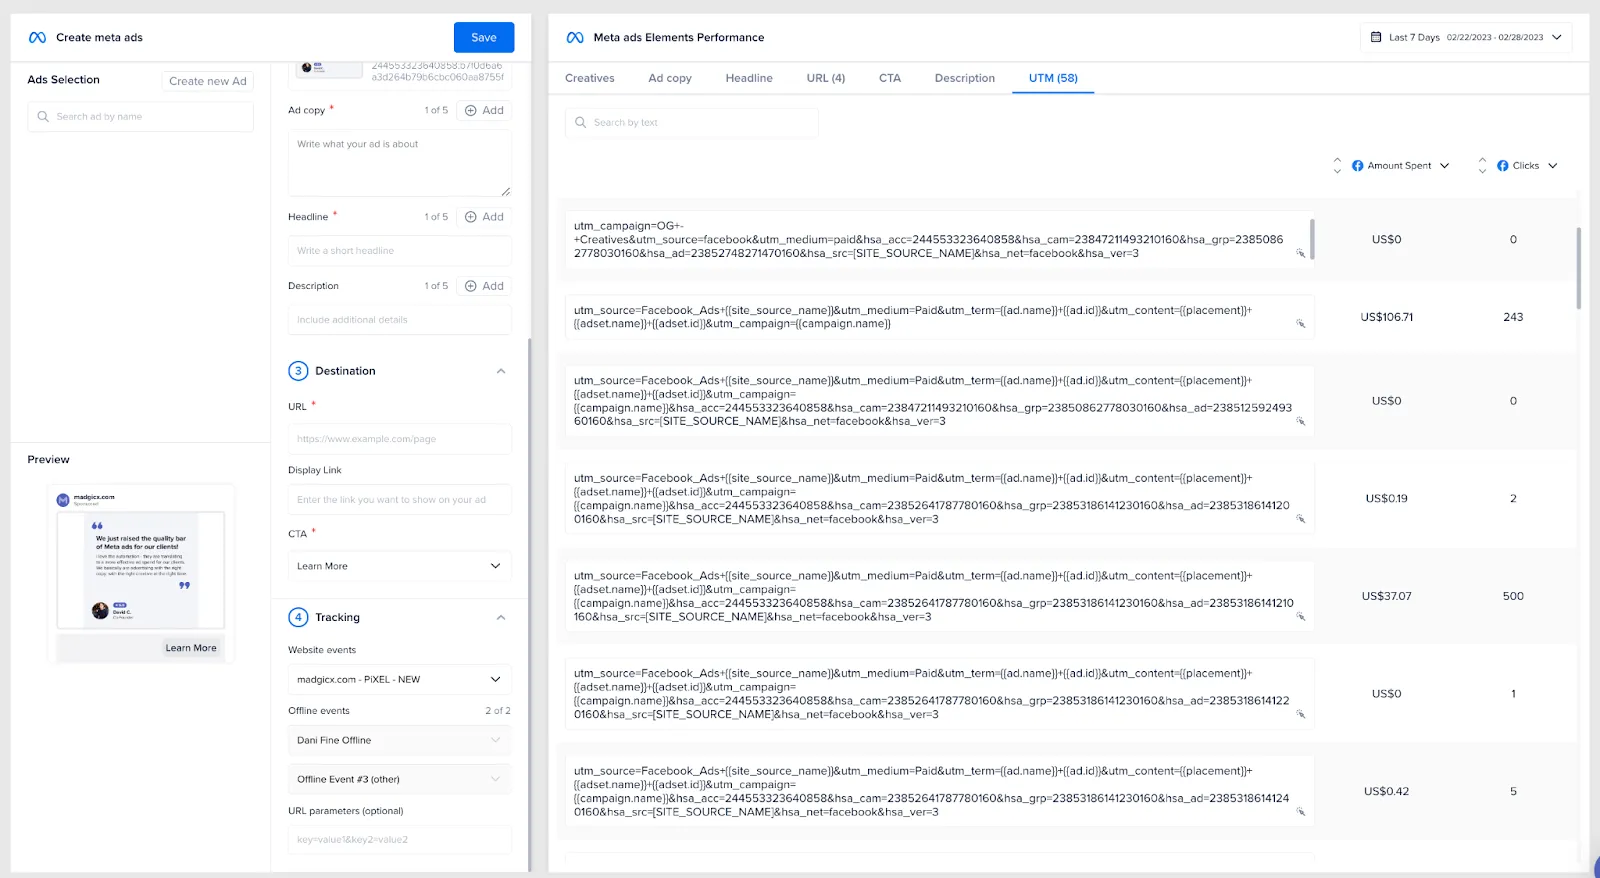
When you are done, click the “Save” button in the left-hand window.
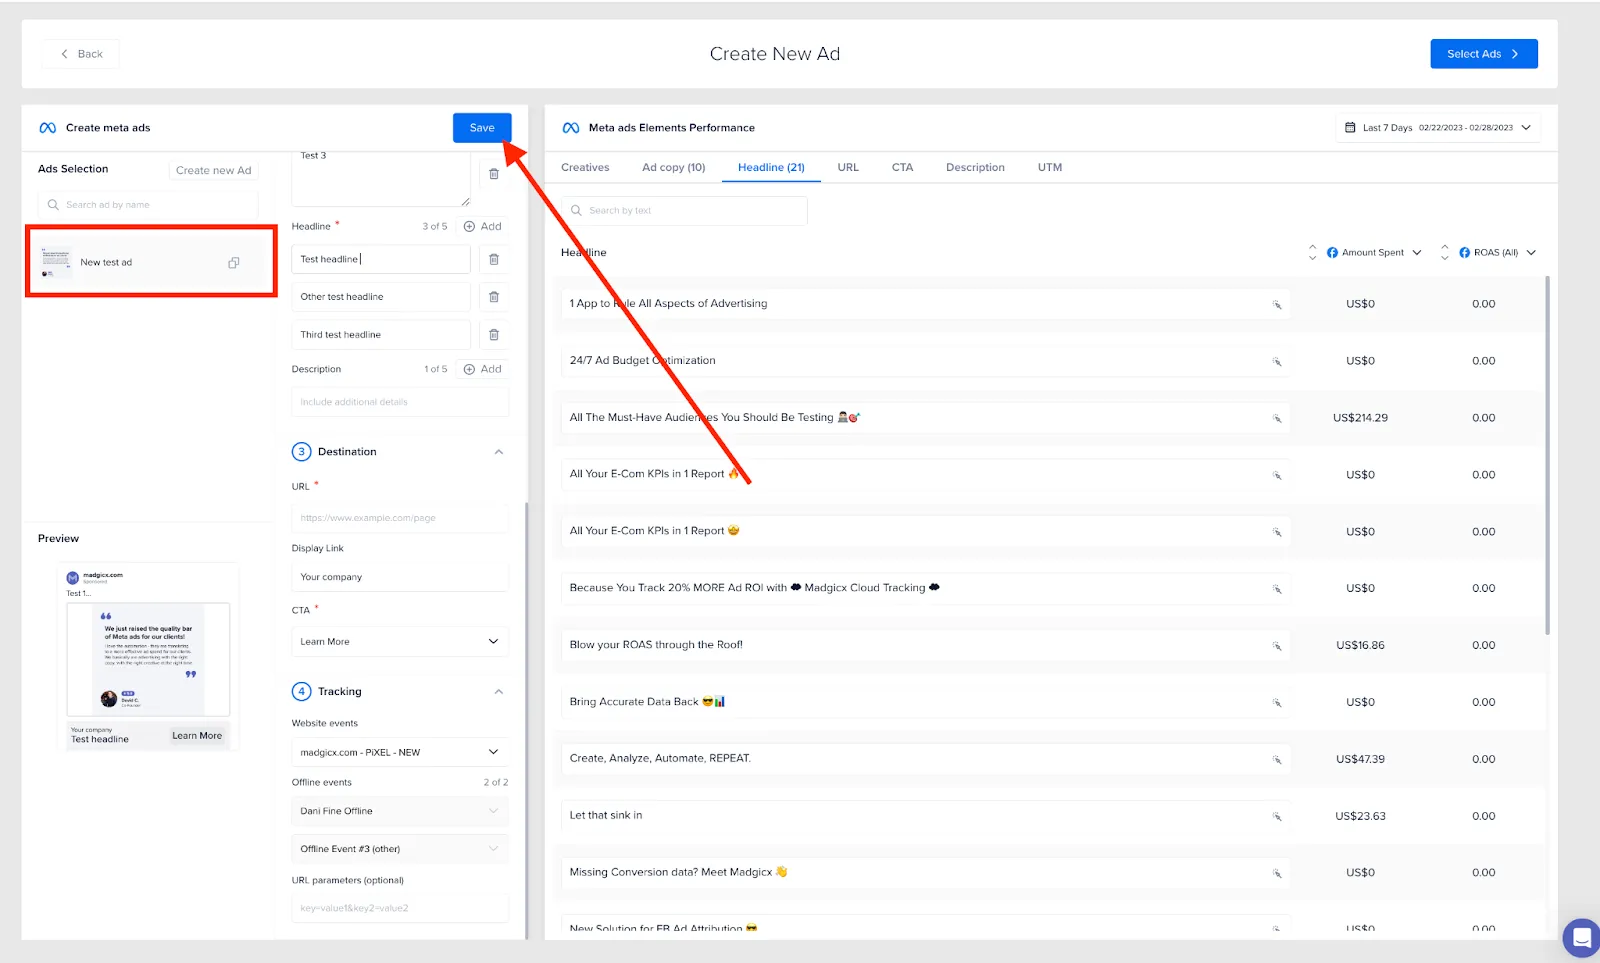
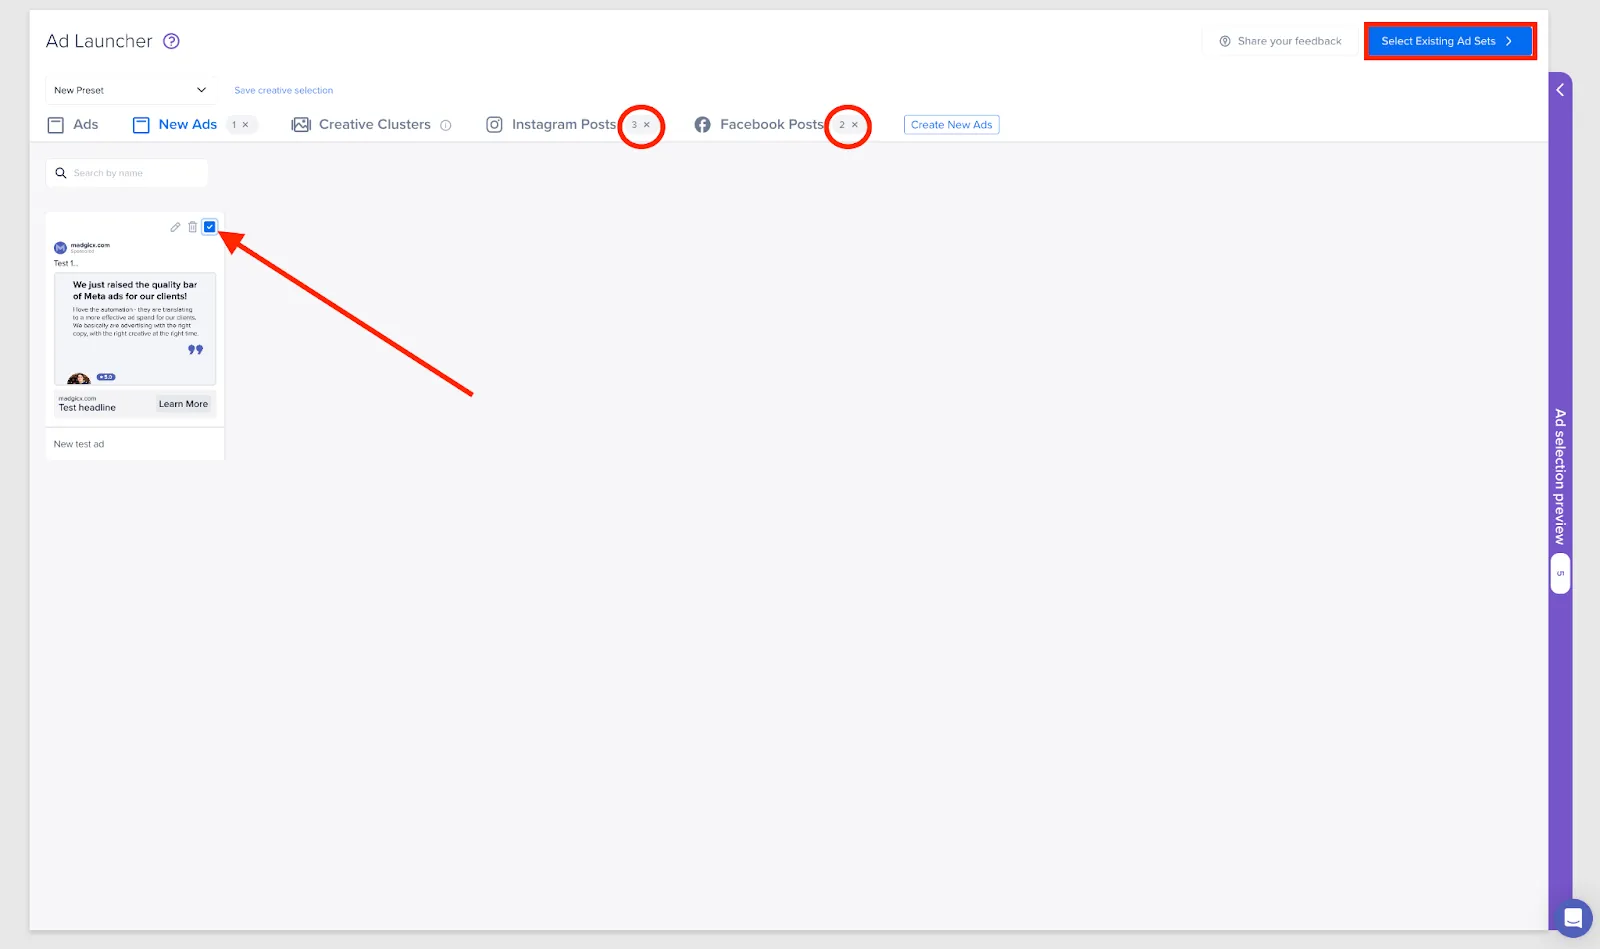
The ad will then appear in the “New Ads” section. Click the checkbox to proceed to select ad sets to apply it to.
If you are unable to click the checkbox, it is because you are missing some fields and see the following prompt.

To fix this, click on the pencil icon to go back to the ad creation tool and add the required field(s).
When you have made your amendments and clicked “Select Ads” you will then be able to make your selection by clicking the checkbox and then the “Select Existing Ad Sets” button in the top-right corner.
If you have selected any ads or Instagram or Facebook posts to make ads from, this will be reflected next to the relevant tabs.
Choose the campaigns you want to launch the ad in. You can also see inside your campaigns by clicking the arrow pointing right and selecting the ad sets you want to insert the ad into.
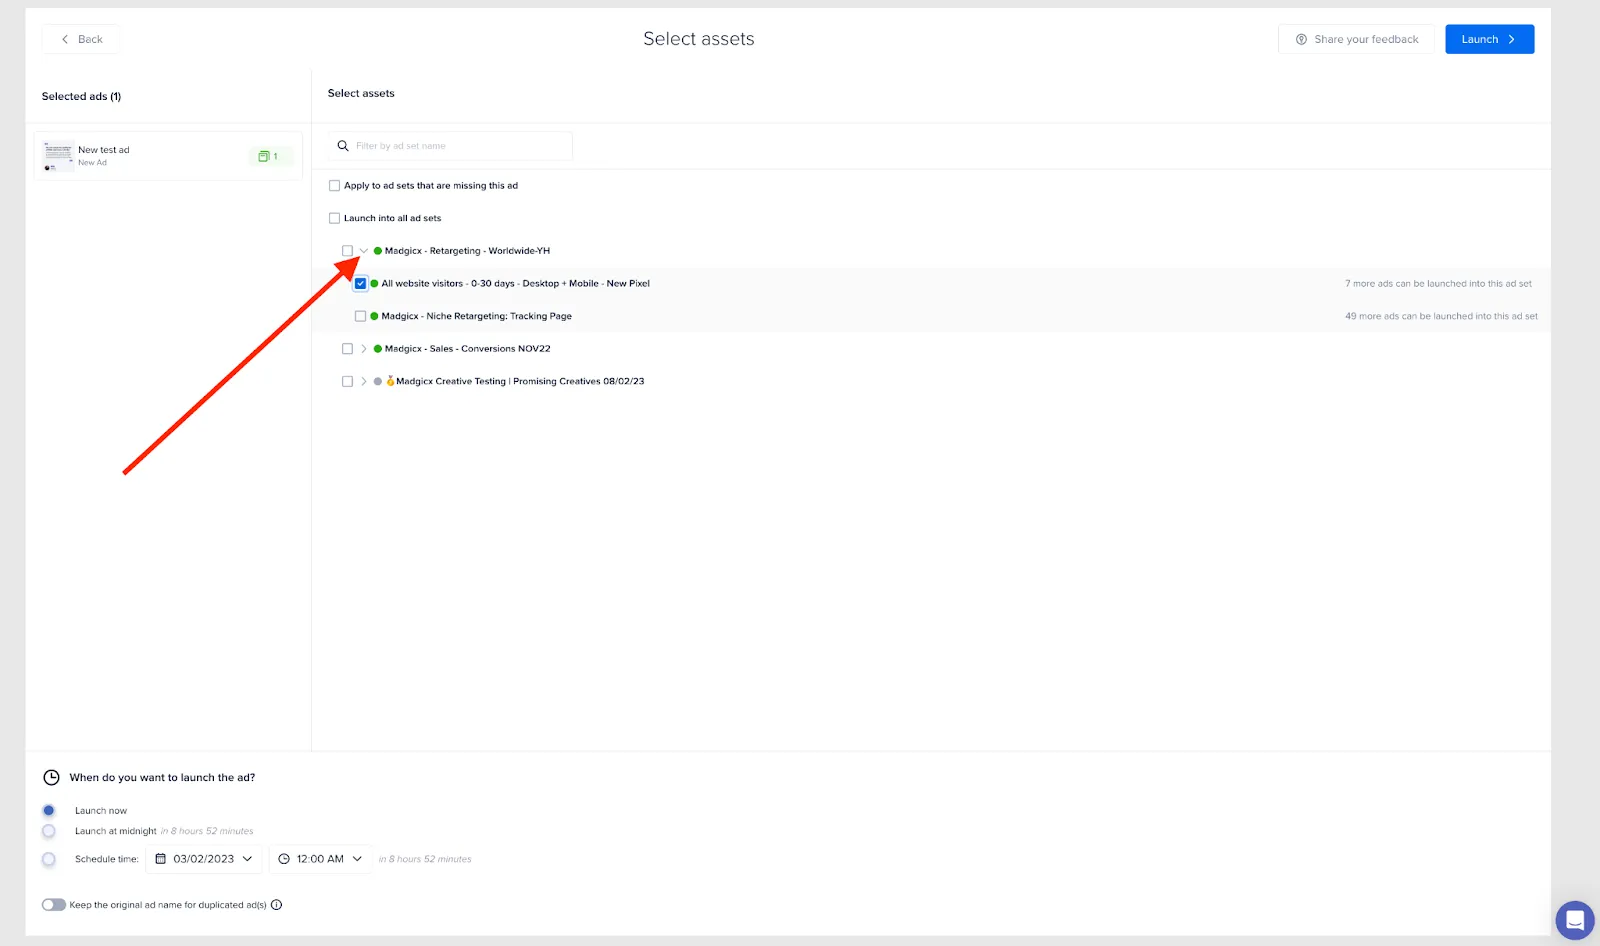
Make your selection by clicking the check box, decide when you want to launch the ad, and then click the “Launch” button in the top-right corner.
📈 Scale your creatives
You can inspect your existing ads and their creatives from the “Ads” tab. Here you can see the visual and textual aspects of ads, along with performance stats. Here you will see creatives you may have used across several ads with average performance stats across their usage.
Use this information to see what works best and scale these creatives and ad copy.
If you want to take a closer look at the ad, click on the eye icon in the bottom right of the ad to open up a popup.

From here, you can easily compare how your ads have been performing to sort the winners from the losers by quickly defining the performance criteria. Set a minimum spend to see which ads have had enough budget to assess their performance.
The view demonstrated in the screenshot above shows how the ads look on Facebook because it's one of the most popular placements. But these ads can be launched on either Instagram or Facebook; you define the placement in the ad-set settings (next step when you have chosen all of your ads).
With Ad Launcher, you can (and should!) leverage ads that got likes and comments as social proof. If you have ads with comments and likes, take advantage of this social proof by launching new ads with the same post ID.
Also, creating an authentic ad by choosing one of your Facebook or Instagram posts that has social proof helps to build trust between you and your audience. Such posts which garnered interaction are generally a good benchmark for what will resonate with your audience when advertising.
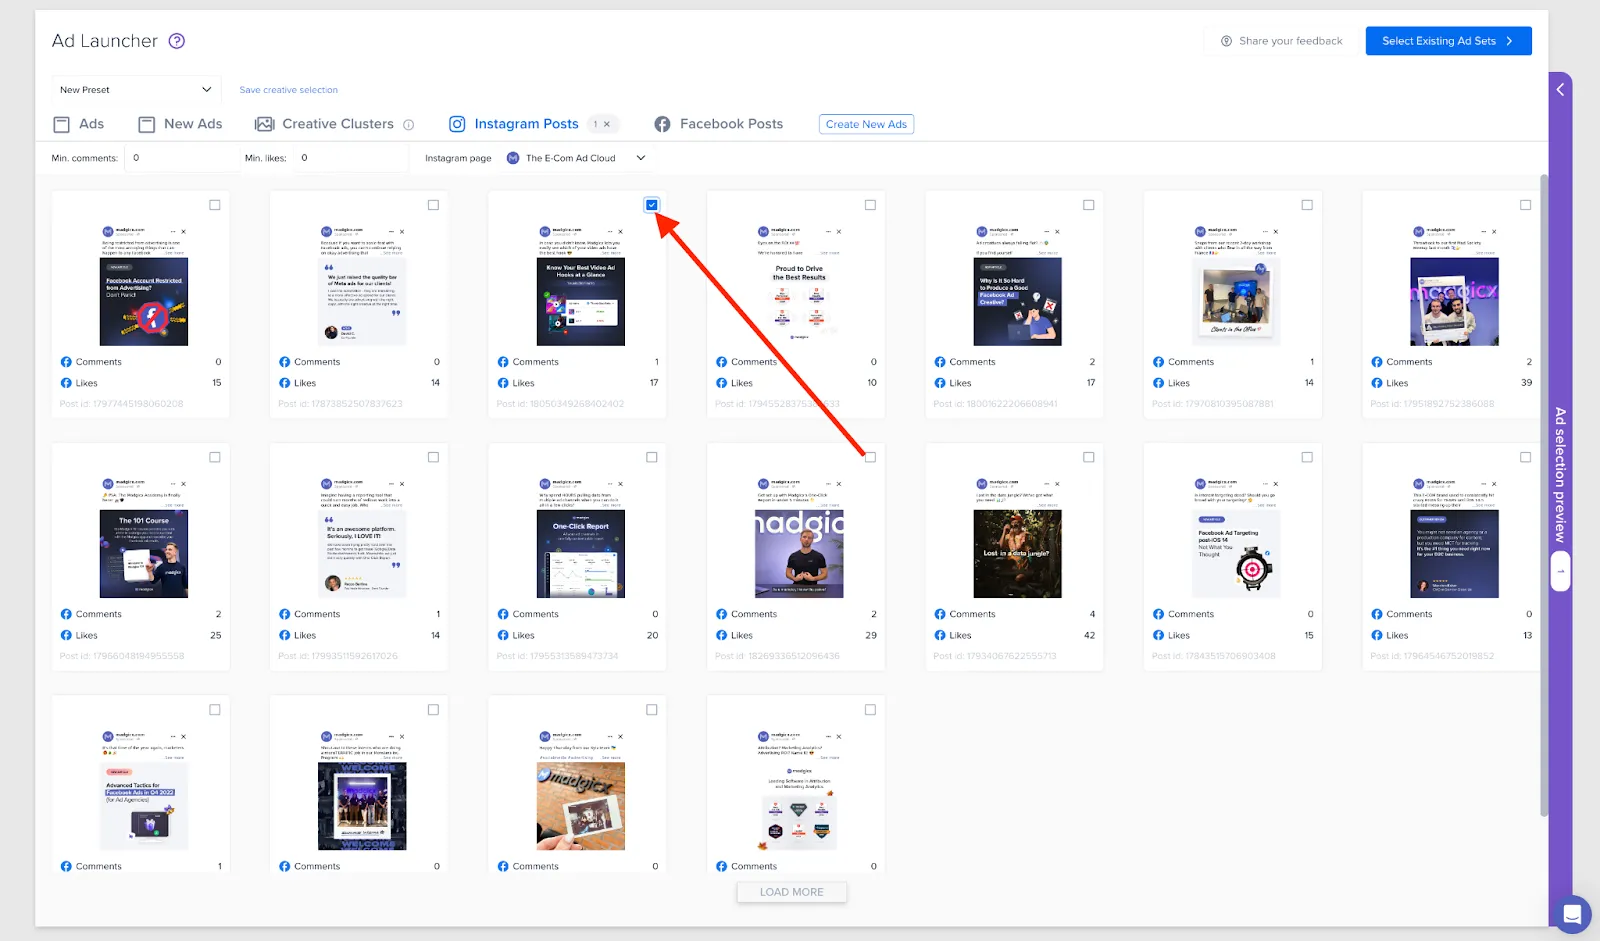
Head to the “Instagram Posts” or “Facebook Posts” tab at the top to see how your social media posts have been performing. The view shows you how many comments and likes you have, shown in order of recency.
Filter the posts that you want to see in the view by the number of comments and likes and the Instagram/Facebook Page (if you have several connected to Madgicx) you want to see posts for.

Select the posts that you want to use in your next ads by clicking the checkbox in the top right of each post. Select as many as you wish to play around with (you can remove unwanted posts later).
These posts will then be added to your “Ad selection preview”. You can see this preview and save presets by clicking the “Ad Picker” (purple bar) on the right-hand side of your screen.
Madgicx’s multi-selection Ad Picker allows you to launch several ads into many ad sets or campaigns, saving you time.
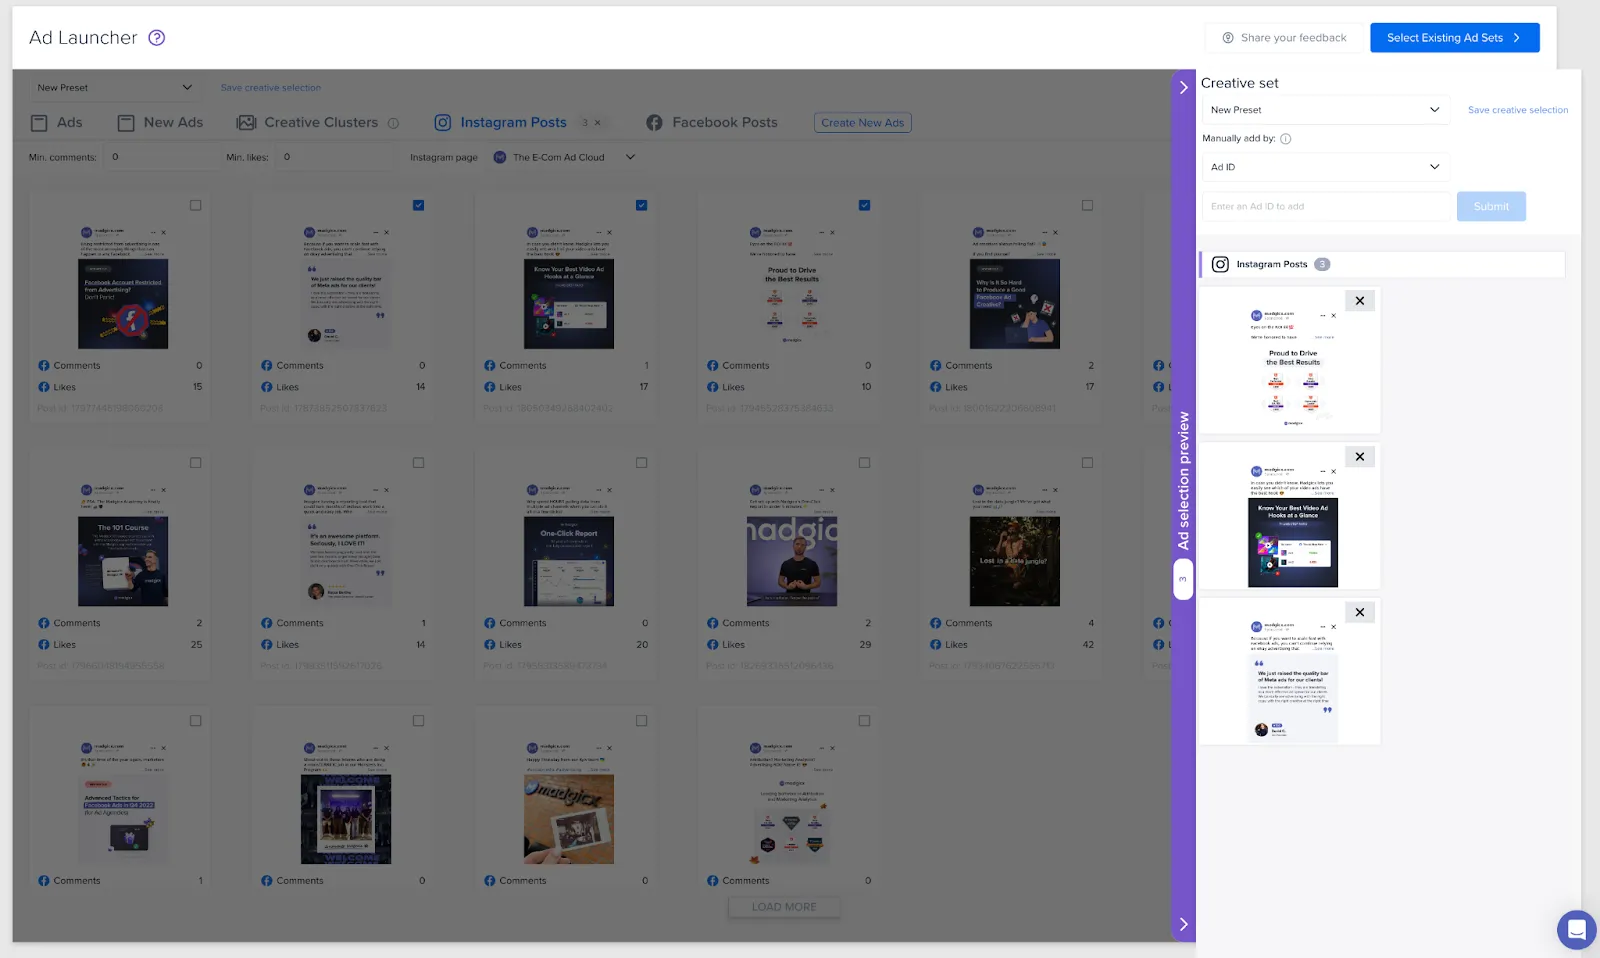
From the Ad Picker, you can also find the ad or post you want to launch manually using the post or ad IDs. This feature is for when you know the ID of the ad/post but can’t find it easily in the list.
🧪 Test your creatives
So you can test variations of your ad copy and creatives with Meta using DCO and MTO, but you don’t have much control over the testing. This is because Meta decides what copy goes with which creative and which variants get budget. This is great for beginners, but more advanced users need more definitive answers as to what works.
Madgicx offers more flexible testing of variations of your creatives in just a few clicks. In short, you can make an ad, then duplicate it and make slight changes to test.
Let’s run through how to do this.
So you’ve created your new ad but you want to test different creatives with your copy. Instead of creating new ads from scratch, with Madgicx Ad Launcher, you can simply duplicate the ad you’ve made and switch the creative.
To duplicate your new ad, hit the copy icon as shown below.
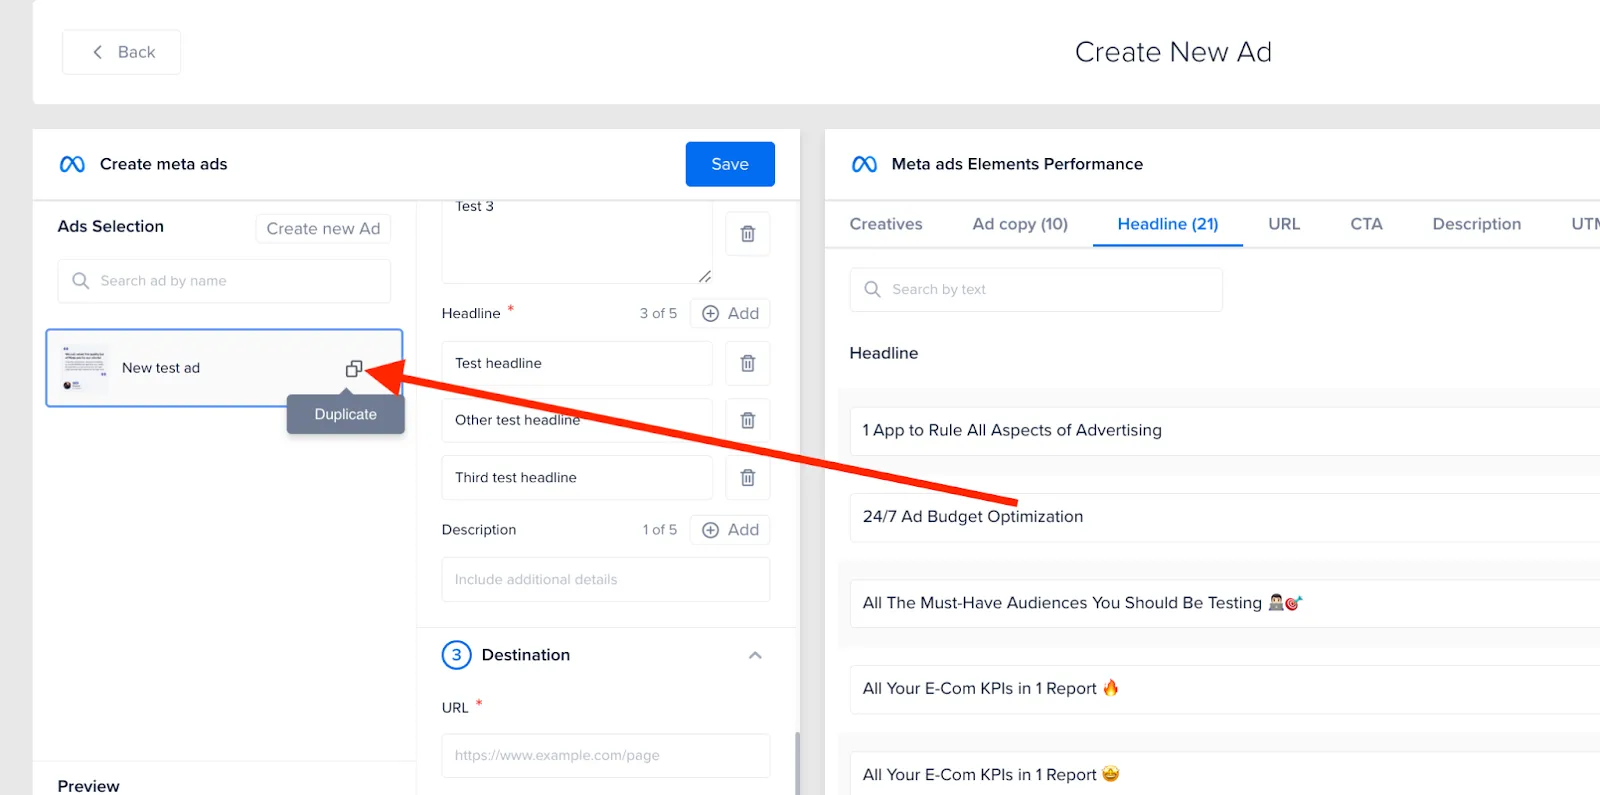
Test your different creatives by duplicating the ads and giving them different names (and assigning different creatives) but keeping the copy the same.
This will allow you to see which creatives perform best with your ad copy. If you know what ad copy works best, you can add just one version and run a full A/B test by just changing the creative in each ad.
All the best with your creative testing!
Difference with Facebook Ads Manager
Madgicx Ad Launcher makes you a better media buyer because it gives you greater insight into what works in your ads and allows data-driven ad creation where you can quickly launch, test, and scale right from Madgicx.
Can I launch ads from the Ad Launcher into new ad sets?
You can only launch ads into existing ad sets using the Ad Launcher. To launch a new ad set, you must create one using the Audience Launcher.
Why are the ads I’m looking for not showing up on the Ad Launcher?
Try these steps to resolve the issue:
- Start by selecting a longer time frame in the top right corner of the Ad Launcher
- Madgicx will only display campaigns, ad sets, and ads that have at least one impression; if your ads do not have impressions, you can find them by searching for the ad ID within Ad Launcher.
If you can’t resolve the issue, contact our support team via our chat support.
How do I white-label the names of my campaigns, ad sets, audiences, and ads?
To enable white-labeling and change the name stamp that appears on all assets you create with Madgicx, head to Settings.
Click on the drop-down menu of the account you want to edit, and find “Name Stamp”. Click on the pencil icon 📝 and change the name from Madgicx to any name you want.
This name will automatically be applied to all asset names that you create through Madgicx.
Read detailed instructions on how to white label your assets
What happens to my likes and comments when launching existing ads with Madgicx?
When launching existing ads, Madgicx will preserve the existing comments and reactions to your ads. If you have an ad running with multiple IDs, we'll use the ad ID with the most reactions and comments.
This tactic is extremely valuable since ads with many likes and comments help build rapport and social proof for your business.
Can we launch Advantage+ Shopping campaigns from the Ad Launcher in Madgicx?
Currently, we don’t support launching Advantage+ Shopping campaigns from Madgicx. We recommend submitting a feature request and checking our release notes.
Related lessons

Didn't find what you were looking for?
Try our FAQ
Check out the answers to our most frequently asked questions. If you can’t find the answer there, you’ll be able to contact our support team.