How to use Madgicx automation tactics
With Madgicx automation tactics, you can set your ad account to autopilot and:
- Launch pre-set automation tactics in a few clicks to optimize your budget
- Use a well-honed framework created by pro media buyers
- Get recommended values for performance triggers based on your account’s data
Madgicx offers you seven prebuilt options to choose from and takes data from your ad account to suggest performance levels for when automation tactics trigger.
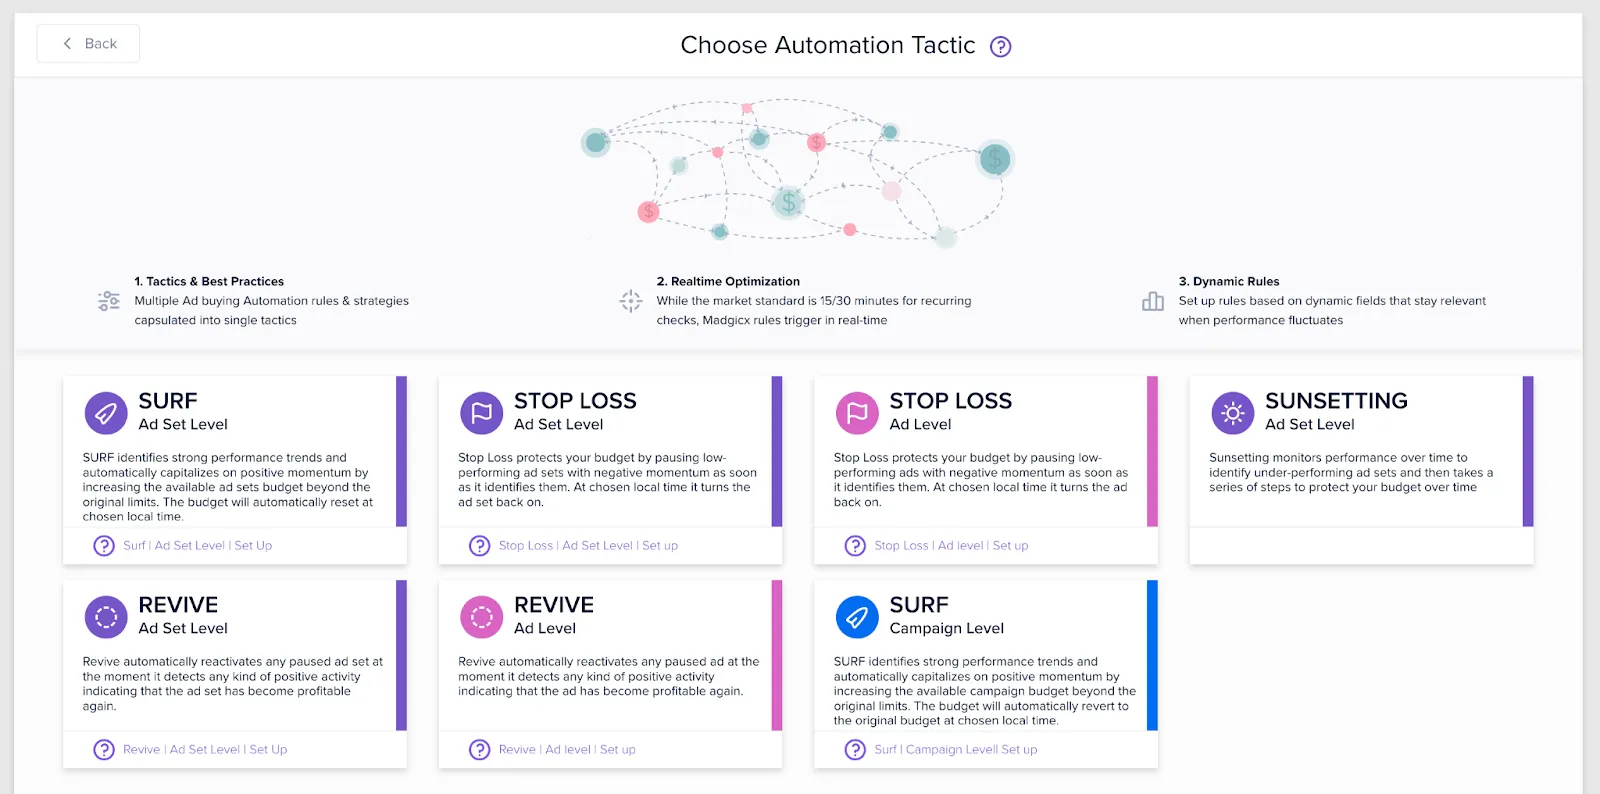
Madgicx automation tactics save you time and money by putting ad account management on autopilot 24/7.
With automation tactics, you can get back to perfecting your next ad campaigns and creatives to drive more conversions, while the automation tactics handle the day-to-day budget management.
We have pre-built and ready-to-deploy templates for different levels of your ad account:
- Ad level (pink)
- Ad-set level (purple)
- Campaign level (blue)
There are 4 tactic templates on offer that work on different levels for your ad account (ad/ad set/campaign: see above legend).
- Revive: bring back ad sets and ads that — due to attribution delays — did better than you initially thought
- Stop Loss: protect your budget from overspending by pausing underperforming ad sets and ads
- Sunsetting: shut off underperforming ads or ad sets for good, rather than on a daily level
- Surf: scale your performing ad sets and campaigns when they are performing above average
Stop Loss and Surf are tactics that are triggered based on your performance of today and restart at midnight. Revive triggers depending on performance at any time and Sunsetting occurs gradually over time, reducing the budget over several days before finally pausing the ad set when the performance drops to the level you specify.
Important: all the Automation Tactics are meant to be applied to acquisition assets. You will need to set up custom automations for other parts of your funnel.
Let’s run through the different tactics and show you how to set them up.
Stop wasting budgets 🛑
One of the most important parts of Facebook advertising is knowing when an ad is underperforming and turning it off. With Madgicx’s automation tactics, you no longer need to constantly monitor ad performance day and night, turning them on and off.
First, select whether you want the stop loss to work on the ad or ad-set level. Then define the event that you want the automation to work for. The event selection offered to you is based on your account type. You should pick your event based on your objective. Your choice will influence the performance metrics Madgicx suggests.
Learn about different ad account types and the main success metrics for each
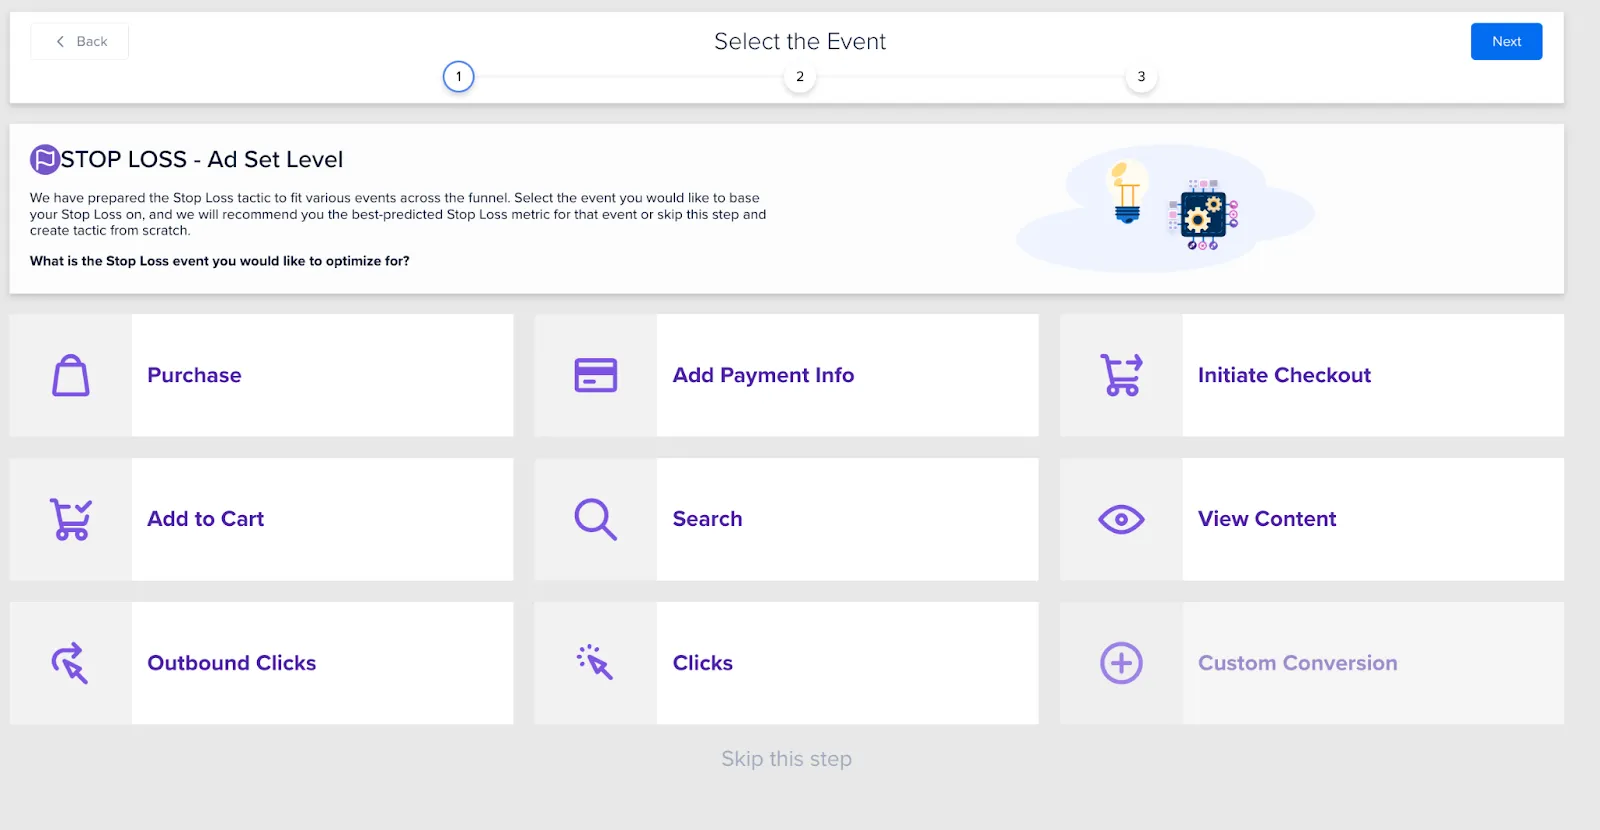
In our example, we will select the ad set level and our event as “Purchase”. We are then prompted to enter values for how much we are prepared to spend on an ad set to get one purchase. As another condition to trigger the automation, Madgicx recommends a ROAS value below which the stop loss will trigger.
The figures that Madgicx recommends are based on your account data, but feel free to alter them.
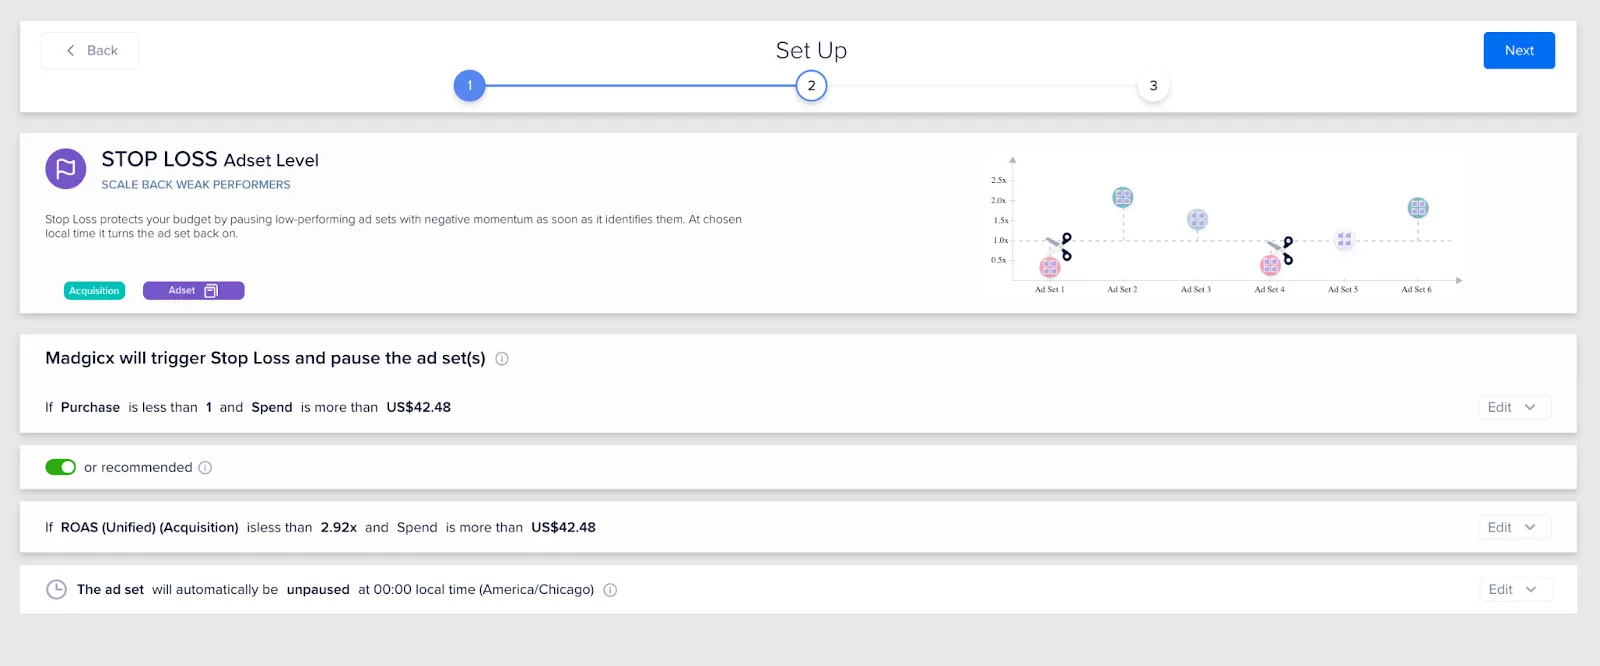
As we can see from the screenshot above: Madgicx recommends that if our ad spend costs us more than $42.48 and we don’t get any purchases (less than 1 = 0), then we will pause the ad for the rest of the day. In addition, if we spend more than $42.48 and our ROAS is less than 2.92, the ad set will also stop. The second condition (recommended) is toggled on by default and — because it’s an “OR” condition — it will trigger whether the first condition is met or not,
Madgicx offers the extra condition to run so that if a purchase is made, but then the ad goes on to run at a loss, the automation will trigger, and the ad set will be paused until tomorrow.
When you click “Next” in the top-right corner, you will be able to choose which ad sets to apply the stop loss to. All campaigns and ad sets within them are selected by default, but you can select individual ad sets within campaigns by clicking the arrow next to the name of the campaign.
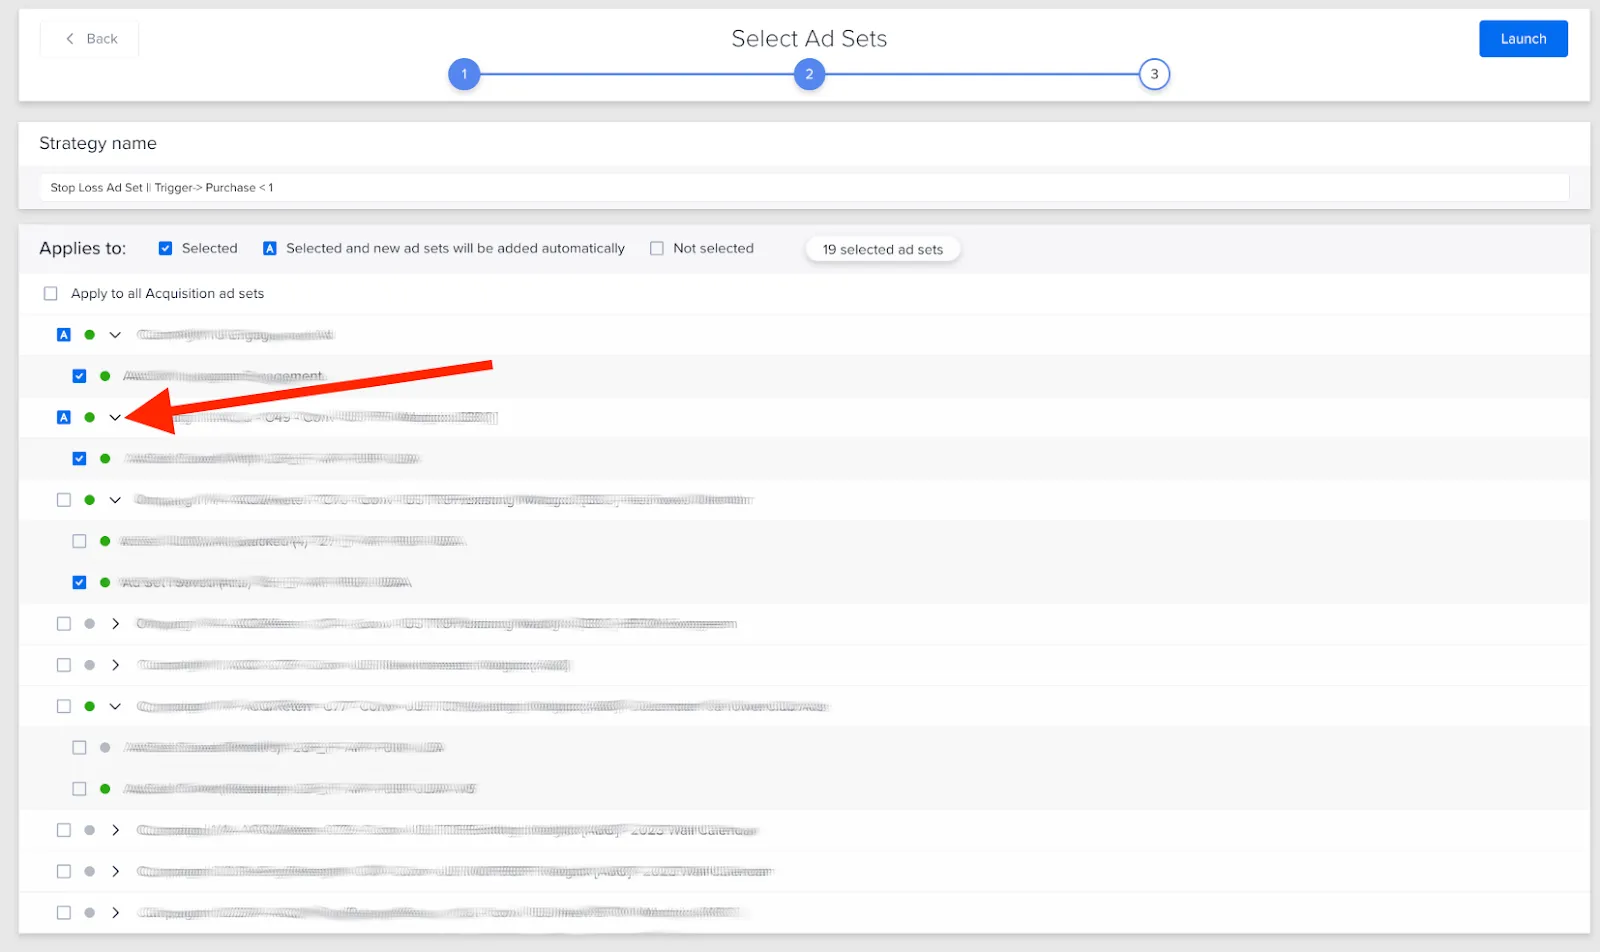
If you want to set up the automation to trigger future ads that you will create for the ad set, you need to click the checkbox twice. The tick will turn into an “A,” and ads that you add to this ad set in the future will also have the automation applied.

Click the checkboxes to select or deselect the ad sets you want to apply the automation to, and click “Launch” in the top-right corner.
That’s it 🚀
You’re now protecting your budgets to turn ads off when they aren’t performing well enough.
Bring back winning ads 🔙
Madgicx’s Revive automation tactic allows you to automatically switch on ads that looked like they were underperforming, but weren’t. This situation occurs quite often due to attribution delays: events (e.g., purchases, clicks, etc.) that take place as a result of people seeing your ads but, for some reason, happen much later on.
For example, someone might see your ad this afternoon but only purchase the product later in the evening.
In fact, you might not have tracking set up correctly, which means you’re missing conversion events and are making decisions based on inaccurate data.
This tactic becomes a must-have for ads which you have activated Madgicx’s Stop Loss tactic on.
First, select whether you want the Revive tactic to work on the ad or ad-set level. i.e., do you want this automation to trigger for one, specific ad or for an ad set (revive all ads in the ad set)?

Then select the conversion event.
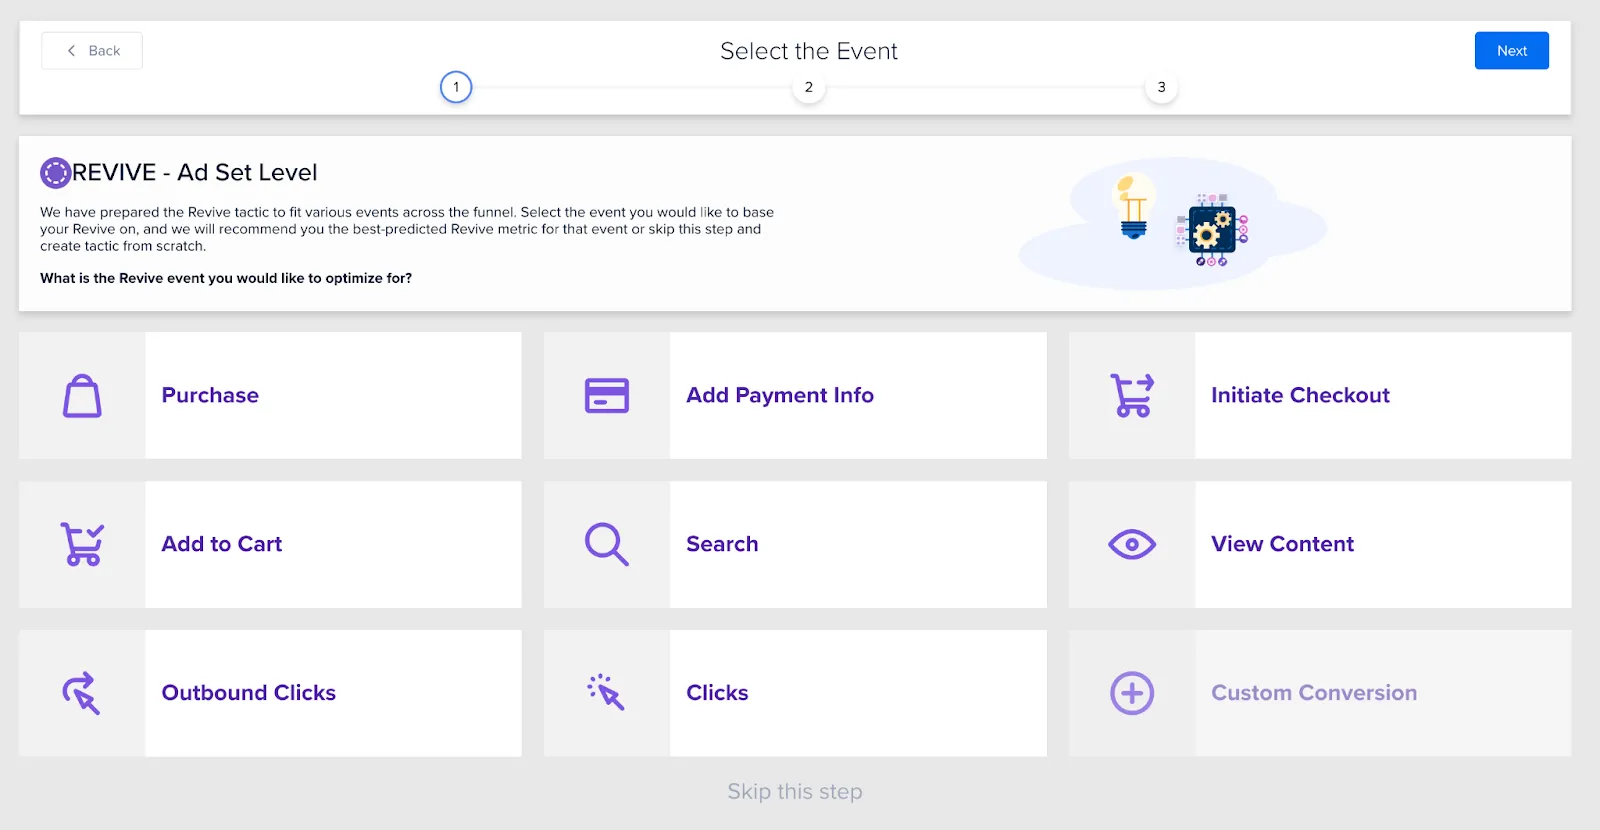
For our example, we have an e-commerce account, and so we’ll select “Purchase” as the event we want to set a performance benchmark for that will lead to the automation firing.
On the next page, Madgicx recommends that we should bring the ad set back if there is at least one purchase for the day and the ROAS is above 2.26.
If you think that you need a different ROAS value or more purchases, you can change this by clicking the “Edit” buttons to the right of the respective section.
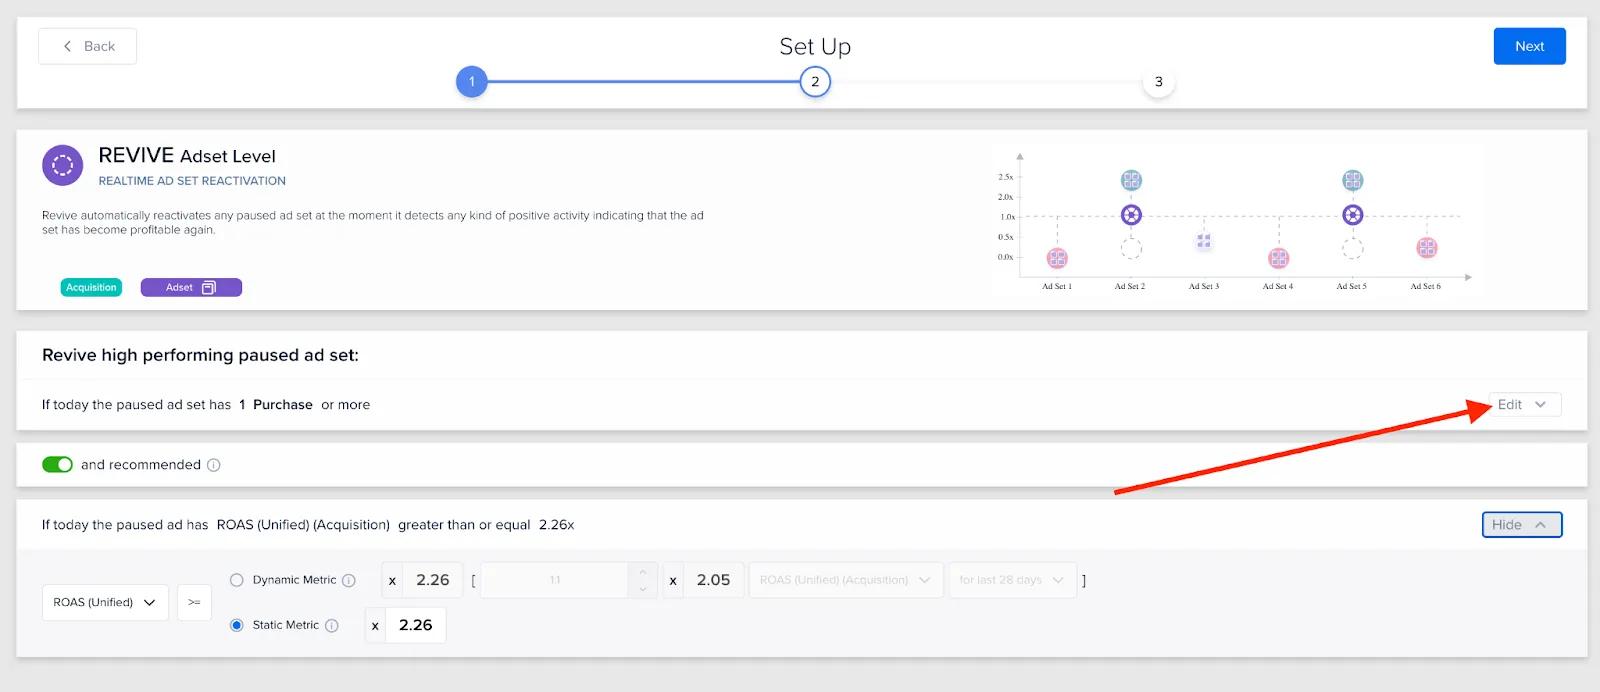
Notice the “and recommended” toggle set to active: this means that for the automation to be triggered — the purchase value should be a set multiple of the return on ad spend (in this case: 2.26).
You can set the automation to be dynamic and change over time depending on your performance.
While static metrics are based on the raw stats of your business overall (e.g., you only make a profit if your ROAS is above 2), dynamic metrics relate to what is going on in your account during a certain time frame.

For example, you may want the automation to trigger based on the recent (e.g., past 28 days) performance of the entire ad account.
We think that the ad should be doing better than 2.26 ROAS, so we will edit it to 2.5 and stick with the static metric.

PRO TIP
When setting up a Revive on the same ad set that you have Stop Loss set up, set the trigger to be 10-20% higher than the trigger for the Stop Loss so that you don’t have your automations firing all the time.
Plus, you only really want the ads to come back on if the base performance level is better than good enough (i.e., at least your breakeven ROAS).
After pressing the “Next” button in the top-right corner, you will head to the last step: selecting the ad sets you want to apply the automation to.
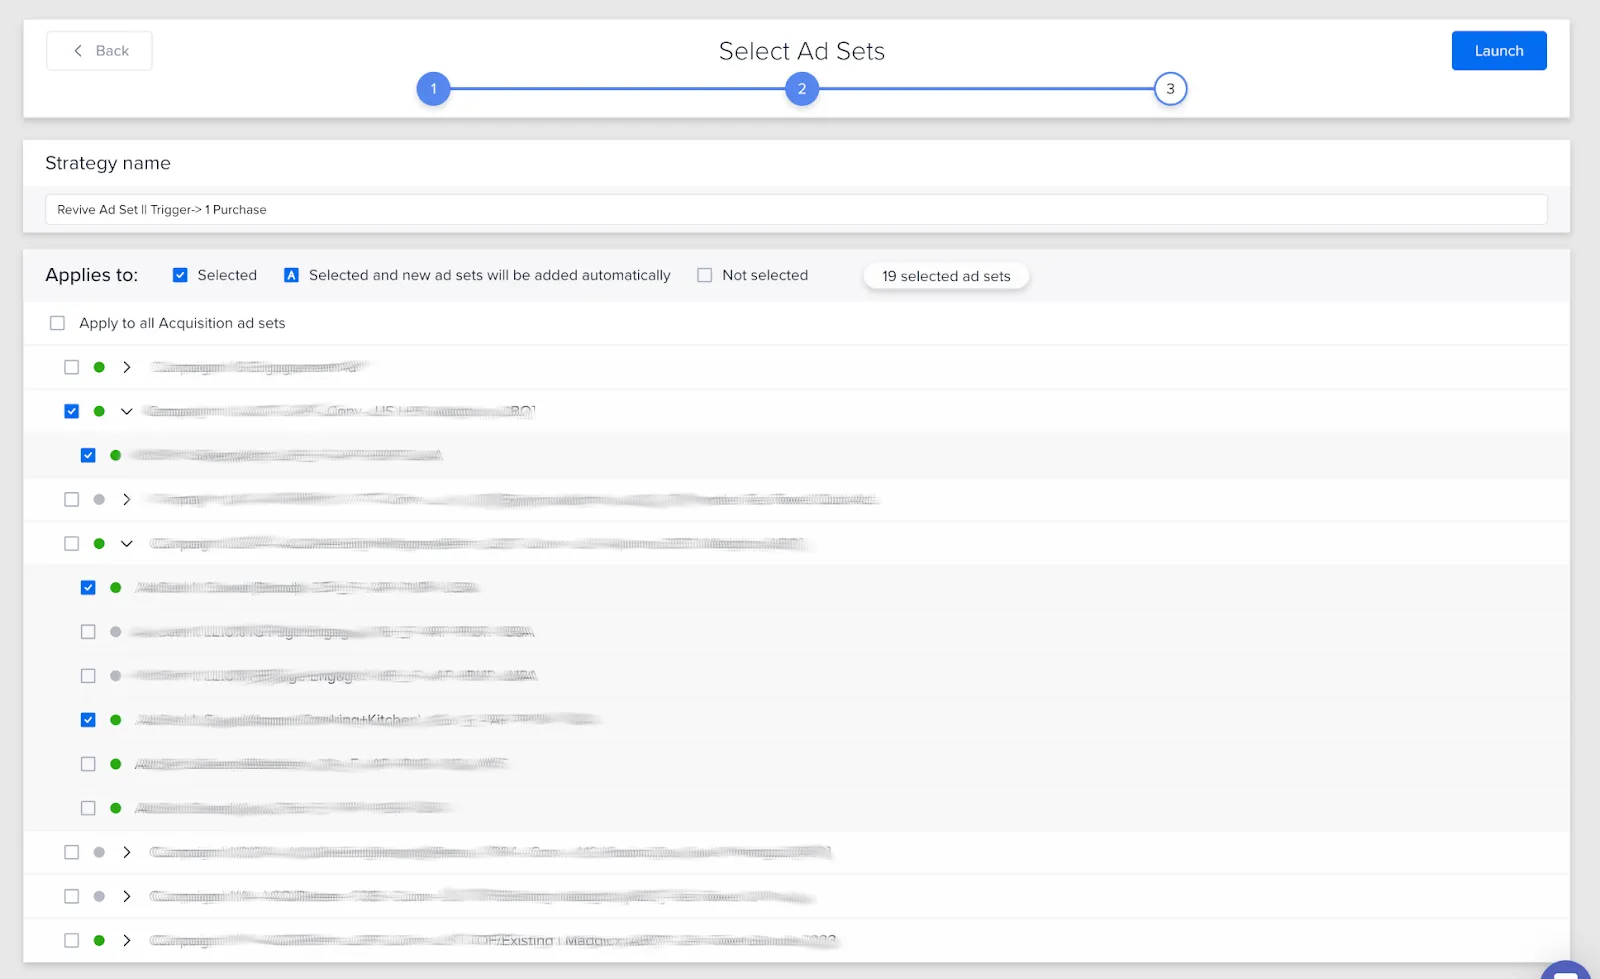
When you have made your ad-set selection, click “Launch” in the top right to set your automation live and bring back ads that shouldn’t have been turned off because they actually perform well enough.
Increase budgets when ads overperform 💰
Madgicx’s Surf automation tactic increases budgets on an ad-set or campaign level when your ads are doing well. Ride the wave of increased conversions while your ads are hot 🏄
The automation tactic identifies strong performance trends and automatically capitalizes on positive momentum by increasing the available campaign or ad-set budget beyond the original limits.
The budget will automatically revert to the original budget at a chosen time (or the default: midnight your local time).
Select the Surf automation tactic, deciding whether you want the automation to fire on ad-set or campaign level. These levels correspond to your budget optimization method: ad-set level for ABO and campaign level for CBO.
The automation can trigger several times a day up to the Surf Limit (see below).
When using Surf, you should choose an event that you expect to occur frequently when you are performing well. Setting up Surf to increase budgets for assets that will never reach a certain performance level makes no sense because the automation just won’t fire.
Pick a performance level that you think is good enough for you to scale your budget and is more likely than not to occur.
For this account, we will select Surf on the ad-set level and set the trigger to be the performance of purchases from our ad set(s).

Note: if you choose campaign level, you will skip the above screen and won’t be prompted to choose the performance metric, which is selected automatically based on your ad account type.
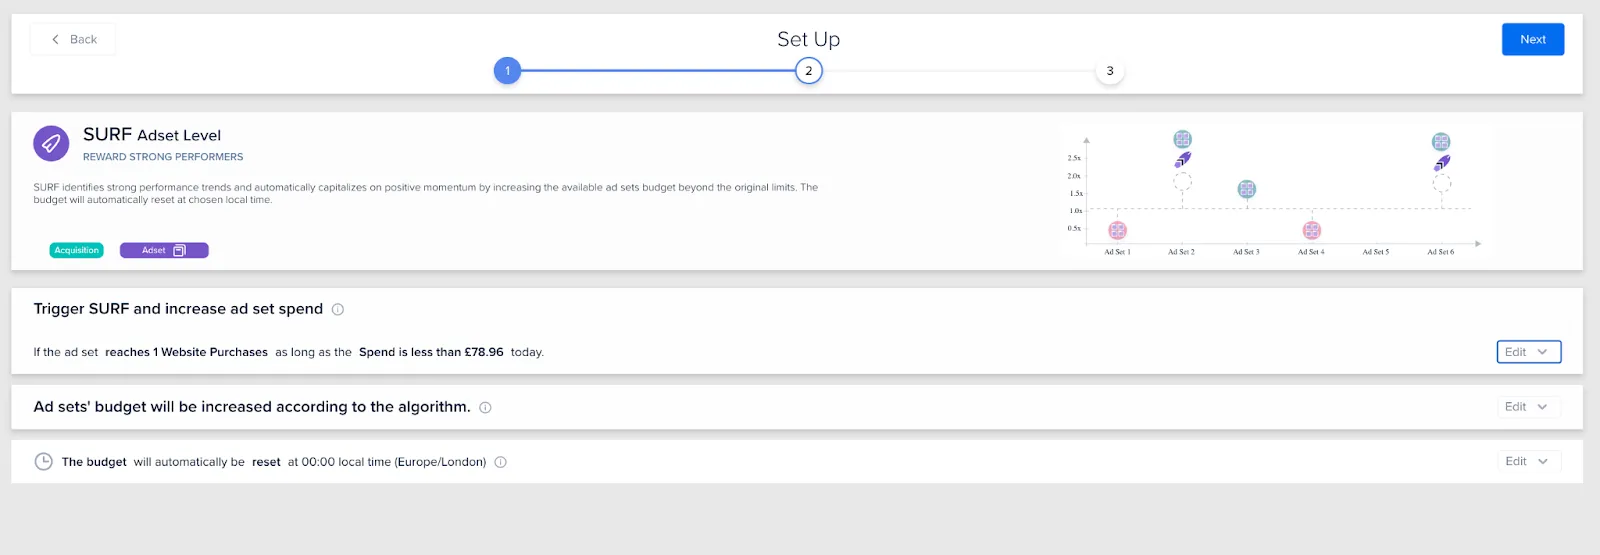
For our ad-set level automation, Madgicx has calculated that we should get 1 Website Purchase before increasing the budget, as long as the daily spend is less than or equal to £79.96 (we’re selling high-ticket items).
We can modify the number of purchases and spend, in addition to how the budget will be increased (and the maximum to be allocated) and the time when this daily tactic will reset.
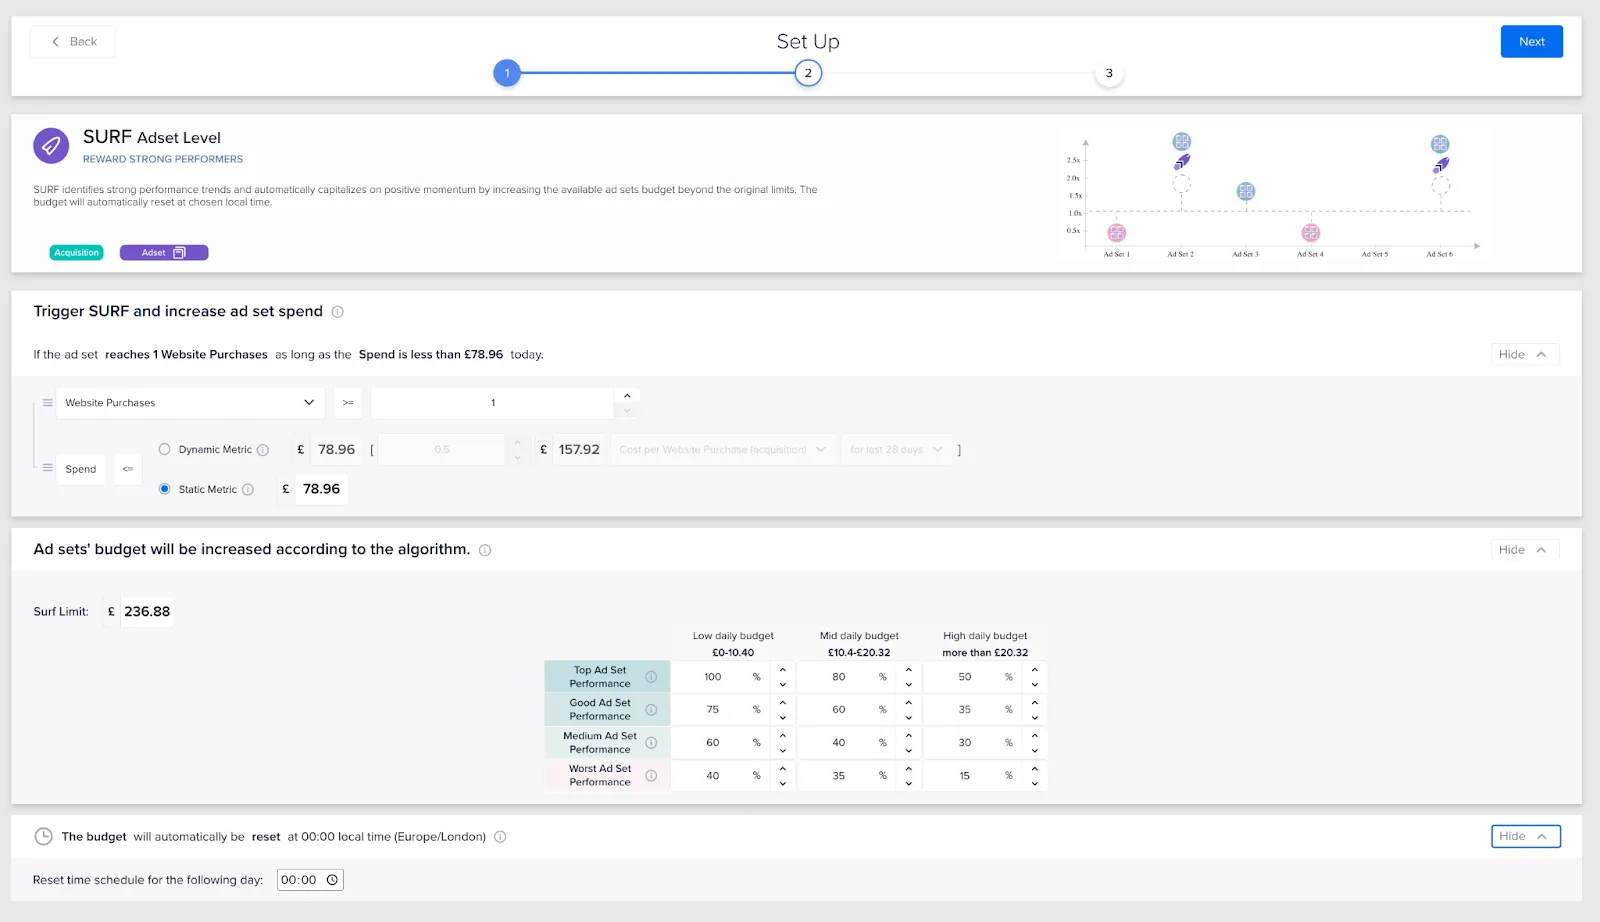
Once Surf has been triggered by hitting the performance threshold, the budget for this ad set will be increased.
The algorithm for increasing the budget takes into consideration the grading performance (top-worst) and daily budget medians to maximize both performance and cost efficiency. Ad sets with a higher median budget will have their budget increased less compared to low-budget ones, with the budget increasing as performance increases.
Ad spend will always be increased proportionally and is always capped by the Surf Limit, so no ad can surf up the budget uncontrollably.
As we can see below, Madgicx segments performance and provides a tooltip explaining what we mean by top, good, medium, and worst performance. Feel free to amend the percentage budget increases according to performance, but we’ll leave them as they are for this example.

Modify the time if your audience is in a different time zone than your ad account or if the spending habits of your prospects and customers occur at specific times.

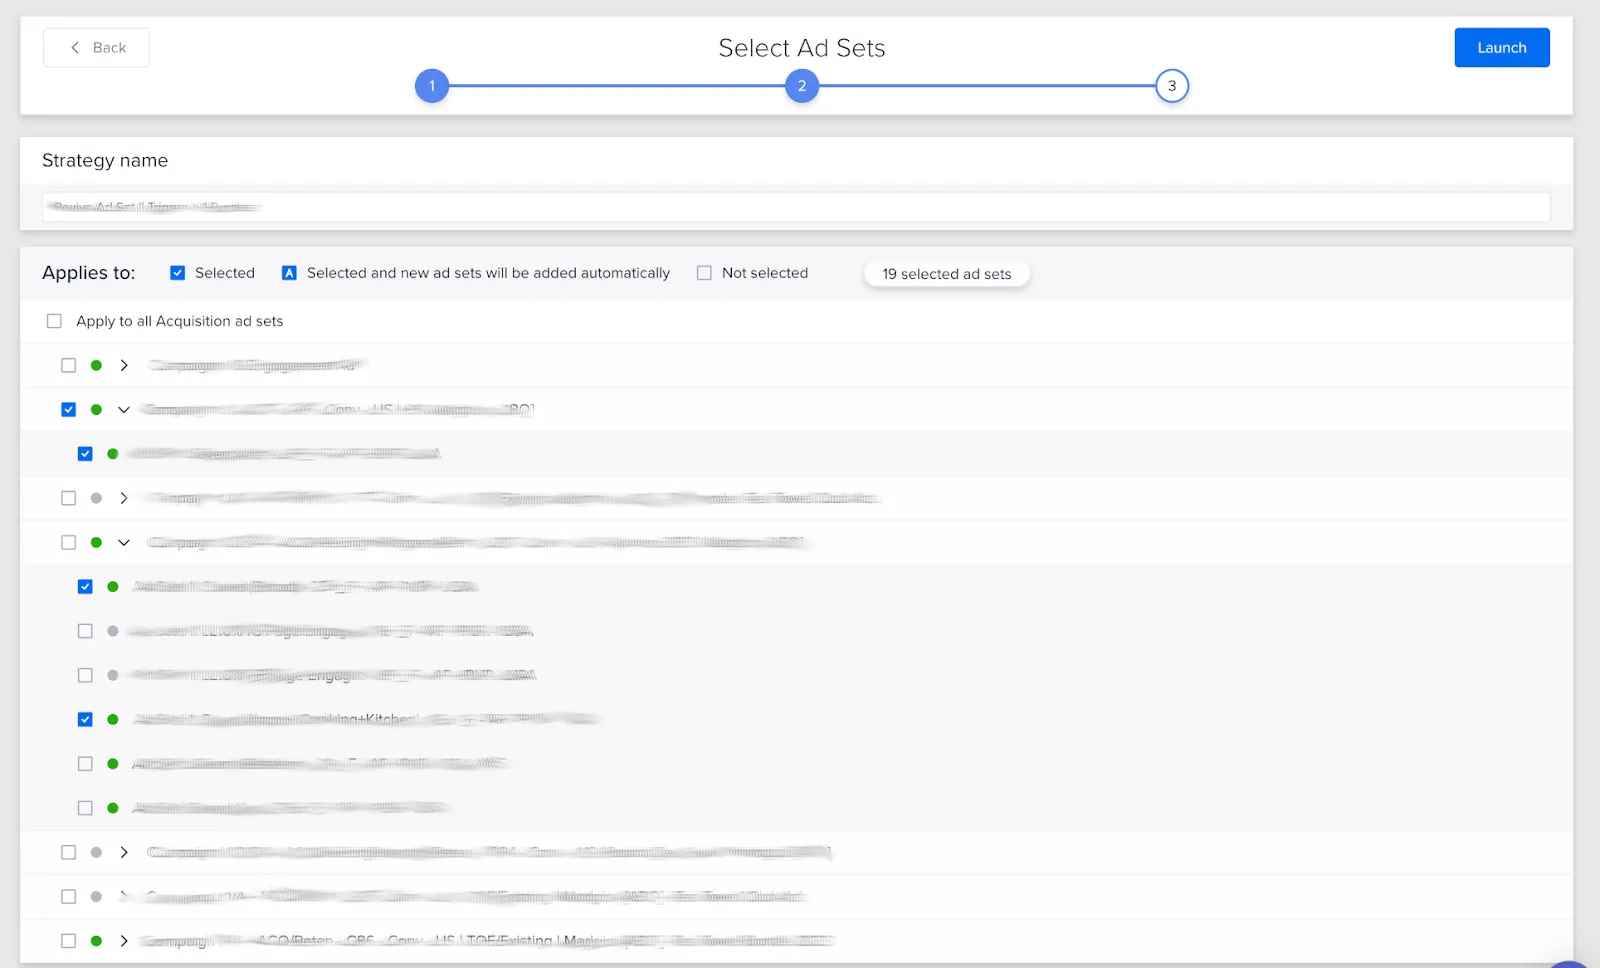
On the next screen, select the ad sets you want to apply the Surf to, and that’s it!
Wind down ads with dwindling performance 📉
Sunsetting monitors the performance of an ad set over time. The automation tactic identifies underperforming ad sets and then takes a series of steps to protect your budget.
For example, if an ad set has been performing really well over time and now has a drop in performance, that doesn’t necessarily mean we want to turn it off immediately. We want to reduce its budget when it is underperforming and turn it off if the performance falls consistently to a level where we want to kill it.
As with the other automation tactics, Madgicx evaluates all of your ad sets and your history to calculate your ideal setup.
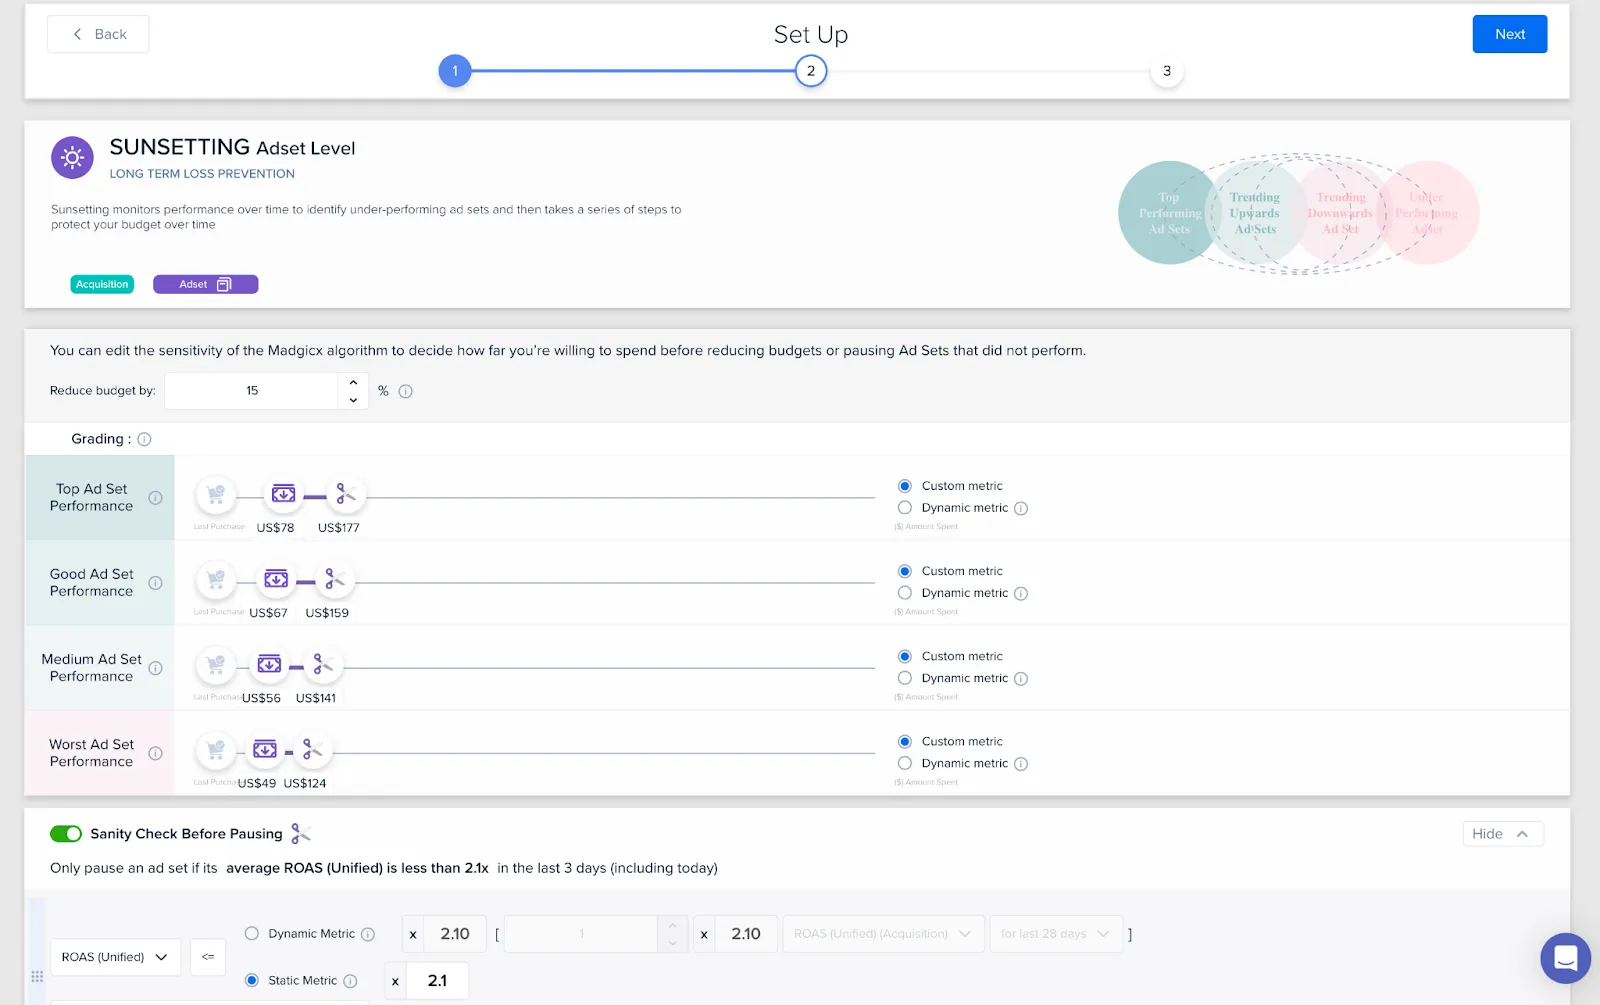
You can alter how your budget for the ad set will reduce when you hit certain spend limits. Madgicx’s media buyers don’t recommend reducing the budget by a large amount because this could completely deflate the ad set, meaning that the performance might subsequently drop further because you aren’t providing enough budget.
Define the spend limits based on the overall performance level (top–worst) of the ad set over time. Madgicx automatically ranks your ad sets based on their performance. Use the sliders to adjust how much budget you are ready to commit before reducing to avoid wasting money on underperforming ad sets.
The purple money note with the down sign is the price level at which you start to reduce your budget. The scissors icon is the price level at which you will turn off the ad set. So you reduce the budget first, and — if the ad-set performance stays on a downward trajectory — you will eventually pause it altogether.

The grading is calculated based on ROAS over the past 3 and 7 days compared to your account average and whether the ROAS has been improving or regressing over these time periods.
You can also set up dynamic metrics to define the automation trigger points based on your costs. You can define the budget you let the ad set spend before triggering the automation based on your average cost per purchase, add to cart, outbound click, etc.
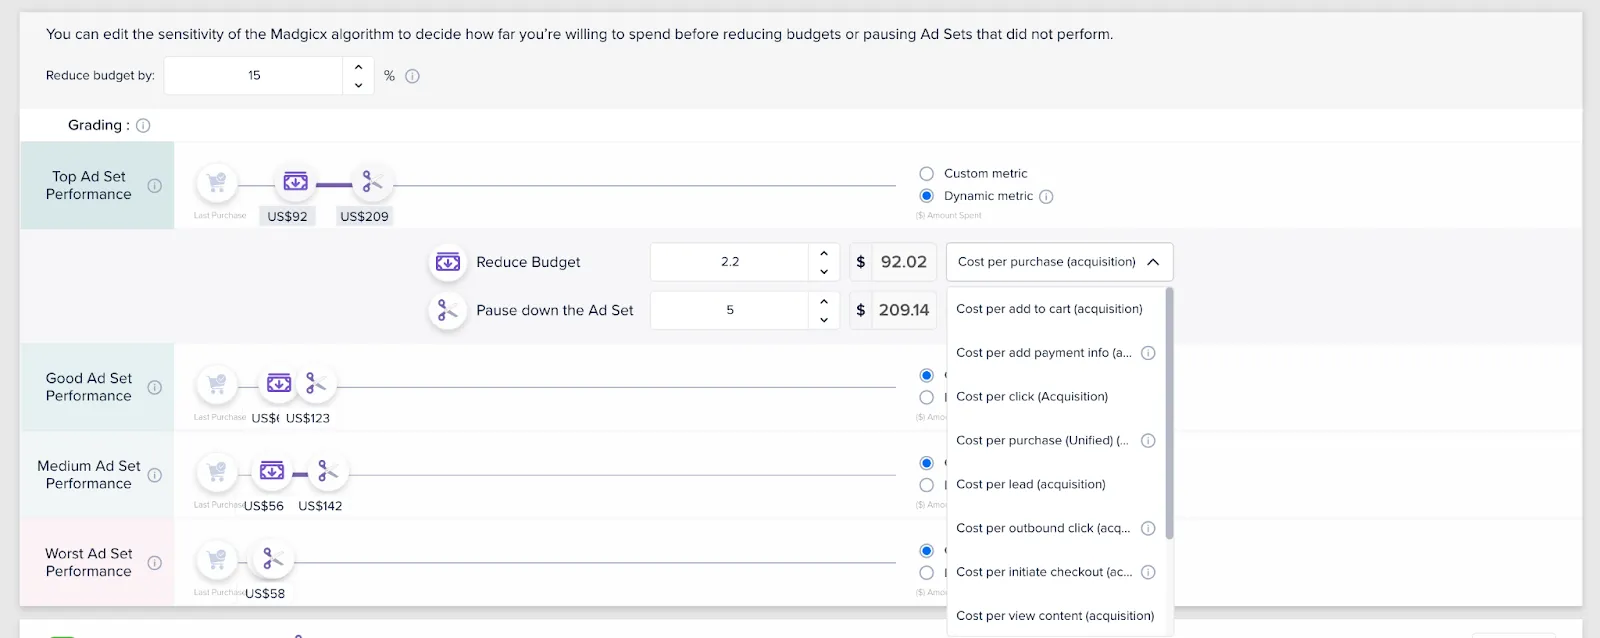
For instance, you can set up a dynamic event metric to reduce the budgets for top-performing ad sets at a spend of 2.2x the average acquisition cost per purchase in your account and then turn off the ad sets when the ad spend is 5 times cost per purchase.
Lastly in this step: you can perform a sanity check to see if this ad set is just having a bad patch while it previously drove performance, which has kept it ROAS-positive. In this case, you probably want to give it more time before turning it off because it still has a chance to see if it can perform as it was doing.

In the account above, Madgicx suggests that we will keep running the ad set if its ROAS is 2.1 or more over the past 3 days. You can modify this, but we are happy with this minimum ROAS value for the past 3 days.
Feel free to change the metrics which trigger the automation depending on what you want to optimize for. The same goes for the time frame of the sanity check, which you can increase all the way up to the last 14 days.
Select the ad sets you want to apply the tactic to and launch the automation. You will now turn off ads that consistently underperform.
Monitor automation performance 🕵️
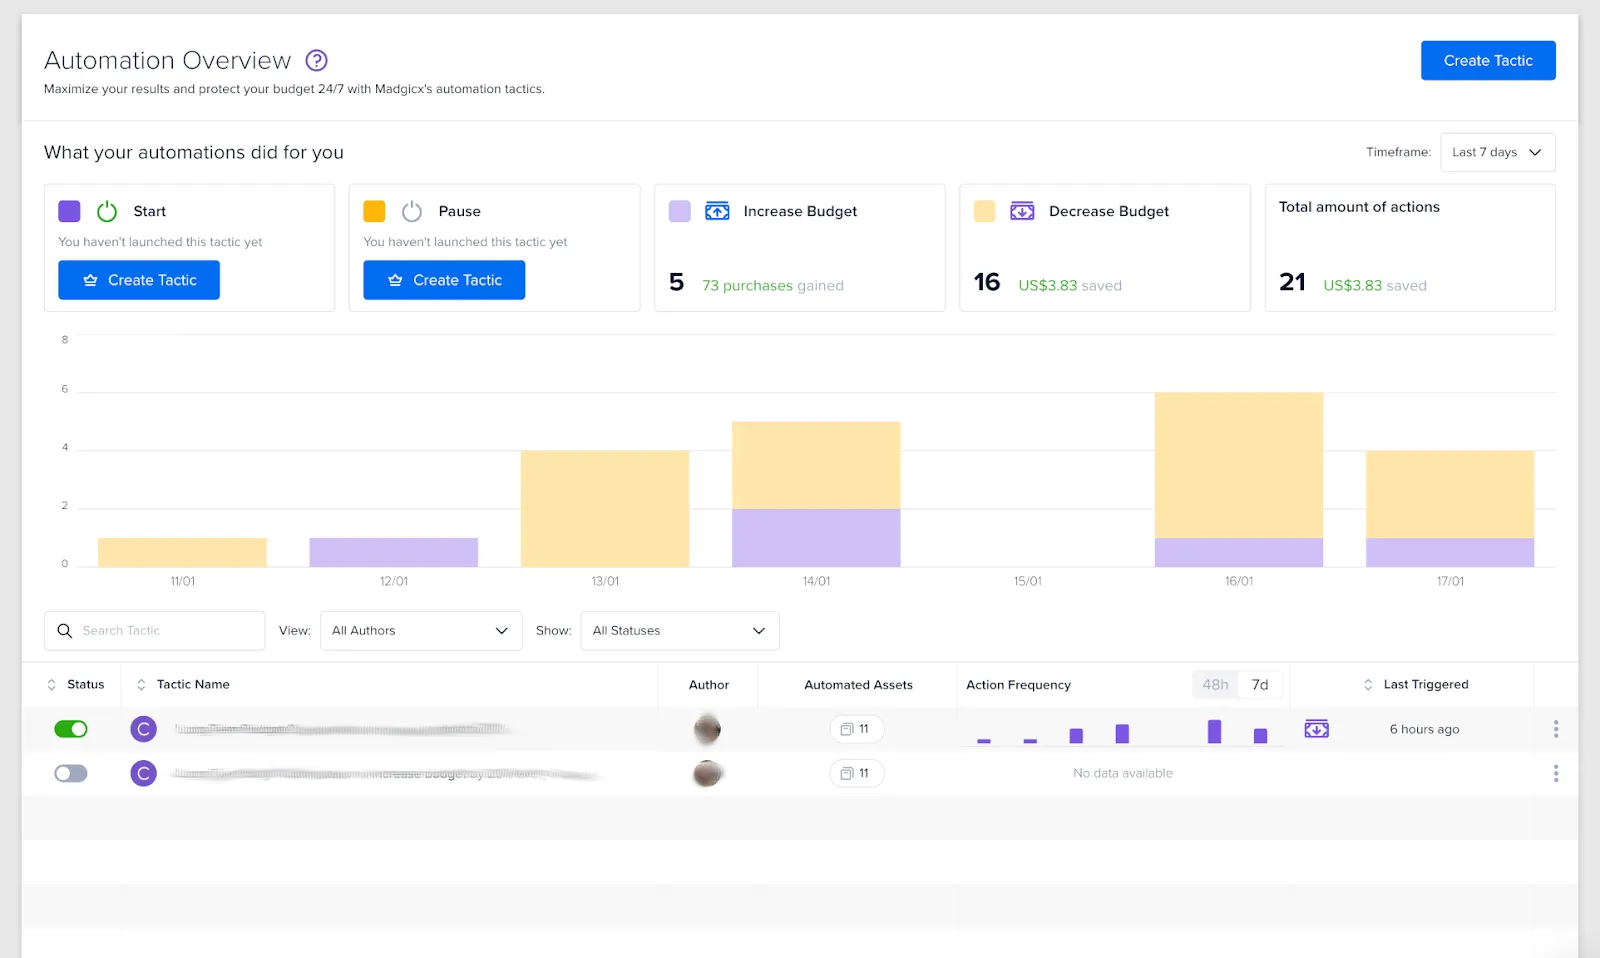
When you have your automations set up, you can monitor their performance in Automation Overview. See:
- Which automations you aren’t using
- How automations are benefiting your ad management
- Which automations fired when and how many times
- Who has been launching automations
Here you can also easily launch automation tactics or pause them.
Difference with Facebook Ads Manager
Madgicx Automations make you a better media buyer because it saves you time by completing actions in Facebook Ad Manager for you.
Since the introduction of iOS14, many advertisers have seen a drop in their tracked conversions. This is an even bigger issue since iOS 14 because Facebook might attribute conversions to ads with a delay of up to 72 hours.
Fix this with Madgicx Cloud Tracking:
✅ 20% more ad ROI tracked in Ads Manager
✅ Done-for-you service worth $000s
✅ No coding required on your end
Didn't find what you were looking for?
Try our FAQ
Check out the answers to our most frequently asked questions. If you can’t find the answer there, you’ll be able to contact our support team.


.webp)
