Media buyers spend a great deal of time monitoring and tweaking their accounts to ensure optimal performance. But Madgicx automations allow you to automate many of these actions to create more time so you can concentrate on other tasks that drive greater value.
Madgicx offers you a whole host of prebuilt options to choose from and takes data from your ad account to suggest performance levels when to trigger automations.
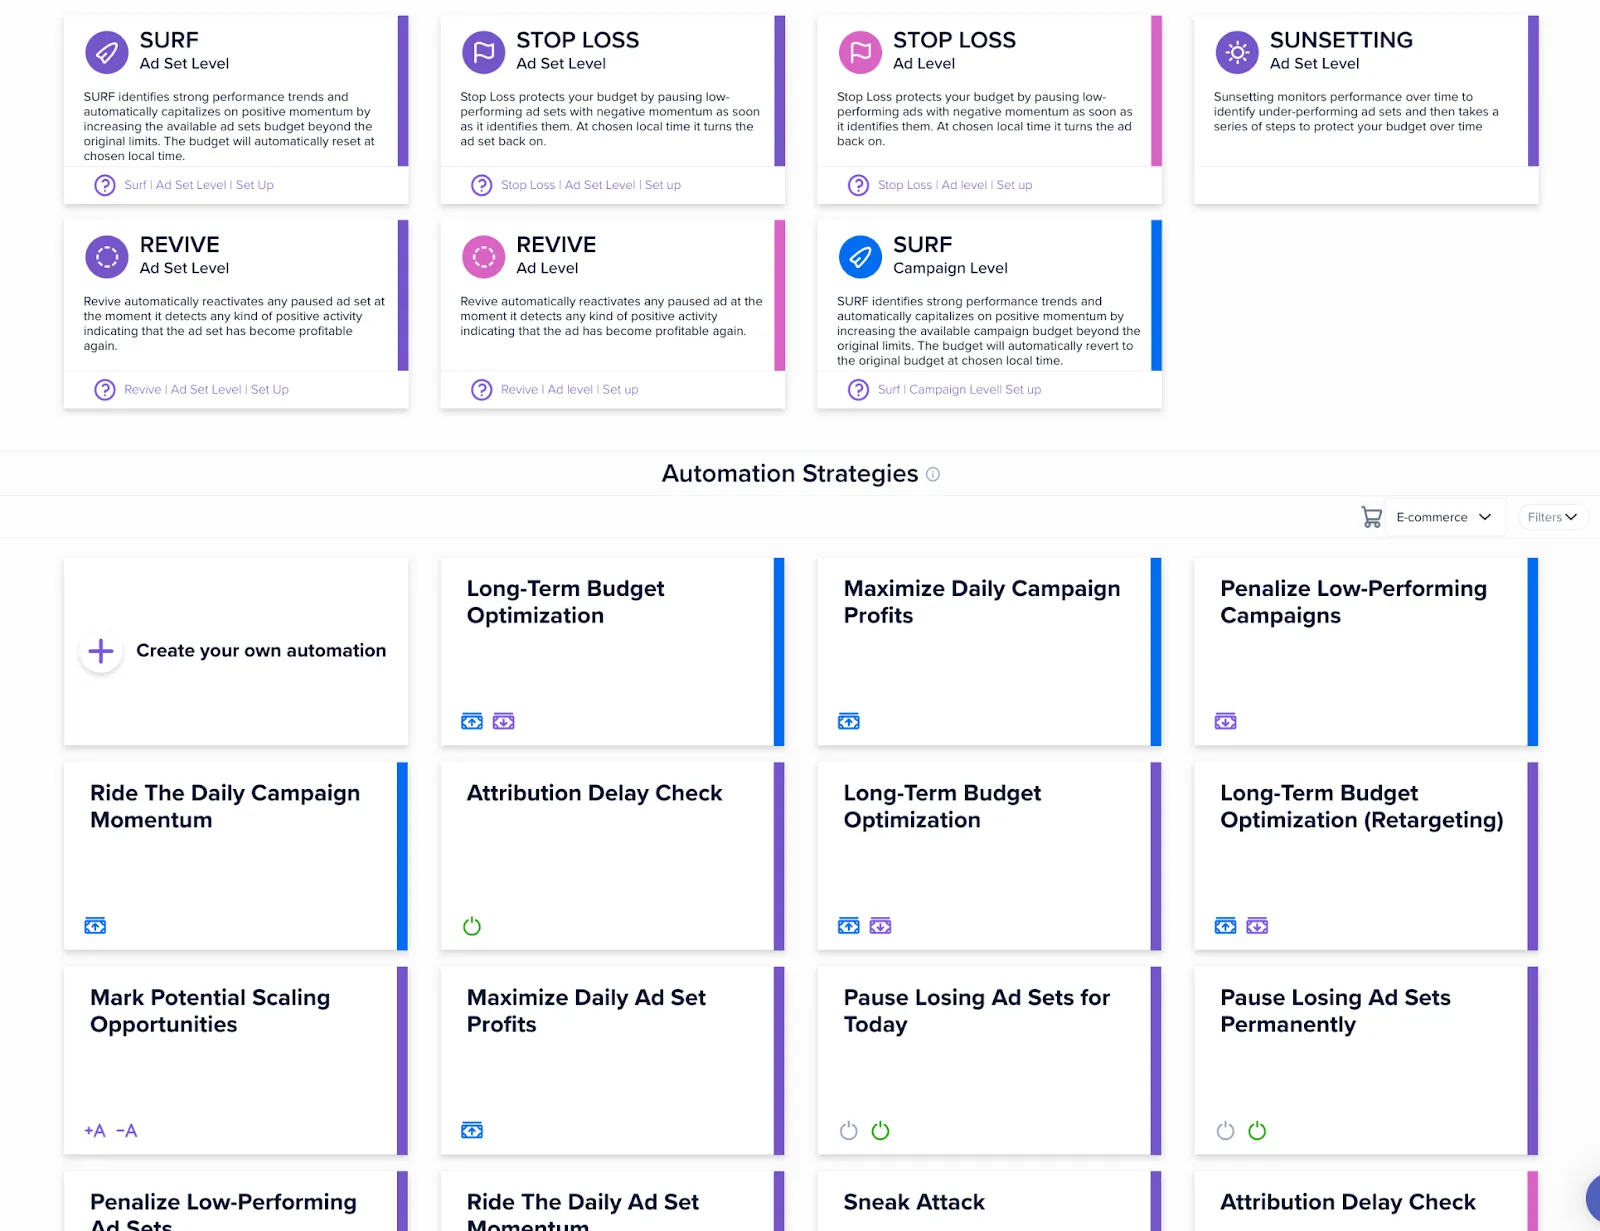
Madgicx automations save you time and money by putting ad account management on autopilot 24/7. Use pre-built automations, edit them, or create custom automations: a limitless sandbox that allows you to create an automation setup from scratch.
Deploy best-practice automations
Madgicx has pre-built and ready-to-deploy templates for different levels of your ad account:
- Ad level (pink)
- Ad-set level (purple)
- Campaign level (blue)

Madgicx automations were made on the back of years and hundreds of millions of dollars of ad-spend experience.
Note: while there are 7 automation-tactic and 24 automation-strategy templates ready to deploy, our Madgicx’s media buyers don’t recommend using them all at once as it can lead to your account becoming over-managed.
Start simple, see what works, and then incrementally add the automations you need.
Let’s run through the different templates Madgicx offers and see how they win you back hours every week.
Automation tactics
There are 4 tactic templates on offer that work on different levels for your ad account (ad/ad set/campaign: see above legend).
- Revive: bring back ads that — due to attribution delays — did better than you initially thought
- Stop Loss: protect your budget from overspending by pausing underperforming ad sets
- Sunsetting: shut off underperforming ads or ad sets for good, rather than on a daily level
- Surf: scale your performing ad sets and campaigns when they are performing above average
Automation strategies
The 24 automation strategies include more options than automation tactics for setting a more complicated automation that includes several parameters. They have been created as proven-effective default methods, using preset values based on the aggregated data of your account.
The automation strategy templates apply to any business, and you can use them to manage your assets with one click.
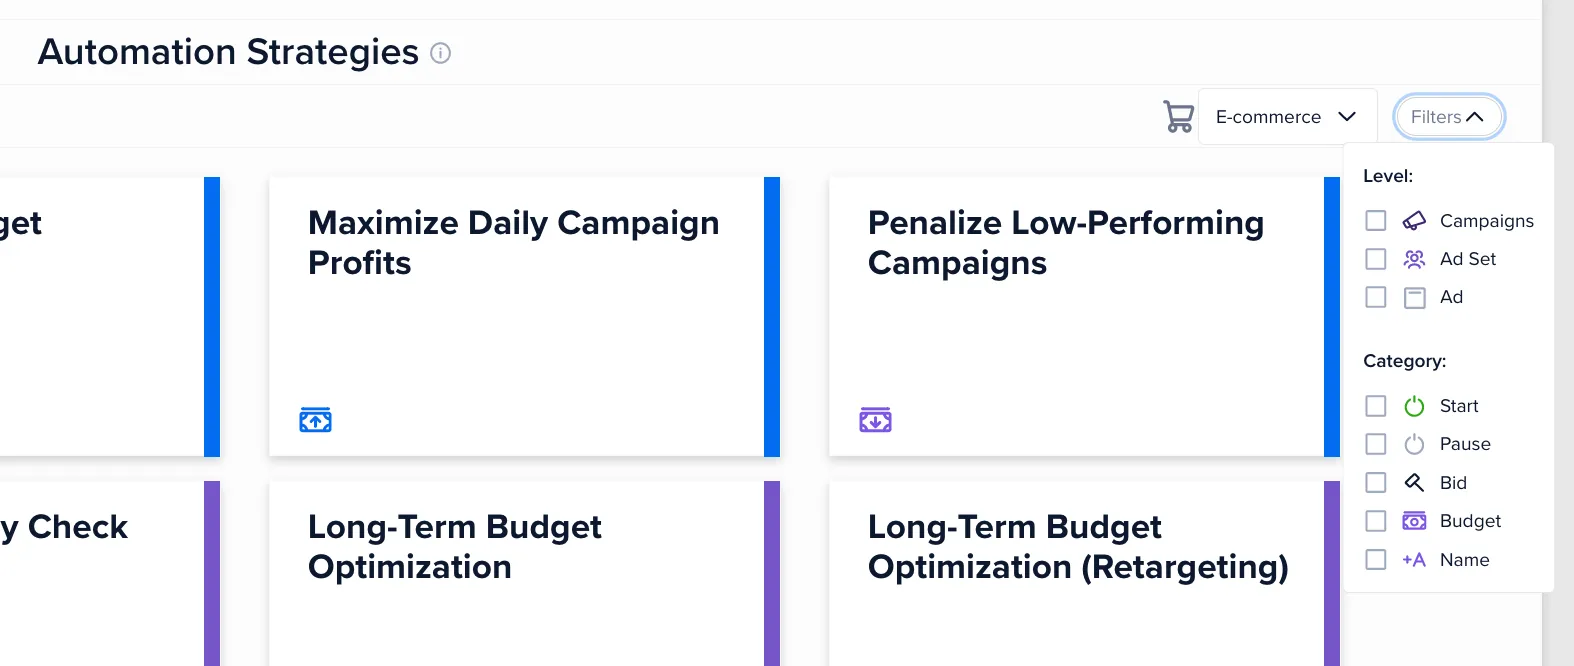
The filter option on the top widget allows users to locate strategies specific to campaigns, ad sets, and ads and categorize their options based on the action type. Also, if you manage multiple accounts and need to monitor different types of conversions, such as purchases or leads, you can switch between e-commerce, lead generation, or app installs to get strategies relevant to your account type.
Learn more about automation strategies and how to use them
In addition to the templates, Madgicx also allows you to create your own custom automations.
Custom Automations
Custom automations are a blank slate on which you can create commands for your ad account to activate when certain conditions are met.
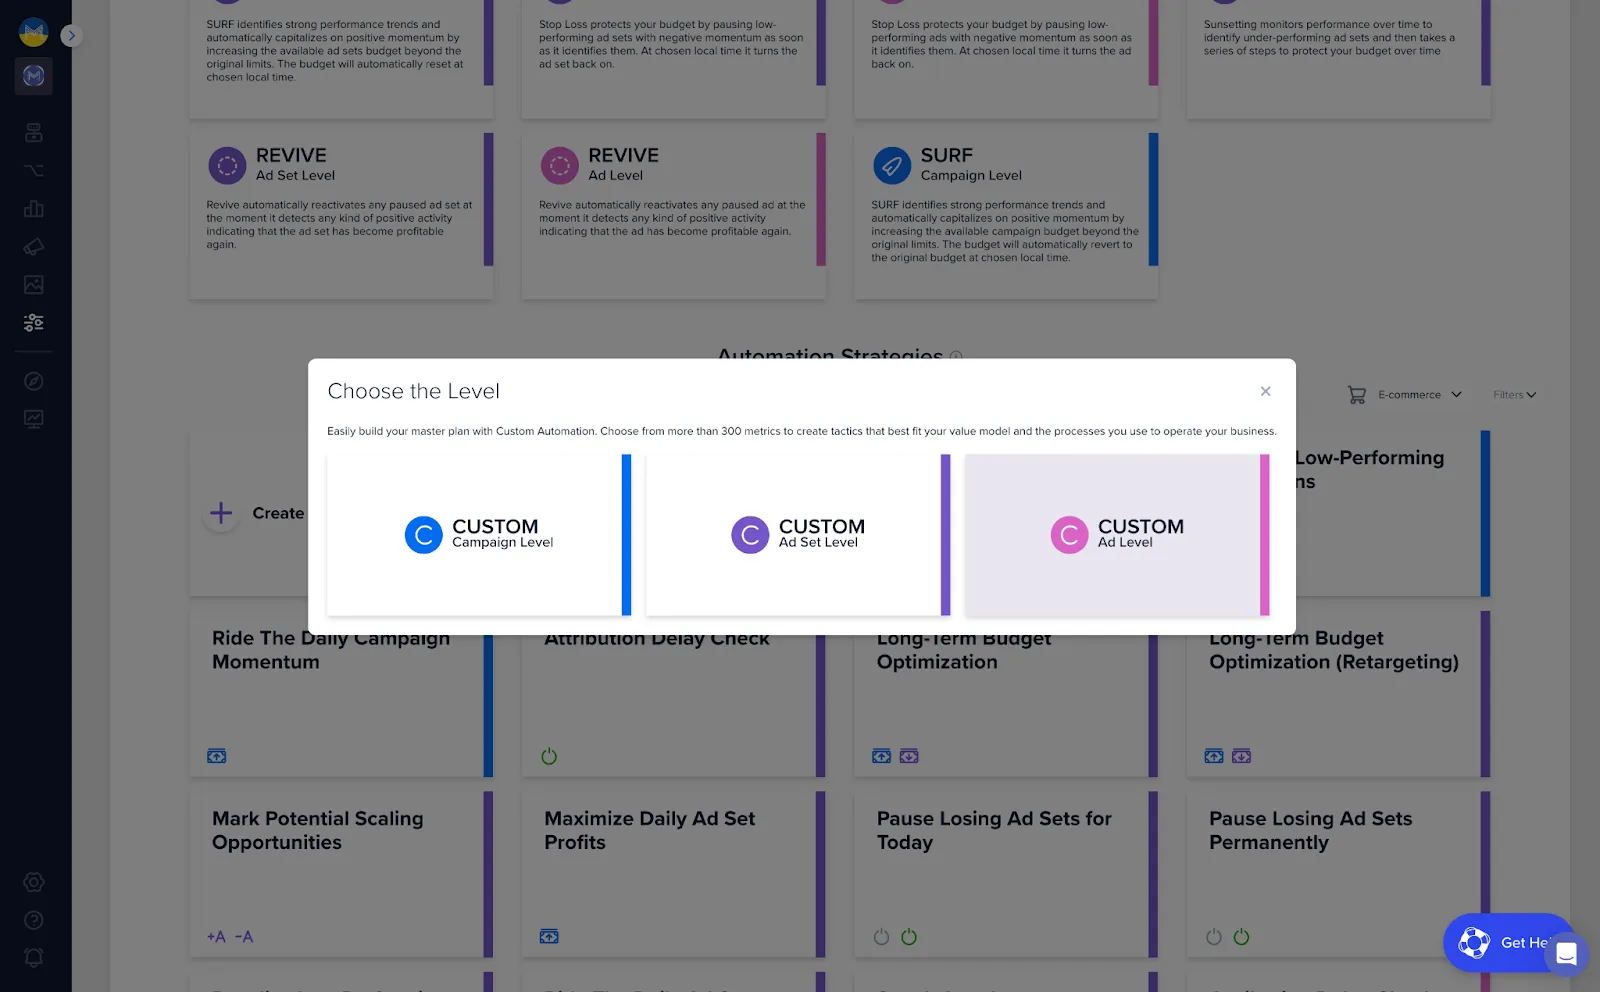
To create a custom automation, click the “Create your own automation” card in the “Automation Strategies” section.
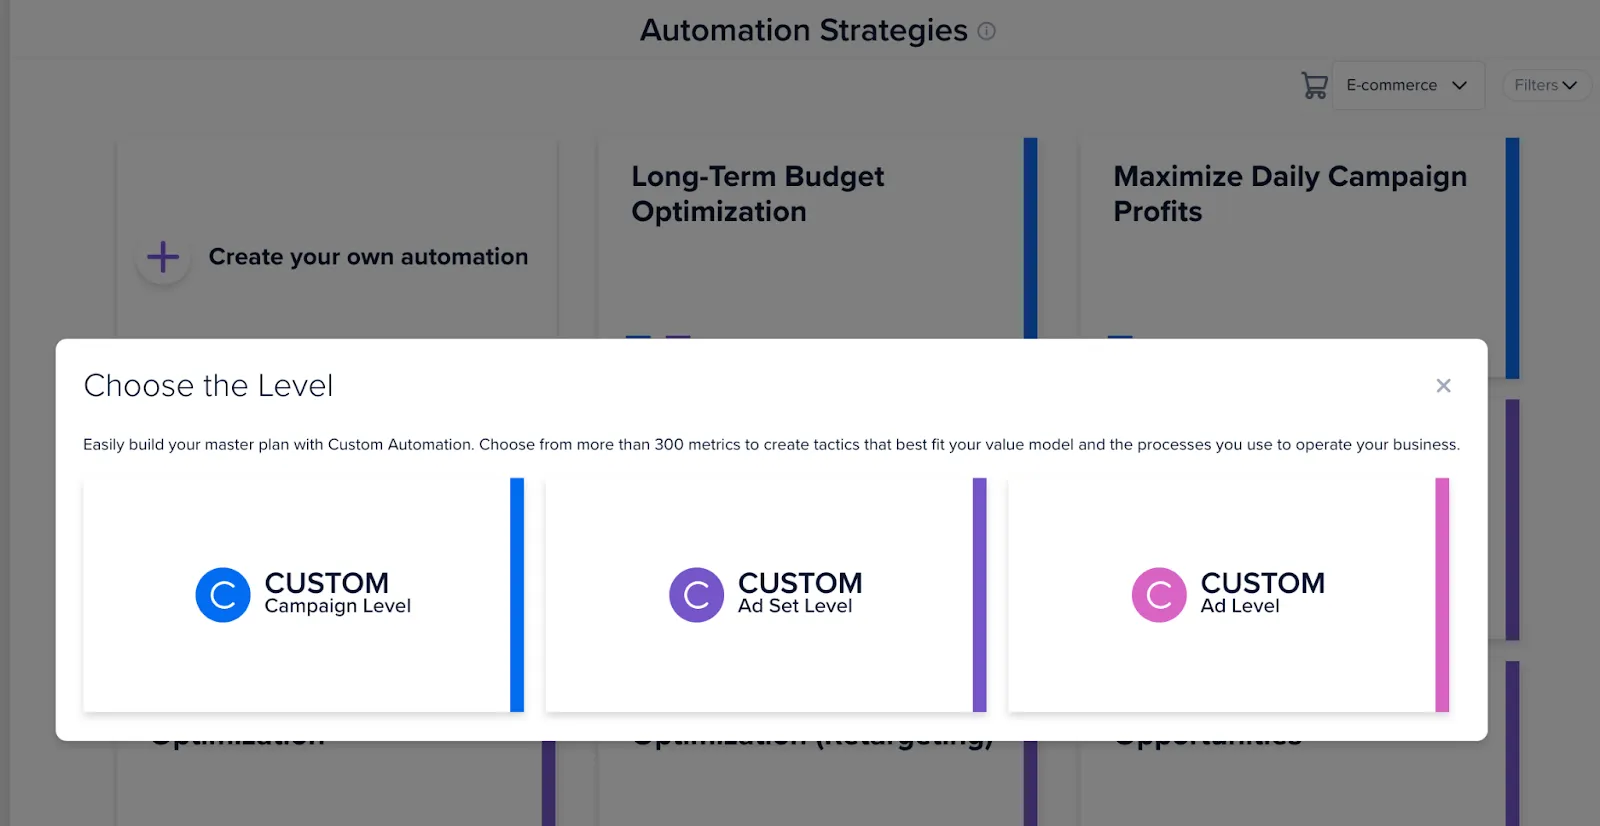
After choosing the ad/ad-set/campaign level you want your automation to work on, you can choose from all kinds of actions you want to perform: pause/start a campaign (or ad set or ad), increase/decrease budget when certain metrics are met, and more.
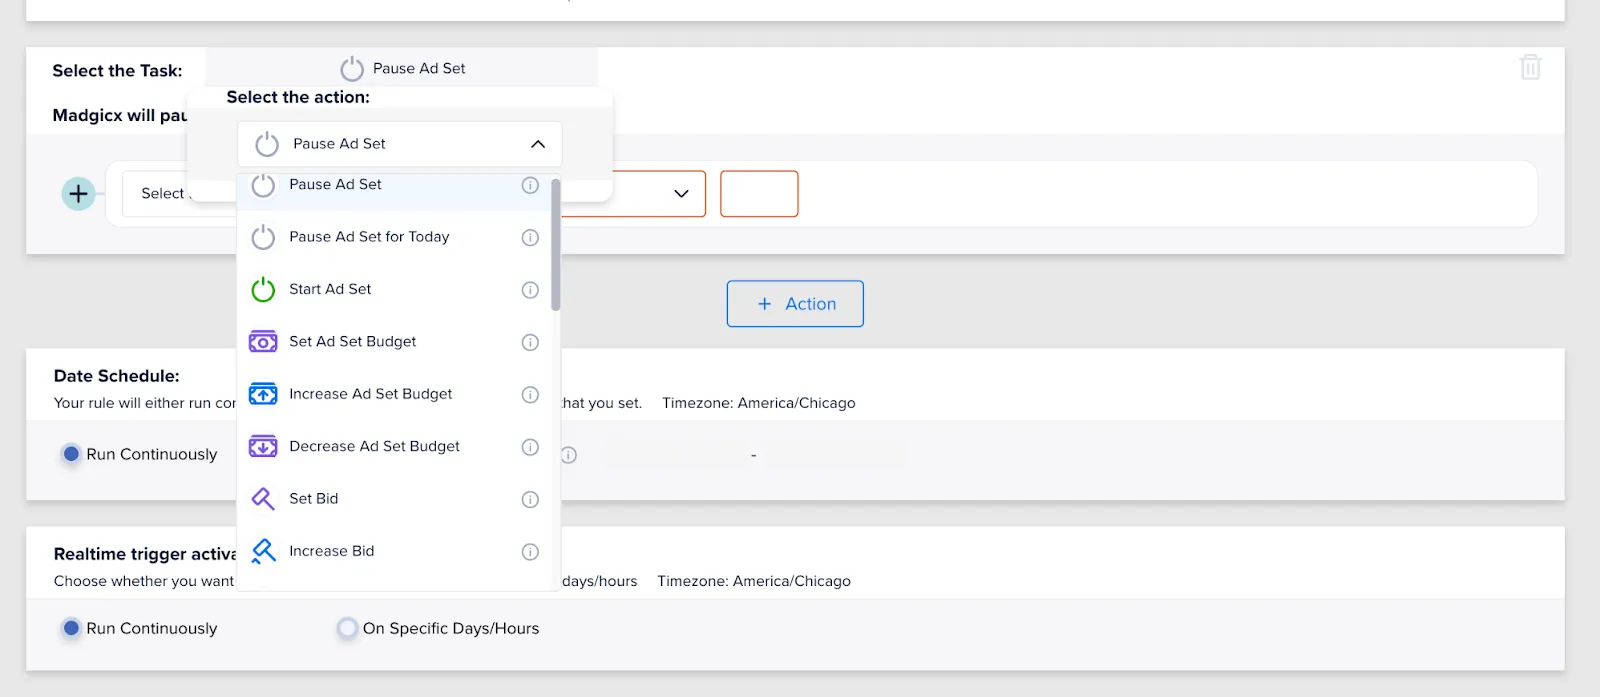
Custom automations are for when you want to be really precise and are for advanced Madgicx users who want to set up an action to trigger upon several conditions.
Learn more about custom automations and how to use them
Now we know which templates we can use and what for, let’s finish our introduction to Madgicx automations by showing you how to set up a basic stop loss automation that every Madgicx user should have.
Stop wasting budgets 🛑
One of the most important parts of Facebook advertising is knowing when an ad is underperforming and turning it off. With Madgicx’s automation tactics, you no longer need to constantly monitor ad performance day and night, turning them on and off.
First, head to the Automation Strategies section and click “Create your own automation”. Then select whether you want the stop loss to work on the ad, ad-set, or campaign level. For this basic automation setup, we will create the stop loss to work on the ad level.
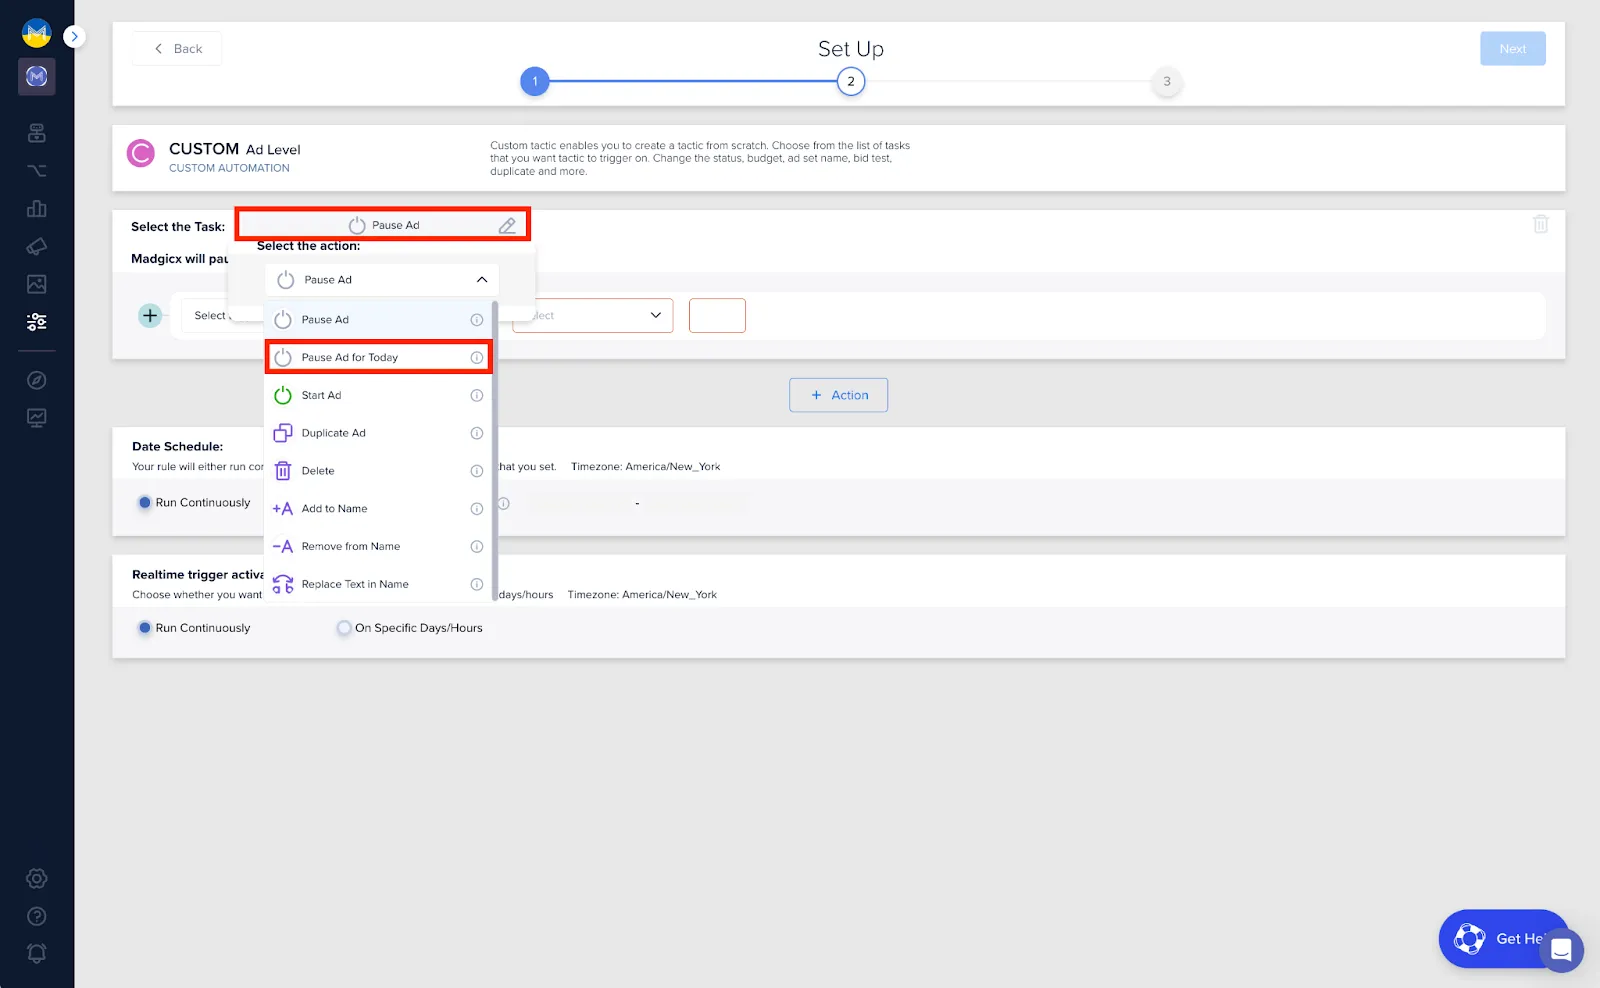
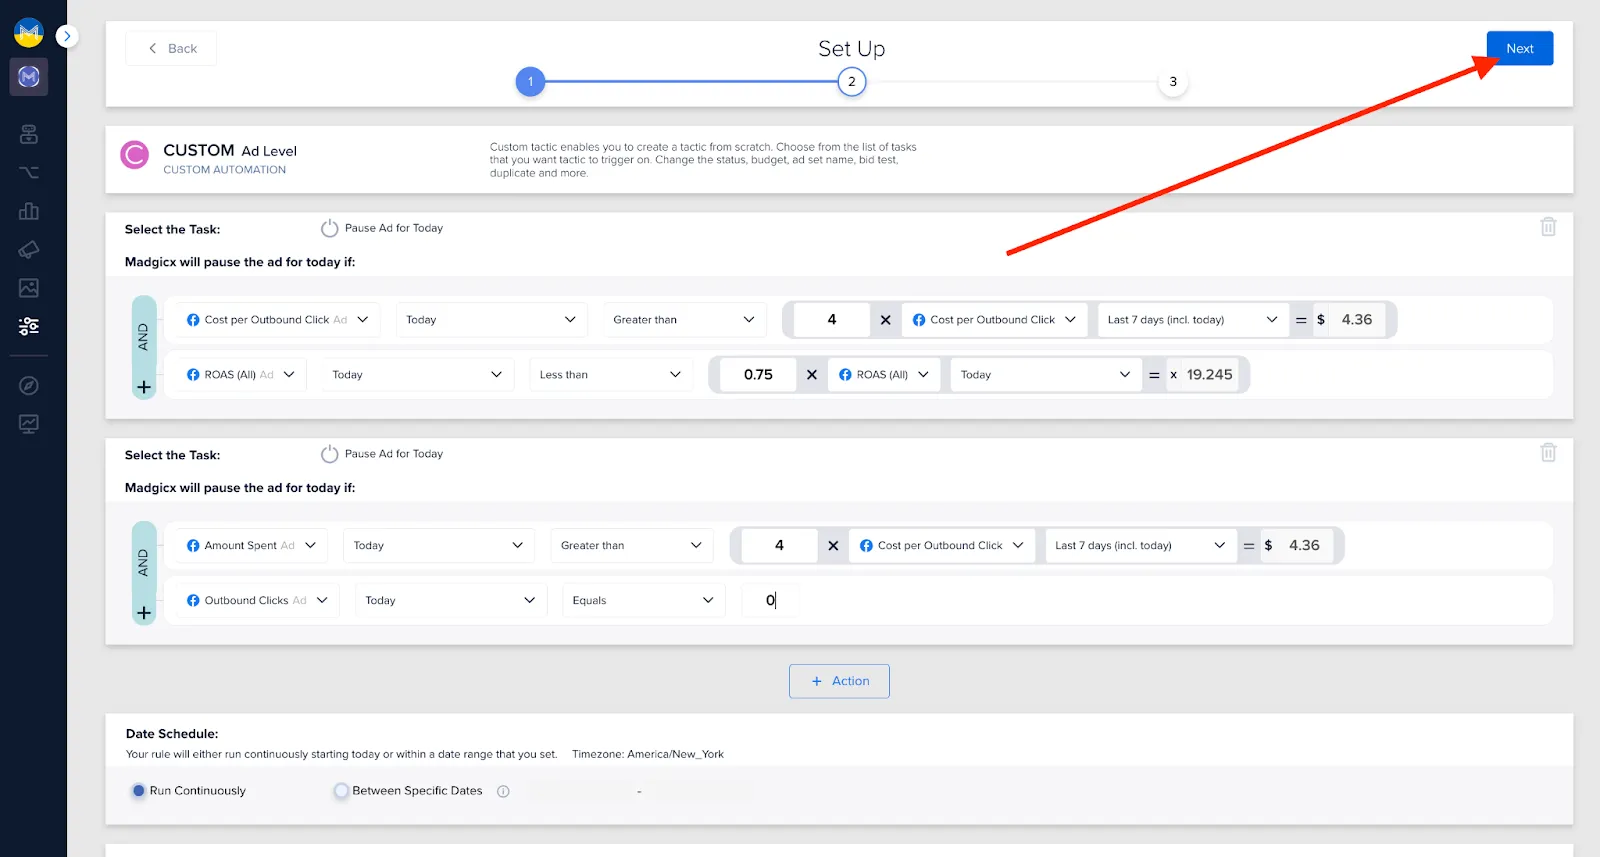
On the next page, you have a blank automation for the ad level ready to be created. Here, first select the task as “Pause Ad for Today”. We want to pause the ad for just one day because we will base it on clicks, which is a metric that can vary wildly, meaning one day you might get a lot of clicks, but on the next, you might get very little to none.
So, we don't want to pause ads indefinitely based on daily click performance, but just pause it for the same day to minimize losses.
We'll pause the ad for today in two cases:
- The Cost per Outbound Click today is greater than 4x the average Cost per Outbound Click in the last 7 days AND the ROAS is lower than 0.75x the average ROAS in the last 7 days
- The Amount Spent is greater than 4x the average Cost per Outbound Click in the last 7 days AND no clicks were generated today
Let’s go through the two conditions step by step.
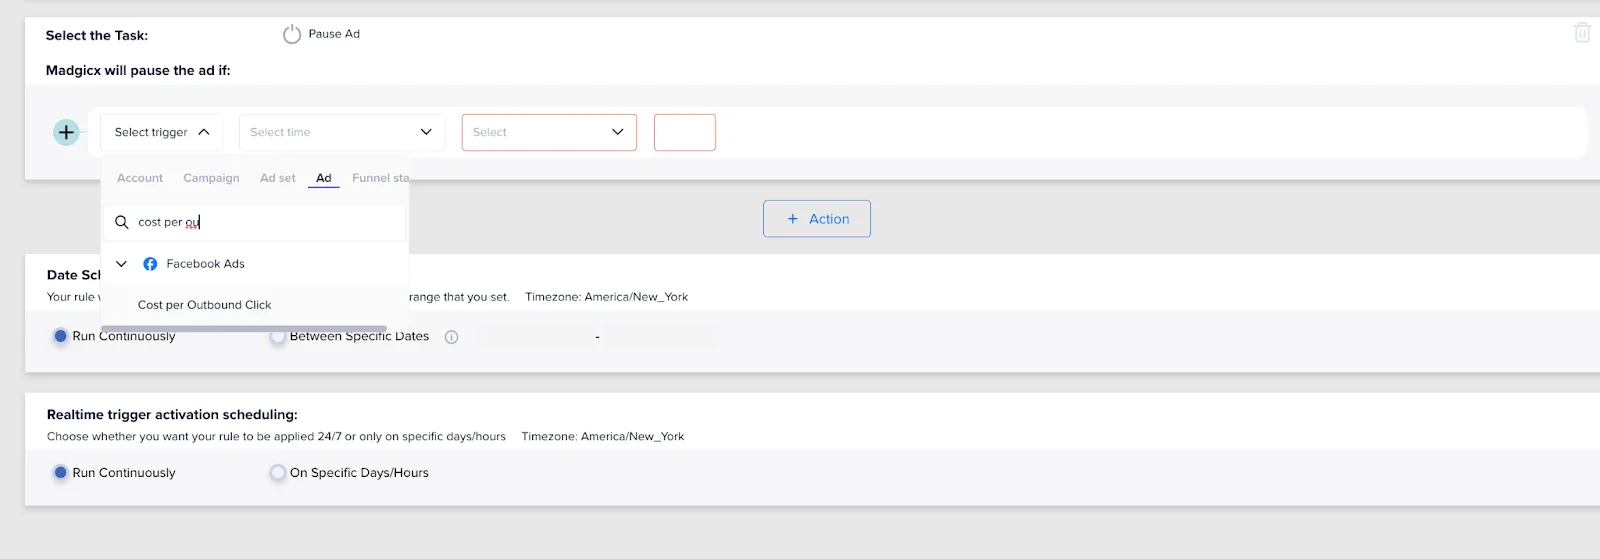
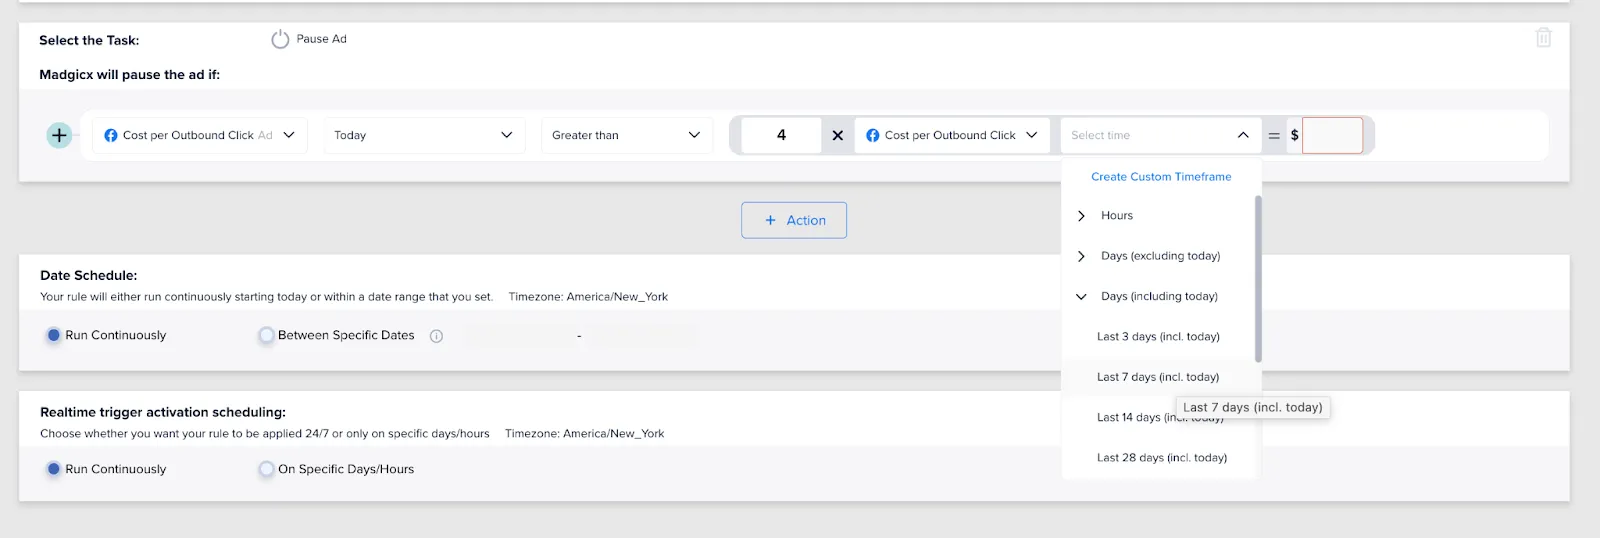
To set the first condition for the stop loss automation to fire, click the “Select trigger” dropdown, search and click “Cost per Outbound Click”.
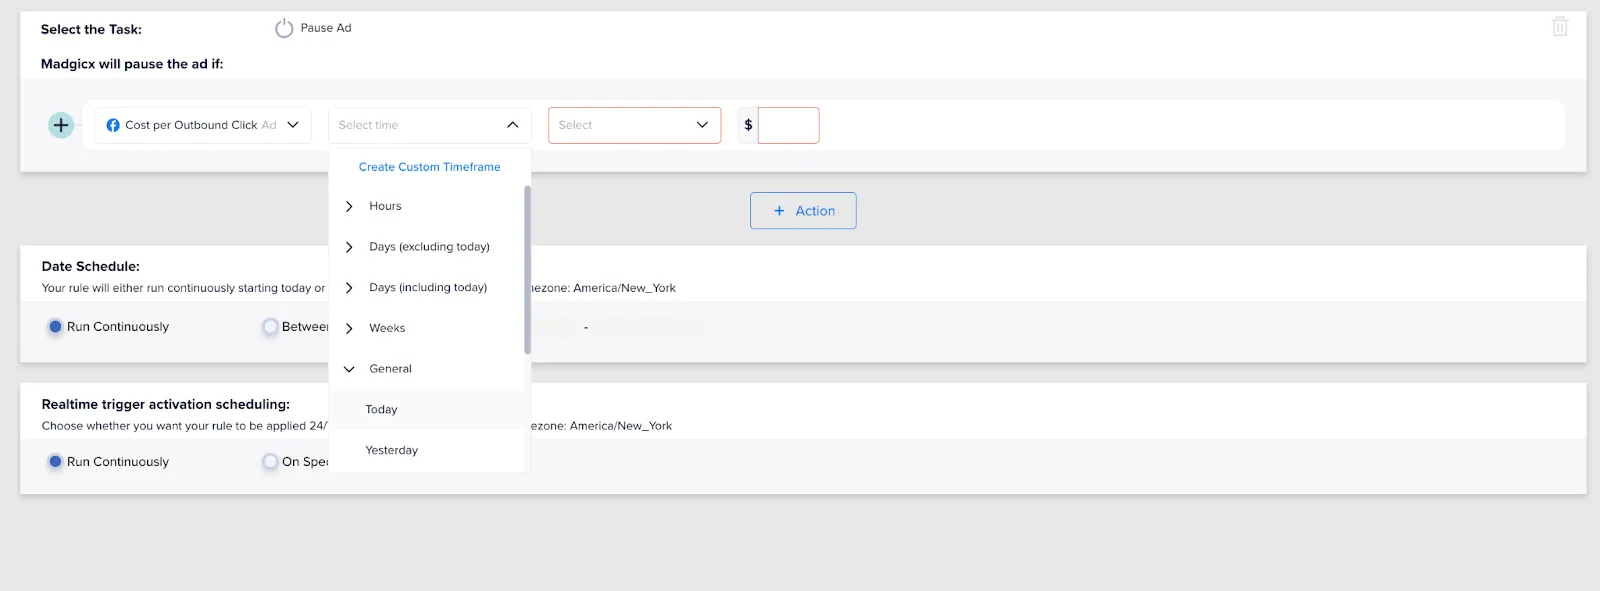
Select the timeframe as today by clicking the “Select time” dropdown, then “General”, and selecting “Today”.
To ensure that the automation triggers based on a value that changes depending on your account’s performance, you need to “Switch to dynamic value” by clicking the stacked left and right arrows.

Set the value to be “Greater than” 4.

Assign the dynamic trigger also as “Cost per Outbound Click”.

And set the time frame as the last 7 days including today. The exact value in currency will be calculated for you by Madgicx.
Now we need to add that ROAS should be lower than 0.75x the average ROAS in the last 7 days for the automation to fire. To do so, click on the plus icon next to the first condition we’ve just created and then select “Condition”.

This second part means the automation will fire only if both conditions are met: i.e., one outbound click costs more than four times your average over the past 7 days and the ROAS for the ad is lower than 75% what it has been on your account for the past week.
Search for ROAS (All) in the dropdown and select it.
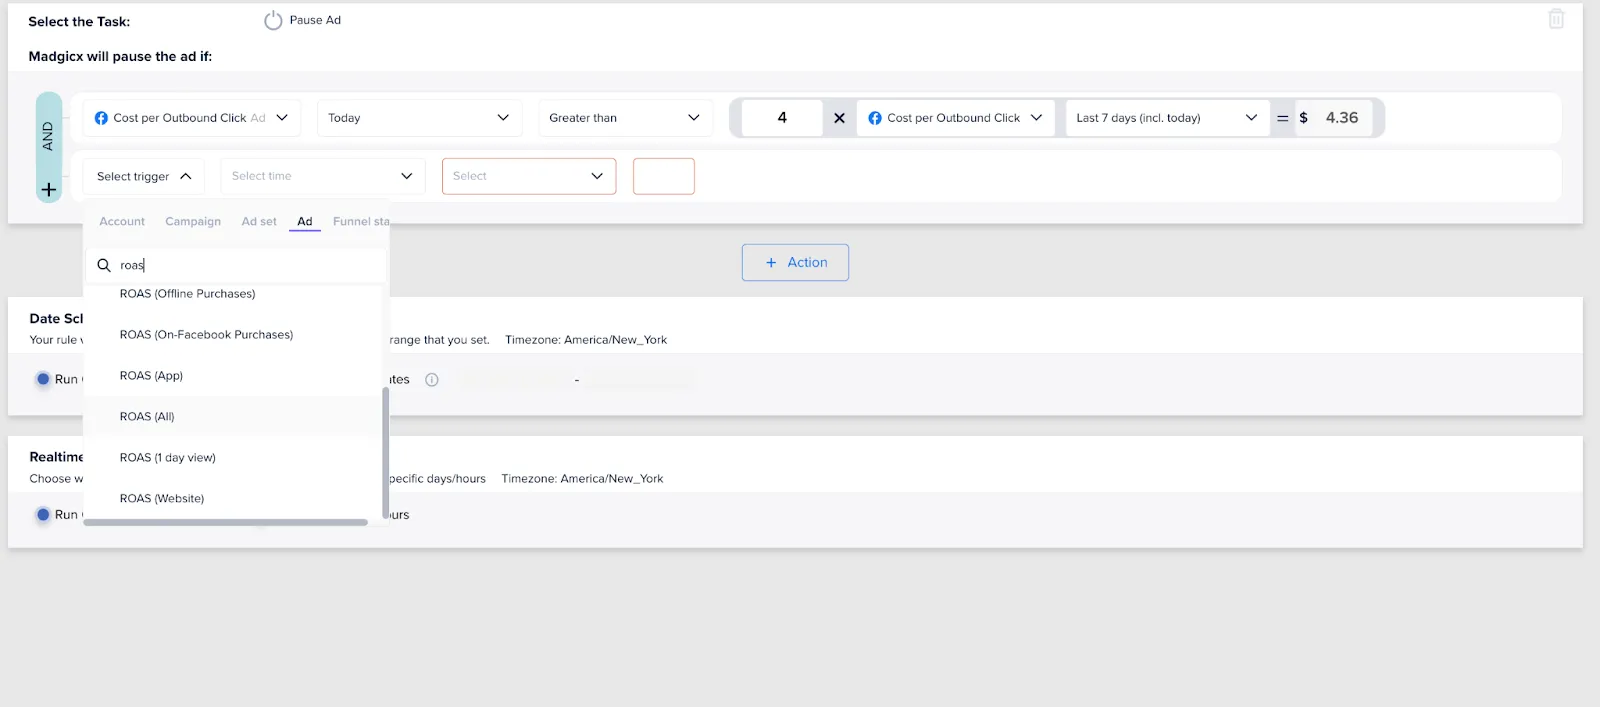
Again define that you want the automation to work daily (today) and switch to dynamic value to define the ROAS condition.

In the dynamic value box, enter the value as 0.75 (i.e., 75%) of the ROAS (All) for the last 7 days (including today).

Your first condition is now ready, let’s move on to the second (Amount Spent is greater than 4x the average Cost per Outbound Click in the last 7 days AND no clicks were generated today).
Create another condition by clicking on the “Action” button below your first condition.
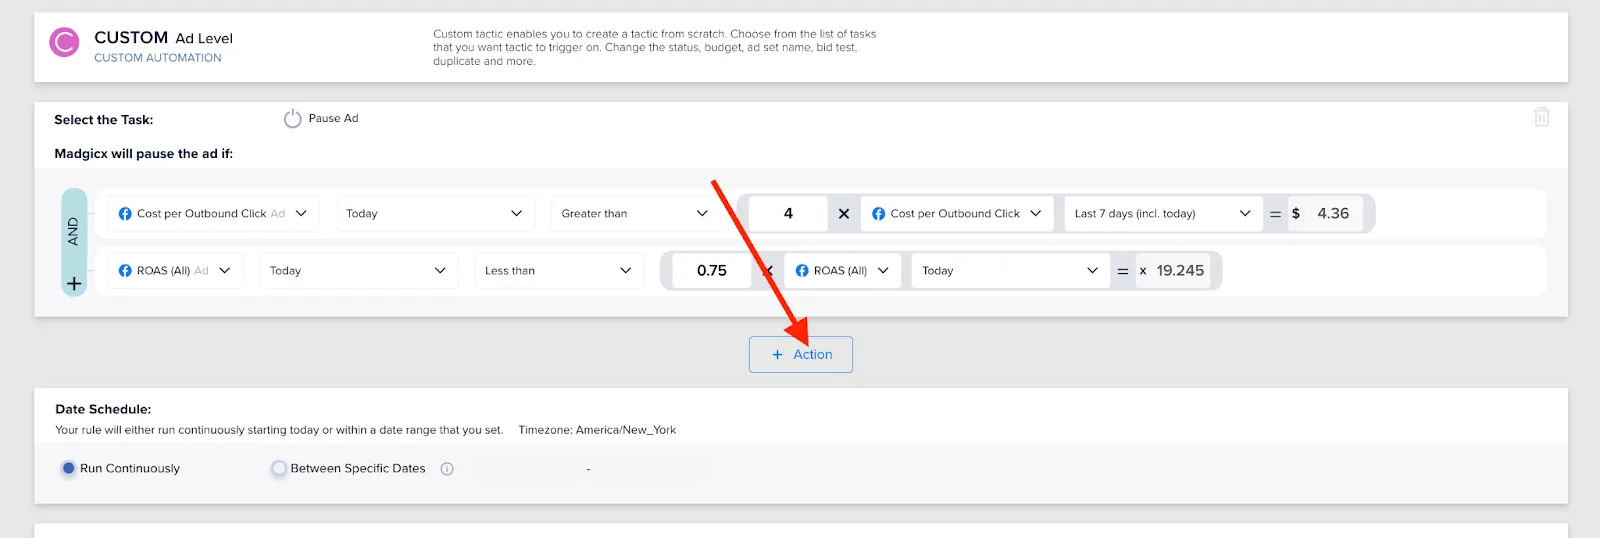
Then we follow the same process with the dropdowns and using the dynamic value selections.
First we make sure to select that the automation should pause the ad for today.

We define the event as Amount Spent.

And that the automation should fire if this amount spent today is greater than 4 times the average cost per outbound click over the past week.

Again here we need to add the second part to this condition by clicking the turquoise “+” button and adding a “Condition”.

Then we complete the fields to make the automation fire if our outbound clicks for today equals 0 (i.e., we didn’t get any outbound clicks today and have spent 4x our average cost per outbound for the week).
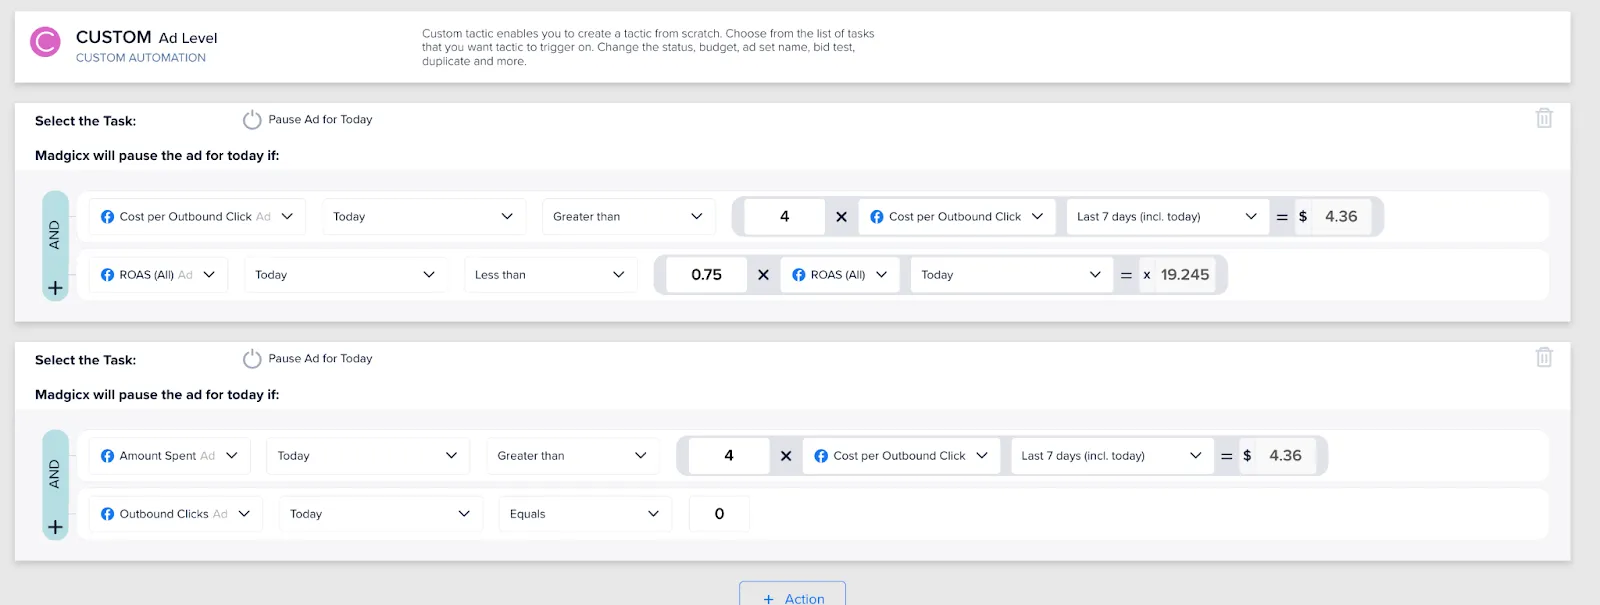
The second condition is probably clear, but we add the first one to make sure that even if we get clicks — and the first ones come at a reasonable cost — the ad is overall unprofitable, and so we need to turn it off.
Hit the “Next” button in the top-right corner to define which ads you want this automation to apply to.
Click the check boxes to select or deselect the ad sets you want to apply the automation to and click “Launch” in the top-right corner.
On this last page where you select the ads, you can filter ads you want to apply the automation to according to the name or status of the campaign, ad-set, or ad.

Otherwise you can make a manual selection. All campaigns and ad sets within them are selected by default, but you can select individual ad sets within campaigns by clicking the arrow next to the name of the campaign.
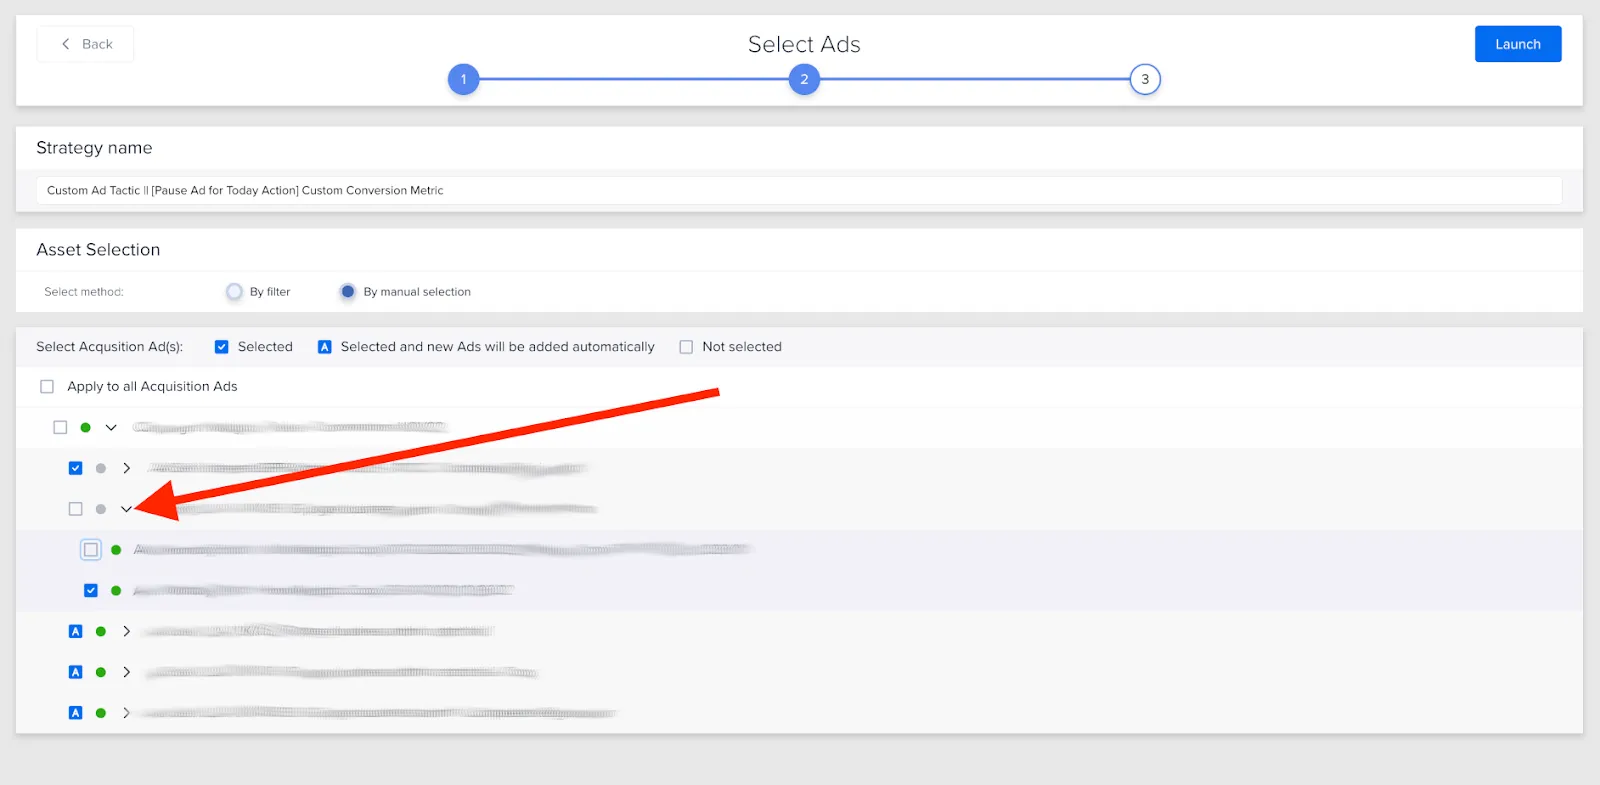
If you want to set up the automation to trigger future ads that you will create for an ad set or campaign, you need to click the checkbox twice. The tick will turn into an “A” and ads that you add to this ad set in the future will also have the automation applied.
Click the check boxes to select or deselect the ad sets you want to apply the automation to and click “Launch” in the top-right corner.
That’s it 🚀
You’re now protecting your budgets to turn ads off when they aren’t performing well enough.
Monitor automation performance 🕵️
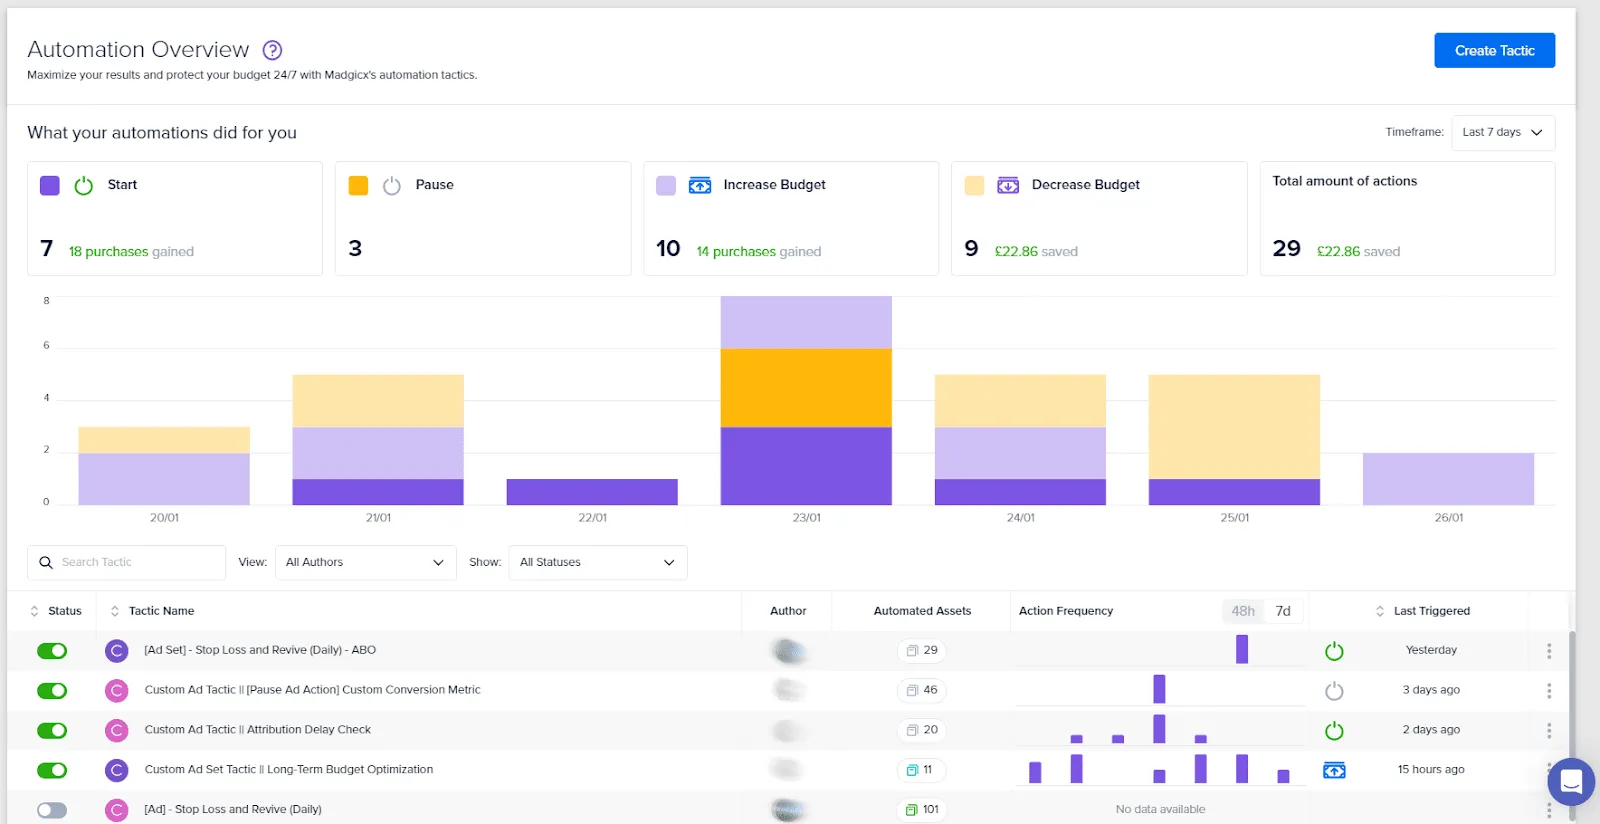
When you have your automations set up, you can monitor their performance in Automation Overview. See:
- What kind of automations you might be missing
- How automations are benefiting your ad management
- Which automations fired when and how many times
- Who has been launching automations
Here, you can also easily launch automation tactics or pause them.
Difference with Facebook Ads Manager
Madgicx Automations make you a better media buyer because it saves you time by completing actions in Facebook Ad Manager for you.
Read our dedicated help article on automation tactics and how to use them.
Didn't find what you were looking for?
Try our FAQ
Check out the answers to our most frequently asked questions. If you can’t find the answer there, you’ll be able to contact our support team.


.webp)
