Set up the Conversions API Gateway powered by Madgicx
By using the Conversions API Gateway by Madgicx, you can:
- Piggyback off our infrastructure to save developer costs
- Boost the accuracy of your event tracking across Meta technologies
- Increase relevance with better ad personalization and optimization from more accurate data
- Reduce your cost per result with improved connectivity and more tracked events
In this article, we cover how to set up the Conversions API Gateway by Madgicx in just a few steps. Madgicx offers a partner hosting solution for Meta’s Conversions API, so you don’t have to set it up yourself or hire developers to do it.
First, you must create a Madgicx account. Next, connect the Conversions API Gateway to your Meta Pixel. Then, you can monitor your conversions tracked by the Conversions API on Madgicx’s real-time dashboard.
What is the Meta Conversions API
The Meta Conversions API is a Meta Business Tool that creates a direct connection between your marketing data and Meta.
This can help you use your own marketing data to:
- Optimize ad targeting
- Decrease cost per action
- Get an overview of campaign outcomes
- Respect privacy preferences
The Conversions API Gateway is just one way to set up the Conversions API. It is a code-free, self-service setup option available in Meta Events Manager or through a partner integration.
With Madgicx’s partner solution, you can subscribe as a tenant on our Conversions API Gateway hosting platform, which we’ve already created, without you investing in building your own.
Setup for the Conversions API Gateway partner solution by Madgicx
Step 1: Create a tenant account
- Enter the required details and choose your plan, which includes monthly, quarterly, or annual payments. Then, click Start your free trial.
- In the next screen, choose your preferred method to create your Madgicx account. You can sign up using your Facebook or Google account, and you will be asked to log into that account. Or, you can sign up with your email address, set a password and click Sign up with email.
- Next, you’ll be asked to enter your account name and email address to get the setup instructions for connecting to the Conversions API Gateway powered by Madgicx. You can also access the setup instructions by clicking the link on the popup screen. When you’re ready, click Submit.
- You’ll arrive at your real-time dashboard on the Madgicx platform.
Step 2: Complete signup on the Conversions API Gateway
- Check your inbox for the setup invitation email from the Madgicx Conversions API Gateway Team, and click the Accept invitation link in the body of the email.
- Create your account by entering your email address, setting a password, and clicking Create Account.
- A confirmation message will appear. Log into your account by clicking the Go to Login link.
- Enter the login details you set in point 2, and click Log in.
Step 3: Connect your Meta Pixel to the Conversions API Gateway
- From the Meta Conversions API Gateway, click the Add data source button.
- Connect your Meta Business Account by clicking Get Started on the next screen. Then confirm that you’re logged into your personal Facebook profile connected to the business portfolio you’re connecting.
- Click on the Continue as [your name] or Log into a different account to continue.
- Click Next to connect to the Conversions API Gateway, and then click Next again to let the host account admin enable the Meta Business extension.
- Select the business portfolio you want to connect to the Conversions API Gateway and click Next. If you don’t have a Meta Business Manager account yet, you can also create one in this step.
- Select existing data or create as new and click Next.
- Activate automatic advanced matching on the next screen, and click Continue.
- Then, click Next to assign permissions on the following screen.
- Click Done on the confirmation screen
- On the Connect to Meta Business Account screen, tick the box that shares your system user token with the capig.madgicx.ai site, and click Confirm.
- Check your Conversions API Gateway dashboard in the Madgicx app to confirm it’s connected. If it's connected, there should be a green dot next to your Pixel name, and if it’s not, you’ll see a red dot.
- Monitor it over the next 10 days to see how the recorded events figures increase.
Optional: Set up data routing
For this step, you will need to log into your domain host, where you can edit your DNS settings.
- Add a new CNAME record to your DNS settings. This process may vary across domain hosts.
Type: CNAME
Name/Target: mct
Value: capig.madgicx.ai
TTL: use the default
If prompted, turn off proxy.
- Once you have added the CNAME record, go back to the Meta Conversion API Gateway.
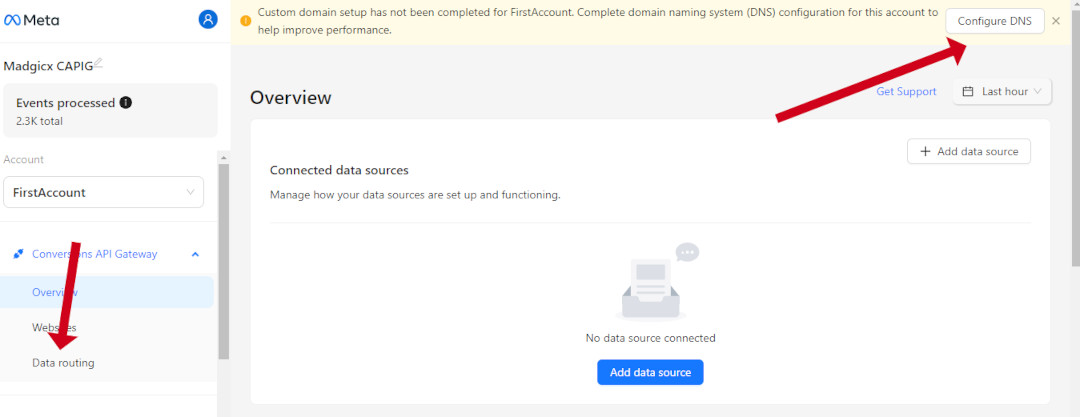
- In the Meta Conversions API Gateway, you can either click Data routing in the menu on the left or the Configure DNS button in the message at the top of the screen. Both will take you to the same screen.

- On the Data routing page, you should click the Optimize button.
- A popup will appear to configure your DNS. Type mct in the subdomain text field to the right of “https://.”
- In the domain field to the right, type your primary web address without the prefix (leave out the www.), and click Continue.
- You are done 😎
Didn't find what you were looking for?
Try our FAQ
Check out the answers to our most frequently asked questions. If you can’t find the answer there, you’ll be able to contact our support team.


